HOW TO ADD A COUNTDOWN TIMER TO A SHOPIFY PROMOTION
Shopify Tutorial | Sales Countdown Timer | Limited-Time Promotions | AB Sales Popup | 2026

Introduction
Running a promotion on your Shopify store is a great way to attract customers, highlight special offers, and encourage shoppers to explore your products.
However, simply offering a discount doesn’t always motivate customers to make a purchase immediately.
Some shoppers might add a product to their cart and return later. Others may leave your store without realizing that your promotion has a specific end date.
One way to make your limited-time offers more visible is by adding a countdown timer to your Shopify store.
A countdown timer displays the remaining days, hours, minutes, and seconds until a promotion ends.
For example, your product page might display:

A countdown timer helps customers understand exactly how long a genuine promotion remains available.
With AB Sales Popup, you can customize countdown messages, timer colors, fonts, schedules, and product targeting without manually editing Shopify theme code.
In this guide, we’ll explain how to add a countdown timer to a Shopify promotion using AB Sales Popup, with your six actual screenshots placed directly under the matching steps.
What Is a Shopify Countdown Timer?
A Shopify countdown timer is a website element that displays the remaining time before a scheduled event ends.
It is commonly used for:
- Flash sales and limited-time discounts.
- Black Friday and Cyber Monday promotions.
- Seasonal sales and holiday offers.
- Product launch campaigns.
- Special collection promotions.
For example, if you’re offering a 20% discount for three days, a countdown timer can show the amount of time remaining before that discount expires.
Unlike a stock countdown bar, which displays inventory availability, a promotional countdown timer measures time.
Why Add a Countdown Timer to Shopify Promotions?
1. Highlight limited-time offers
A countdown timer makes the promotion’s end time clear to shoppers.
2. Help customers make timely decisions
Customers can see how much time they have to take advantage of an offer instead of guessing when it ends.
3. Increase promotional visibility
A well-positioned timer can draw attention to sales that customers might otherwise overlook.
4. Create a more engaging product page
A live countdown adds a dynamic element to the store’s design.
5. Support conversion optimization
Countdown timers can be useful in marketing experiments, although they do not guarantee higher conversions. Their effectiveness depends on the offer, timing, presentation, and audience.
Common Problems When Adding Countdown Timers Manually
Shopify merchants may encounter technical problems when trying to build their own promotional countdown timer.
These include writing JavaScript to calculate remaining time, handling different time zones, positioning the timer inside product templates, and ensuring it behaves correctly after the promotion ends.
Merchants also need to update or remove timers when promotional dates change.
A dedicated countdown timer app makes these settings easier to manage through a visual interface.
Introducing AB Sales Popup
AB Sales Popup is a Shopify app that provides tools for sales notifications, visitor counters, sold counters, stock countdown bars, and promotional countdown timers.
Its Countdown Timer feature allows merchants to set a promotion’s start and end times, customize its appearance, and select the products or collections where the timer should appear.
Key Features
- Custom countdown heading text.
- Days, hours, minutes, and seconds display.
- Adjustable timer labels.
- Custom heading, number, and label colors.
- Font family and size customization.
- Text alignment settings.
- Promotion start and end scheduling.
- Timer expiration behavior.
- Product and collection targeting.
- Shopify app block integration.
- Live timer preview.
App Link: Install AB Sales Popup on Shopify
How to Add a Countdown Timer to a Shopify Promotion Without Coding
Step 1: Open the Shopify App Store
Open Google and search for Shopify App Store.

Click the official Shopify App Store website.
You can also visit it directly at apps.shopify.com.
Step 2: Search for AB Sales Popup
Inside the Shopify App Store, locate the search bar and enter AB Sales Popup.

Look for the app with the black-and-yellow bell icon.
Click the listing to view the app’s features and installation options.
Step 3: Install and Open AB Sales Popup
Click Install to add AB Sales Popup to your Shopify store.
If the app is already installed, click Open.

After installation, navigate to:
Shopify Admin → Apps → AB Sales Popup
The app dashboard allows you to access its different social proof and urgency features.
Step 4: Enable the Countdown Timer Feature
Inside AB Sales Popup, open Dashboard and scroll to Manage Features.
Image 1: AB Sales Popup dashboard showing the Countdown Timer feature under Manage Features.
Image explanation: Your screenshot shows the app’s Manage Features dashboard.
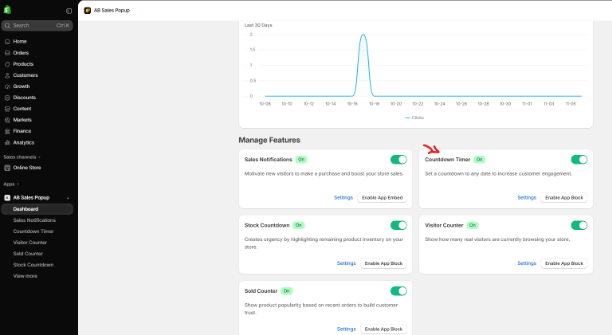
The red arrow highlights the Countdown Timer card in the upper-right area.
You can see its green On status and the available Settings and Enable App Block controls.
Make sure the Countdown Timer feature is turned On.
Then click Settings, or select Countdown Timer from the left sidebar.
Step 5: Configure the Promotion Start and End Dates
Inside the Countdown Timer settings, scroll to the Timer Settings section.
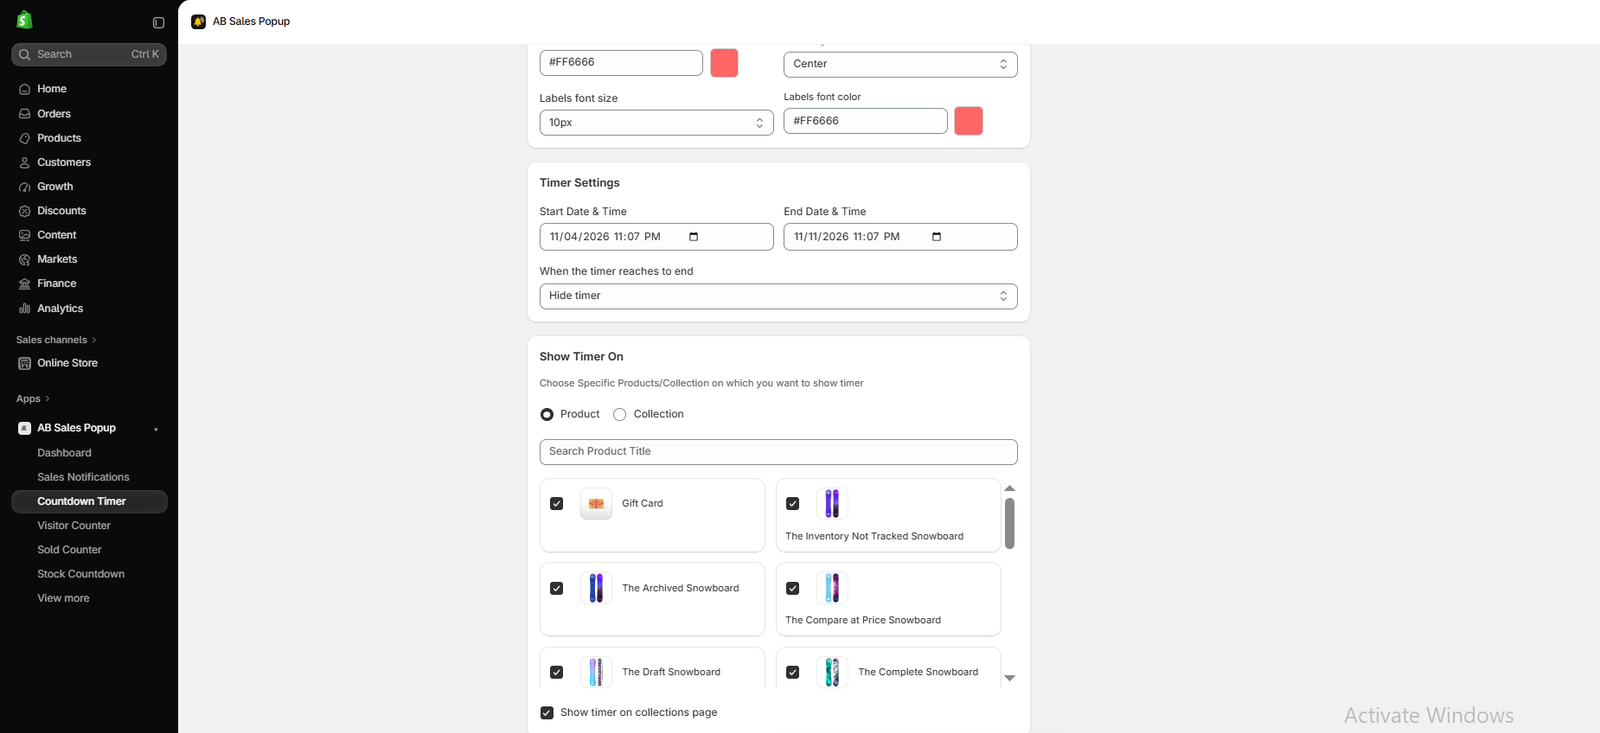
Image 2: Configure your countdown timer’s start date, end date, expiration behavior, and product or collection targeting.
Image explanation: This screenshot shows the Timer Settings section, including two date and time fields.
The example configuration is:
| Setting | Screenshot value |
|---|---|
| Start Date & Time | November 4, 2026, 11:07 PM |
| End Date & Time | November 11, 2026, 11:07 PM |
| When timer ends | Hide timer |
The dates are examples from your screenshot. For a new promotion, choose your actual future start and end times.
Under When the timer reaches to end, the example is set to Hide timer.
This prevents the timer from continuing to appear once the selected promotion has ended.
Make sure the promotion itself also expires when promised, so the timer and actual offer remain consistent.
Step 6: Choose the Products or Collections for Your Countdown Timer
In the same screenshot, scroll to Show Timer On.
This section lets you choose where the countdown timer should appear.
You can select Product or Collection, depending on your promotional campaign.
In your screenshot, Product is selected, and the page displays a searchable product list with checkboxes.
Examples include Gift Card, The Archived Snowboard, The Draft Snowboard, and The Complete Snowboard.
Select the eligible products that are part of your promotion.
Your screenshot also shows a Show timer on collections page checkbox enabled.
For best results, only target products and collections that actually qualify for the promotion. Draft and archived products must be made available before customers can see them.
Step 7: Customize the Countdown Timer Heading and Time Units
Return to the top of the Countdown Timer settings page.

Image 3: Countdown Timer settings showing the heading text, time units, design options, and live preview.
Image explanation: Your screenshot shows the Countdown Timer feature switched On.
At the top, you can see the Timer Settings and Timer List tabs.
Under the Content section, you’ll find the Heading text field. In your screenshot, it reads:
Sale ends in
You can customize this heading according to your promotional campaign. For example, use “Black Friday Sale Ends In,” “Limited-Time Offer Ends In,” or “Holiday Discount Ends In.”
Below the heading, the Time Units section allows you to customize four labels:
| Time unit | Screenshot label |
|---|---|
| Days | DAYS |
| Hours | HRS |
| Minutes | MINS |
| Seconds | SECS |
On the right, the Preview section shows how the timer will look, with example values for days, hours, minutes, and seconds.
These values are preview examples rather than a verified live countdown.
Step 8: Customize the Countdown Timer Font and Colors
Scroll down to the Design Settings section.

Image 4: Changing the countdown heading color and previewing the updated timer design.
Image explanation: This screenshot shows how merchants can customize the countdown timer’s appearance.
The Heading text remains “Sale ends in,” but its color has been changed from coral to blue.
The color picker is open, allowing you to choose a color visually or enter a HEX value.
The screenshot shows these example settings:
| Setting | Value |
|---|---|
| Heading font family | Inherit |
| Heading font size | 14px |
| Heading font color | #1E78E7 |
| Numbers font size | 18px |
| Numbers font color | #FF6666 |
| Text alignment | Center |
| Labels font size | 10px |
The Preview panel displays the blue heading with coral-colored countdown numbers.
Choose a font and color combination that complements your Shopify theme and remains readable on mobile.
Step 9: Change the Timer Label Colors
The app also allows you to customize the labels beneath each countdown number.

Image 5: Using the color picker to customize countdown timer labels to bright green.
Image explanation: Your screenshot shows the Labels font color field being edited.
The label color has been set to green, with the HEX value #51EA10 displayed.
In the Preview panel, the DAYS, HRS, MINS, and SECS labels appear green.
This allows you to make the timer’s labels visually distinct from the larger countdown numbers.
For a professional storefront, use a small, consistent color palette. If your brand uses blue and white, for example, consider combining those colors with one contrasting accent.
Make sure the labels have adequate contrast against the timer background.
Step 10: Customize the Countdown Numbers Color
Next, adjust the Numbers font color setting.
Image 6: Changing countdown numbers to purple while keeping the heading blue and the time-unit labels green.
Image explanation: This screenshot shows the Numbers font color setting with its color picker open.
The chosen value is #CB30F2, a bright purple shade.
In the Preview panel, the countdown numbers are purple, the heading is blue, and the smaller time-unit labels are green.
This demonstrates that AB Sales Popup lets you style multiple parts of the countdown independently.
For most Shopify stores, two or three coordinated colors will create a cleaner appearance than using many unrelated colors.
Once you’re satisfied with the design, click Save at the top of the page.
Step 11: Enable the Countdown Timer App Block in Shopify
Return to AB Sales Popup → Dashboard → Manage Features.
Find Countdown Timer and click Enable App Block.
In your Shopify theme editor, open the product page template where you want the timer to appear.
Add the AB Sales Popup Countdown Timer block to a supported section, then position it near the product information or promotional message.
Click Save in the theme editor.The provided screenshots show the Enable App Block control on the dashboard, but not the final theme editor placement screen. This step describes the intended Shopify app block workflow.
Step 12: Preview and Test Your Countdown Timer
After saving the app settings and theme changes, preview an eligible product page.
Check that the timer appears correctly, displays the remaining time until the scheduled promotion ends, and uses the colors and labels you selected.
Also test it on mobile.
Verify that the timer disappears or performs the selected expiration action at the correct time, and that the actual promotion ends as advertised.
Where Should You Place a Countdown Timer on Shopify?
The best placement depends on your storefront layout and the type of promotion.
| Placement | Best suited for |
|---|---|
| Below product price | Product-specific discounts |
| Above Add to Cart | Limited-time product offers |
| Near promotional text | Campaign announcements |
| Collection pages | Promotions covering multiple products |
For product-specific offers, placing the timer near the product price or purchase controls is often a useful starting point.
Best Practices for Shopify Countdown Timers
Use genuine promotional deadlines
Never use a misleading timer that continuously resets while claiming an offer is about to expire.
Keep the timer easy to read
Use clear labels and sufficient contrast between the text and background.
Choose the correct start and end dates
Make sure the timer matches your actual promotion schedule and intended store time zone.
Avoid overwhelming customers
Too many banners, popups, timers, and stock alerts can create a cluttered shopping experience.
Test your timer on mobile
Check the layout, spacing, and readability on smaller screens.
Verify expiration behavior
Make sure the timer and promotional pricing both end when promised.
Frequently Asked Questions
1. Can I add a countdown timer to Shopify without coding?
Yes. AB Sales Popup provides a visual countdown timer configuration interface and supports Shopify Online Store 2.0 app blocks. Shopify App Store
2. Can I customize the countdown timer’s colors?
Yes. You can customize the heading, numbers, and labels with separate color settings.
3. Can I choose the countdown timer’s start and end dates?
Yes. The Timer Settings section includes Start Date & Time and End Date & Time fields.
4. Can I display the timer only on selected products?
Yes. The screenshots show product and collection targeting options.
5. Can I hide the timer after the promotion ends?
Yes. The timer expiration setting includes a Hide timer option.
6. Can I change the countdown text?
Yes. You can customize the heading and the labels for days, hours, minutes, and seconds.
7. Can I add a countdown timer for Black Friday?
Yes. You can configure a countdown that matches the actual dates of your Black Friday promotion.
8. Is AB Sales Popup free?
The current Shopify listing includes a free-to-install Starter plan covering up to 500 monthly visitors before usage fees apply. A Basic plan is listed at $6.99 per month, with additional usage charges specified in the listing. Shopify App Store
Conclusion
Adding a countdown timer to a Shopify promotion is a practical way to communicate a genuine deadline and make limited-time offers more visible to customers.
With AB Sales Popup, merchants can create promotional countdowns, configure start and end dates, customize colors and fonts, select eligible products or collections, and display timers using supported Shopify theme app blocks.
The screenshots in this tutorial demonstrate how to enable the Countdown Timer feature, configure promotional dates, customize the countdown’s text and appearance, and preview different color combinations.
For the best results, use accurate promotional deadlines, maintain a professional design, and ensure that your timer behaves correctly when the promotion ends.
Want to add a customizable countdown timer to your Shopify promotions?Install AB Sales Popup on Shopify