HOW TO ADD A CUSTOM SECTION TO THE SHOPIFY DAWN THEME WITHOUT EDITING LIQUID
Introduction
Shopify’s Dawn theme provides a clean, modern foundation for building an online store. However, merchants often need additional sections beyond the layouts included with their theme.
Whether you want to add FAQs, testimonials, comparison tables, promotional banners, or custom content blocks, creating these sections manually can require Liquid, HTML, CSS, and JavaScript knowledge.
Fortunately, Section Kit: Theme Sections makes it possible to add ready-made sections without manually editing Liquid code.
SectionKit offers a library of 500+ premade sections that merchants can add to compatible Shopify themes and customize through the Shopify Theme Editor. Shopify App Store
This tutorial explains the complete process, from finding the app to publishing a customized section on your storefront.
The Merchant’s Challenge
Shopify merchants often encounter difficulties when customizing their stores. Built-in theme sections may not support a specific layout, hiring developers for small changes can be expensive, and manually editing Liquid files can introduce errors.
Another common challenge is choosing the correct theme. A Shopify store may contain several installed themes, including Dawn, Horizon, and unpublished copies. Adding a section to the wrong theme means it may not appear on the intended storefront.
SectionKit helps simplify the process by letting merchants select sections from a library, install them into a chosen theme, and edit their content visually.
Introducing Section Kit: Theme Sections
SectionKit is a Shopify app for merchants who want additional storefront sections without building each one from scratch.
It includes layouts for FAQs, testimonials, banners, payment icons, comparison tables, feature cards, and other content. The app is free to install, with additional charges for certain sections. Shopify App Store
App: Section Kit: Theme Sections on Shopify App Store
Step-by-Step Guide: Add a Custom Section Without Editing Liquid
Step 1: Open the Shopify App Store
Open Google and type Shopify App Store into the search bar.
Find the official Shopify App Store result at apps.shopify.com and click it. This opens Shopify’s marketplace, where you can discover applications for storefront design, marketing, and other store features.
What is an app marketplace? (with examples)

Image 1: Your screenshot highlights the Google search phrase “shopify app store” and points to the official Shopify App Store result.
Step 2: Search for Section Kit: Theme Sections
Once inside the Shopify App Store, click the search bar at the top.
Enter Section kit theme section and search.

Look for Section Kit: Theme Sections, recognizable by its black-and-white SectionKit logo. Click the app’s name to open its listing.
Image 2 — SectionKit search result
Image 2: The red circle identifies the Section Kit: Theme Sections listing, while the arrow points to the search bar. Select the highlighted result.
Step 3: Install the SectionKit App
On the app listing page, review the description, screenshots, and pricing information.
Click Install to add SectionKit to your Shopify store. Shopify may ask you to log in, choose your store, and approve the requested permissions.
If the app is already installed, the button may say Open, as shown in your screenshot.
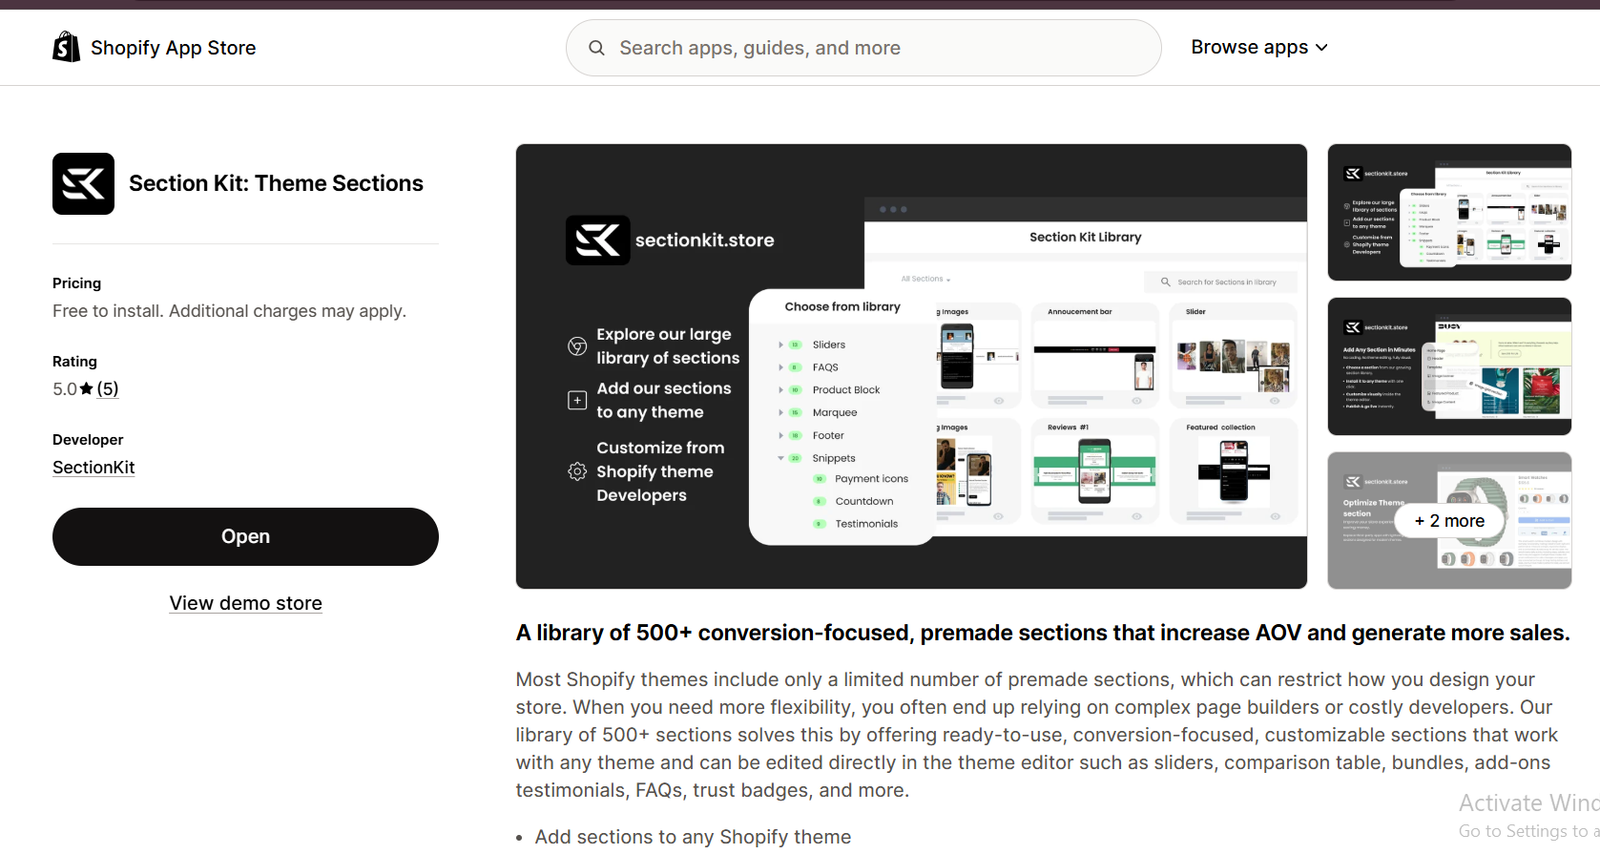
Image 3: The SectionKit listing shows its logo, pricing, app preview, and Open button. New users should click Install; existing users can click Open.
Step 4: Explore the SectionKit Library
After opening the app, select Explore Sections from the left sidebar of your Shopify admin.
The SectionKit library displays available section designs with preview images, names, and prices. You can browse categories such as Testimonials, FAQs, Image with Text, Footers, and Widgets.
Use the search bar to locate a specific design. For this tutorial, we’ll use SK Partner Rows #1, a section designed to display partners, organizations, or community initiatives.
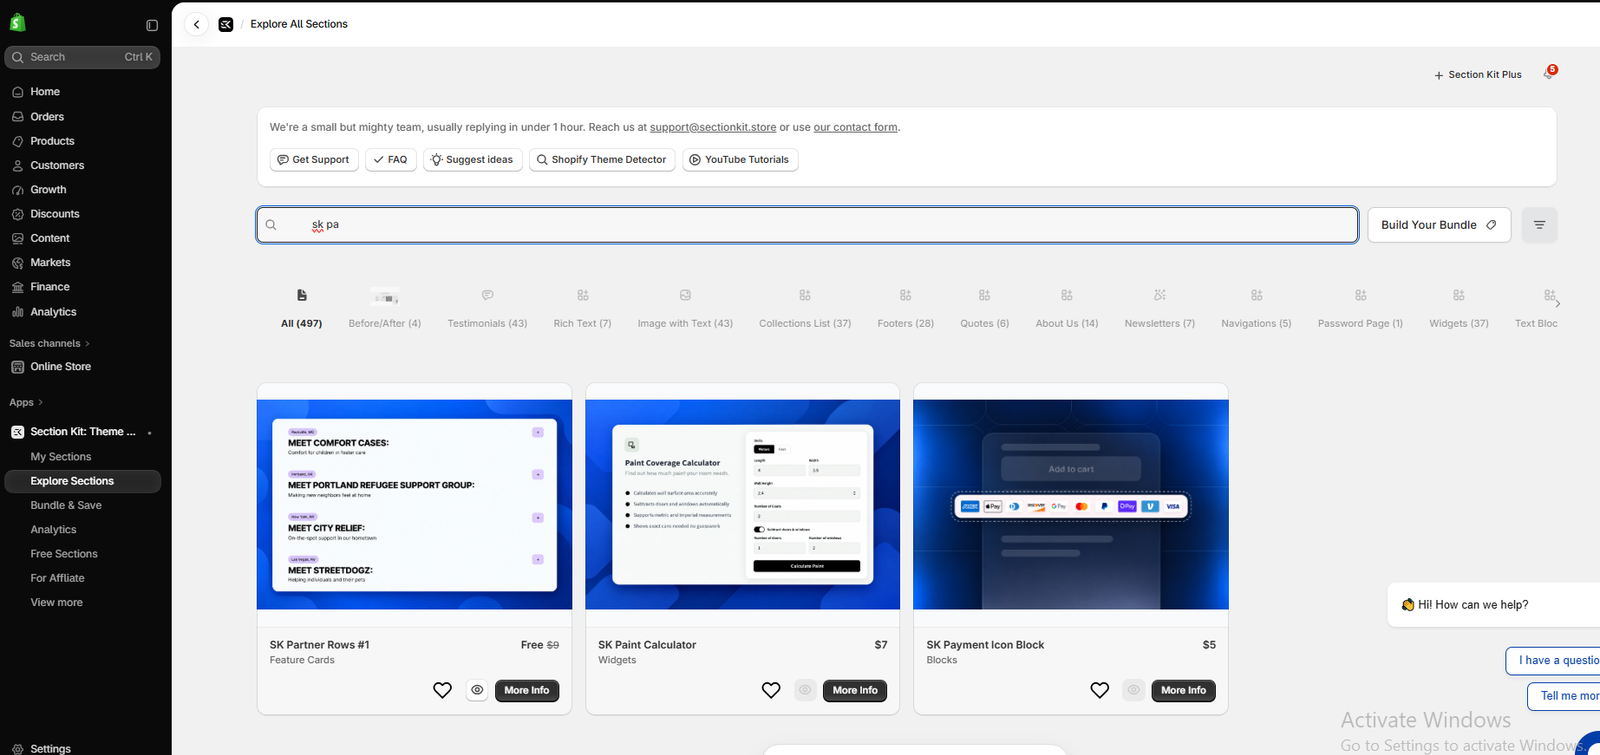
Image 4: The screenshot shows the Explore Sections dashboard, search bar, category navigation, and section cards. Find SK Partner Rows #1 and click More Info to inspect it.
Step 5: Preview the Section and Add It to Your Library
Before installing a section, review its layout and available features.
Click More Info on the section card. A details window opens, showing a larger preview, description, pricing, and other information.
In your screenshot, the SK Partner Rows #1 section includes location labels, bold headings, descriptions, and expandable content.
The details panel also shows its available layouts and customization features.
Once you’ve decided to use the section, click Add to My Sections.
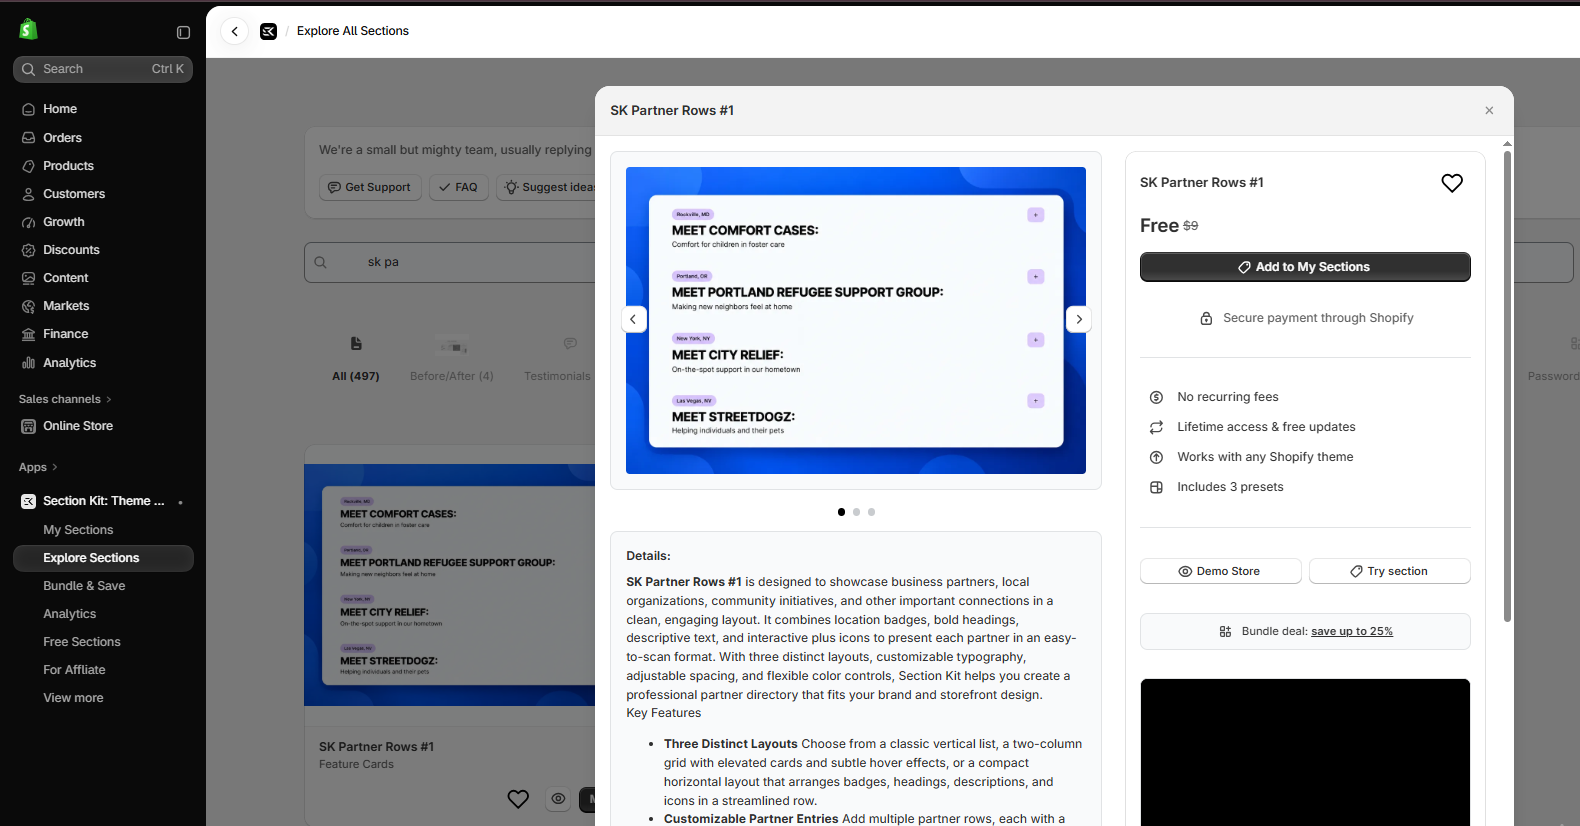
Image 5: The section details window displays the preview on the left and installation options on the right. Click Add to My Sections to select this design.
Step 6: Find the Section Under My Sections
After selecting the section, open My Sections from the SectionKit sidebar.
This area contains the sections you’ve added to your library. You can review their names, prices, installation status, and available customization options.
Locate SK Partner Rows #1.
If the section has already been installed, you’ll see an Installed status. The Customize button lets you continue configuring it.

Image 6: The screenshot highlights My Sections in the sidebar and the Customize button for SK Partner Rows #1. This is where merchants manage their selected sections.
Step 7: Install the Section in Your Shopify Theme
Next, make sure the section is installed in the theme you intend to customize.
SectionKit provides a theme-selection window showing the themes available in your store.
In the screenshot, the available themes include debut-vintage-theme, Horizon, Copy of Horizon, and Atelier.
For this tutorial, select Dawn if Dawn is installed in your store. If it isn’t listed, you will need to add Dawn to your theme library first.
Use the installation control beside your chosen theme, then select Open Customizer when available.
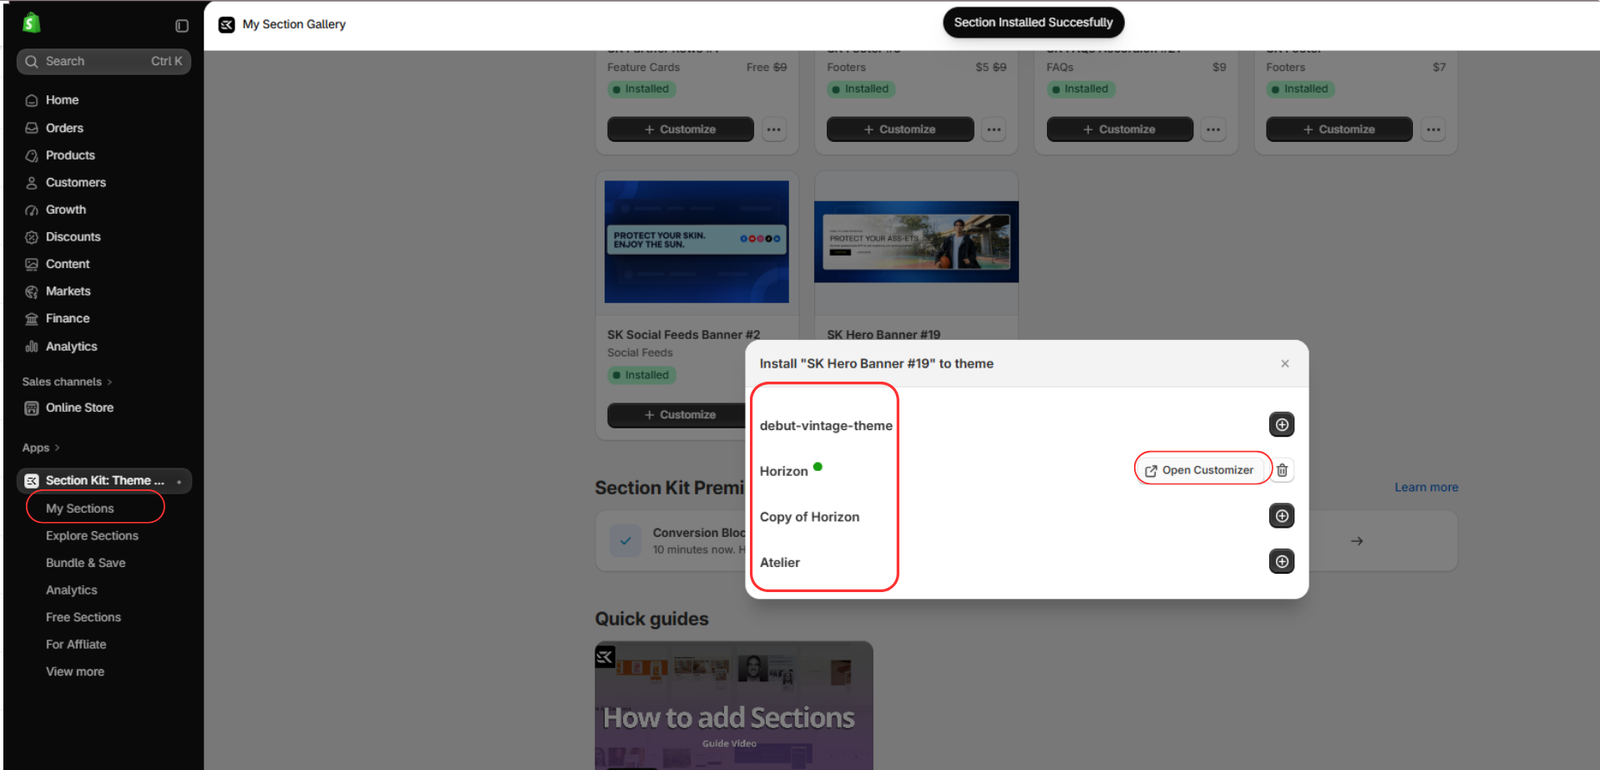
Image 7: The red outline identifies the available Shopify themes, and the second outline highlights Open Customizer. Select the correct theme before proceeding.
Important: The example screenshot uses Horizon. When following these instructions for Dawn, choose Dawn instead.
Step 8: Add the Custom Section in the Shopify Theme Editor
After clicking Open Customizer, Shopify opens the theme editor.
Navigate to the page where you want to display your new section. For example, choose the homepage if you want the section to appear on your store’s main page.
In the left sidebar, click Add section.
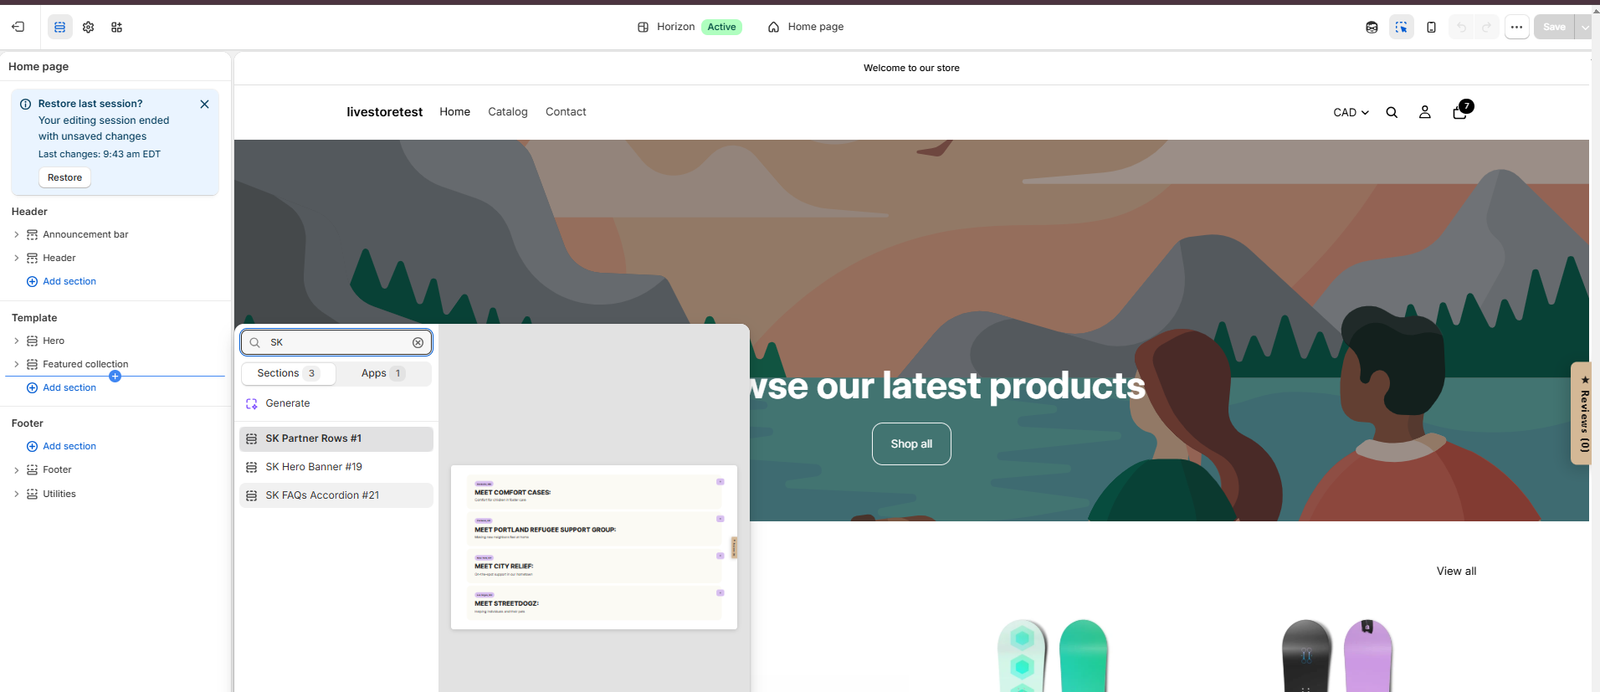
A section-selection window will appear. Type SK into the search field to locate installed SectionKit sections.
Your screenshot shows three available options:
- SK Partner Rows #1
- SK Hero Banner #19
- SK FAQs Accordion #21
Select SK Partner Rows #1 to add it to the page.
Image 8 — Add custom section in Shopify Theme Editor
Image 8: The screenshot shows the Shopify Theme Editor with the Add section panel open. Search for SK and select SK Partner Rows #1 from the available sections.
This is the key step: you can add the section through the visual editor without manually writing Liquid code.
Step 9: Customize the Section and Save Your Changes
Once added, the custom section appears in your page preview and in the theme editor’s left sidebar.
Click SK Partner Rows #1 to view its settings. Depending on the section, you can customize text, headings, descriptions, colors, spacing, and layout options.
In your example, the section contains four partner entries:
Meet Comfort Cases: Comfort for children in foster care.

Meet Portland Refugee Support Group: Making new neighbors feel at home.
Meet City Relief: On-the-spot support in our hometown.
Meet StreetDogz: Helping individuals and their pets.
These are demonstration entries. Replace them with content relevant to your own store.
Use the available section blocks to edit individual entries or add more content where supported.
Preview the layout on desktop and mobile devices, then click Save in the upper-right corner.
Image 9 — Finished custom section in Shopify Theme Editor
Image 9: The completed SK Partner Rows #1 section is visible in the Shopify storefront preview. The left sidebar shows its editable blocks, and the Save button appears in the upper-right corner.
Your custom section is now configured in the selected Shopify theme. If you’re working on an unpublished theme, you’ll also need to publish that theme before customers can see the changes on your live storefront.
Benefits of Adding Custom Sections With SectionKit
SectionKit helps merchants expand their storefronts without manually building every section.
Its main advantages include access to ready-made layouts, visual customization through Shopify’s Theme Editor, and the ability to select individual sections for specific needs.
Instead of hiring a developer for every FAQ, banner, testimonial layout, or promotional block, merchants can explore existing designs and choose suitable options.
This can be particularly useful for businesses that frequently update their storefronts or experiment with different page layouts.
Frequently Asked Questions
1. Can I add custom sections to the Shopify Dawn theme without coding?
Yes. You can use compatible section apps such as SectionKit to install ready-made sections and customize them without manually editing Liquid files.
2. Does SectionKit work with Dawn?
SectionKit is designed for Shopify themes, including Dawn. Individual section compatibility and available customization settings may vary.
3. Are SectionKit sections free?
The app is free to install and offers free and paid sections. Review each section’s pricing before selecting it.
4. Can I customize the section after installing it?
Yes. Supported content and design settings can be adjusted through the Shopify Theme Editor.
5. Why can’t I see my section in the theme editor?
Check that you installed it in the correct theme, opened the intended page template, and searched for the installed section under Add section.
6. Can I add sections to product pages?
Many sections can be used on supported product templates, depending on their configuration and theme compatibility.
7. Will the section appear immediately on my live store?
Changes saved to your published theme can appear on the storefront. If you’re editing an unpublished theme, you’ll need to publish it first.
Conclusion
Adding custom sections is an effective way to expand the design possibilities of your Shopify store.
Although the Dawn theme includes useful built-in sections, merchants sometimes need additional layouts to communicate product benefits, showcase testimonials, display FAQs, or create more engaging pages.
With Section Kit: Theme Sections, you can browse ready-made designs, install a section in your chosen Shopify theme, customize its content, and save your changes without manually editing Liquid files.
Whether you’re building a new Shopify store or improving an existing one, SectionKit offers a practical way to create more flexible storefront layouts.
Explore SectionKit: Section Kit: Theme Sections — Shopify App Store