HOW TO ADD A BEFORE AND AFTER SECTION TO A SHOPIFY PAGE

Introduction
Showing customers the difference between two images is one of the most effective ways to visually demonstrate product features, transformations, and results.
Whether you sell skincare products, hair treatments, cleaning solutions, fashion accessories, or home improvement products, a Before and After section on Shopify allows visitors to compare images using an interactive slider.
However, most Shopify themes do not include an advanced Before and After comparison section by default. Adding one manually can require custom coding, third-party scripts, or developer assistance.
Fortunately, Section Kit: Theme Sections makes it easy to add a professional, customizable Before and After image comparison section to your Shopify store without writing any code.
In this guide, we will walk you through the entire process using Section Kit, with original screenshots showing exactly how to add, customize, and publish a Before and After section on your Shopify page.
The Merchant’s Challenge: Why Shopify Stores Need Before and After Sections
Many Shopify merchants struggle to showcase product transformations effectively.
1. Difficulty demonstrating product results
Traditional product images show what an item looks like, but they may not clearly demonstrate changes or improvements.
A Before and After slider allows shoppers to compare two images in the same space.
2. Limited Shopify theme functionality
Many Shopify themes offer image galleries, banners, and standard product media, but lack interactive image comparison tools.
3. Custom coding requirements
Adding an interactive slider manually can involve Liquid, JavaScript, and CSS, making it difficult for nontechnical merchants.
4. Inconsistent mobile experiences
Some custom comparison sections are difficult to use on mobile devices, where customers need smooth touch interaction.
5. Maintaining a professional storefront
Merchants need sections that match their branding and let them control image sizes, labels, spacing, and layouts.
These challenges are why a ready-made Before and After section can be valuable.
Why a Before and After Section Is Important for Shopify Stores
Before and After comparisons help customers understand visual differences without switching between multiple product images.
They are particularly useful for stores selling beauty products, haircare, cleaning products, home renovation services, and products that involve visible transformations.
An interactive comparison section can help merchants communicate product benefits more clearly, encourage visitors to explore product results, and create a more engaging shopping experience.
For product claims involving real outcomes, always use genuine, representative images rather than misleading transformations.
Introducing Section Kit: Theme Sections
Section Kit: Theme Sections is a Shopify app that helps merchants customize their stores using ready-made sections.
Instead of hiring a developer to build an image comparison slider from scratch, store owners can use Section Kit to install a customizable design directly into their Shopify theme.
One available section is SK Before and After #3, which provides an interactive image comparison layout.
Section Kit: Theme Sections
Add customizable Shopify sections without coding.Get Section Kit on Shopify App Store
Features of the Before and After Section
- Interactive image slider: Customers can drag the comparison handle to see before and after images.
- Multiple comparison layouts: Choose from different available layouts and presets.
- Custom image uploads: Add your own before and after product images.
- Editable labels: Change the Before and After text to match your content.
- Responsive design: Create comparisons suitable for desktop and mobile.
- Customizable appearance: Adjust image sizing, colors, corner radius, and layout settings.
- No-code installation: Add the section through Shopify’s theme editor.
Step-by-Step Guide: How to Add a Before and After Section to Shopify
Step 1: Open the Shopify App Store
Start by opening Google and searching for Shopify App Store.
Select the official Shopify App Store result, as shown in the screenshot.
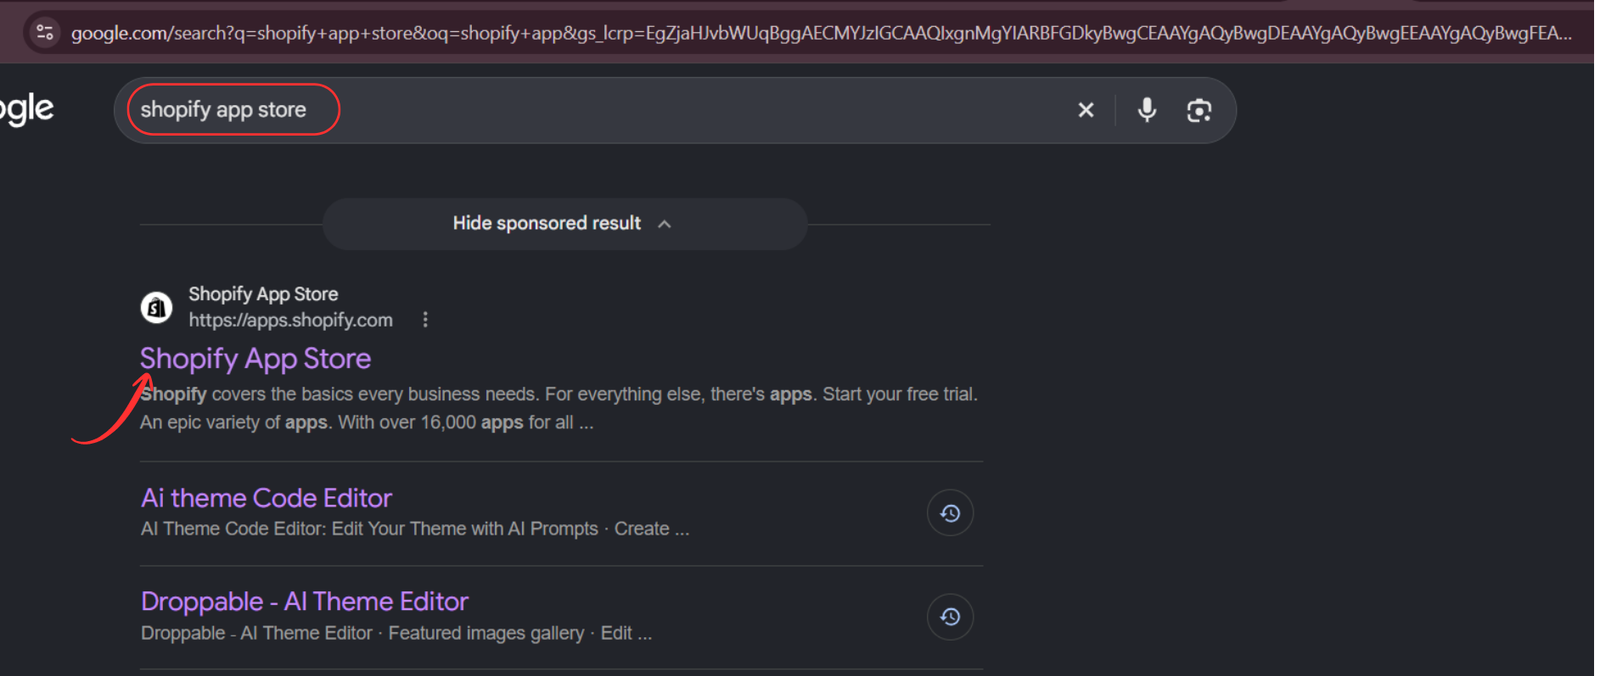
Image 1: Find and open the official Shopify App Store.
You can also visit Shopify App Store directly.
Step 2: Search for Section Kit: Theme Sections
Once inside the Shopify App Store, use the search bar to enter Section Kit Theme Sections.
Locate the app named Section Kit: Theme Sections, identifiable by its black-and-white app icon in the provided screenshot.
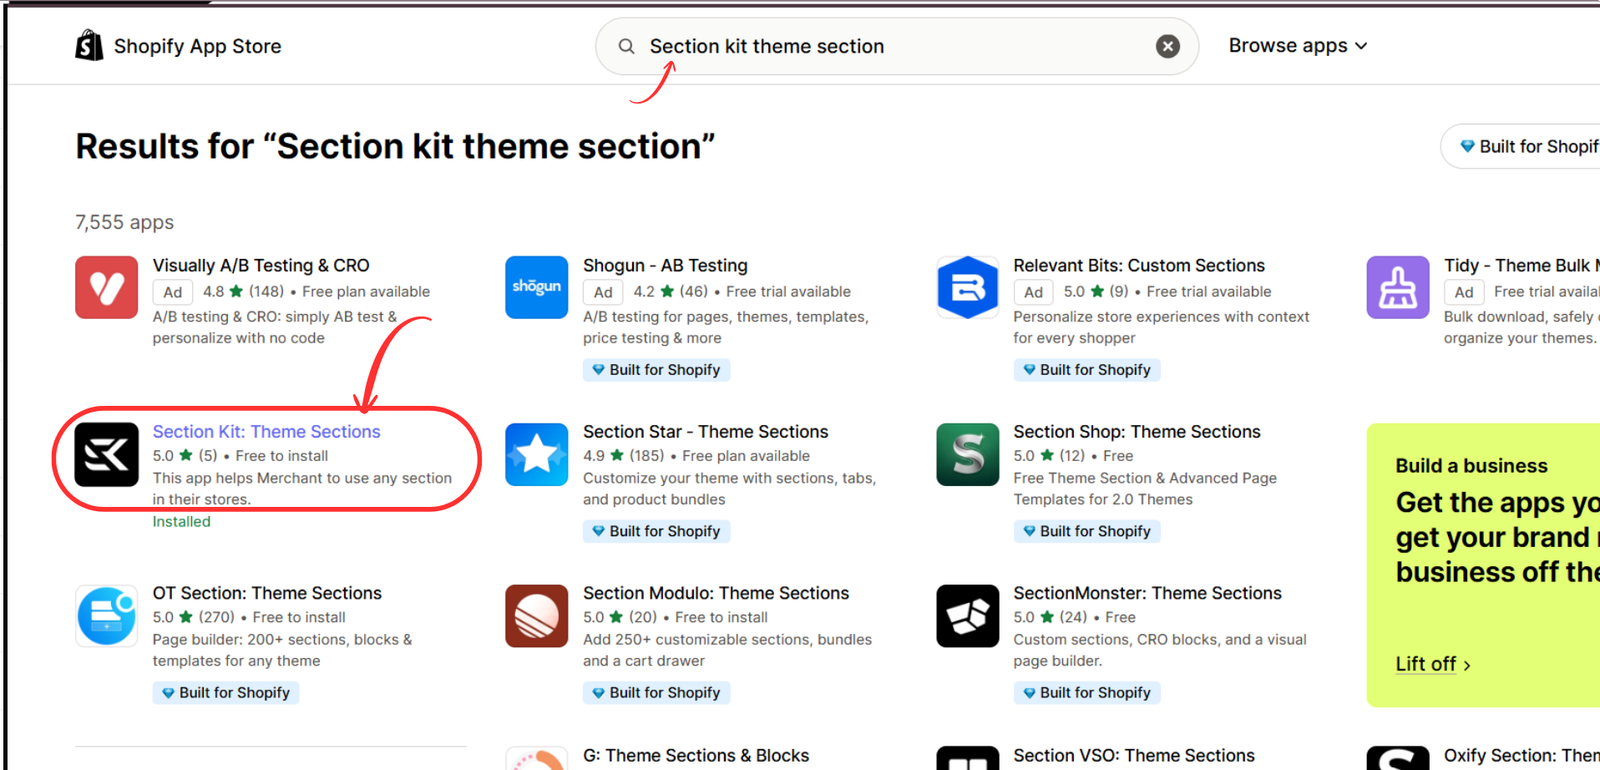
Shopify App Store search results highlighting Section Kit Theme Sections
Image 2: Search for Section Kit: Theme Sections and select the correct app.
Open the app listing and follow the installation process if you have not already installed it.
Step 3: Open the App in Your Shopify Admin
After installation, open Section Kit from your Shopify admin.
The app gives you access to its section library, allowing you to explore different layouts and design elements for your storefront.

You can begin by selecting Explore Sections from the left-hand menu.
Step 4: Open Section Kit and Search for Before and After
First, open your Shopify admin and launch the Section Kit: Theme Sections app.
From the left sidebar, select Explore Sections.
You will see the section library containing different storefront designs.
Locate the search bar and type before.
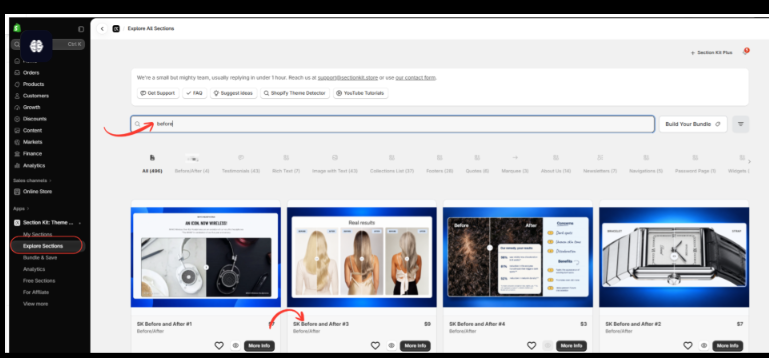
The search results will display available Before and After sections, including SK Before and After #1, #2, #3, and #4.
Section Kit Explore Sections showing Before After search resultsImage 1: Search for “before” inside Section Kit’s Explore Sections library and find SK Before and After #3.
For this tutorial, we will use SK Before and After #3, which provides a three-column comparison design.
Click More Info on this section to continue.
Step 5: Preview the Before and After Section and Add It to Your Library
After clicking More Info, a detailed preview window appears.
This popup shows the section’s example design, description, available features, and pricing.
The preview demonstrates how customers can compare images using a draggable slider.

In your screenshot, SK Before and After #3 is marked as Free.
The section also indicates lifetime access, free updates, Shopify theme compatibility, and three included presets.
SK Before and After #3 preview and Add to My Sections buttonImage 2: Preview the SK Before and After #3 section and select Add to My Sections.
Click Add to My Sections.
This adds the selected comparison section to your Section Kit library so you can install it into your store’s theme.
Step 6: Install the Before and After Section Into Your Shopify Theme
Once you click Customize, Section Kit displays the available Shopify themes.
Choose the theme you want to customize.
If you are testing a new layout, installing the section in a draft theme first is a useful option.
After installing the section into your selected theme, locate the Open Customizer button.
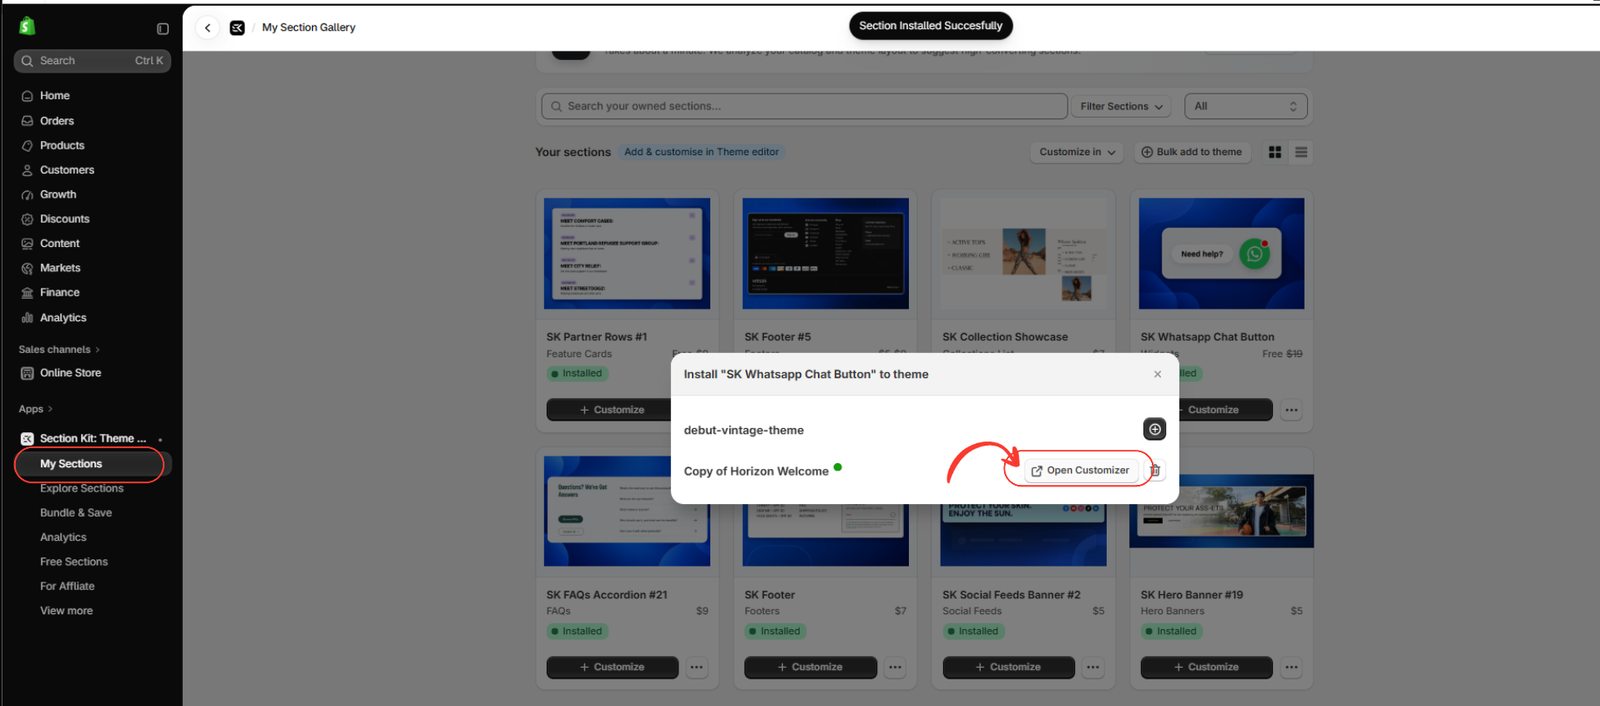
Image 4: Select your Shopify theme and click Open Customizer to proceed to the theme editor.
Click Open Customizer.
This opens the Shopify theme editor, where you can add the comparison section to your desired page.
Step 7: Add the Before and After Section to Your Shopify Page
Inside the Shopify theme editor, navigate to the page template you want to customize.
For example, you can add a Before and After section to your homepage or an appropriate product page template.
Then follow these instructions:
- Click Add section in the left sidebar.
- Enter bef or before into the section search field.
- Locate SK Before and After #3 in the results.
- Click the section to add it to the page.
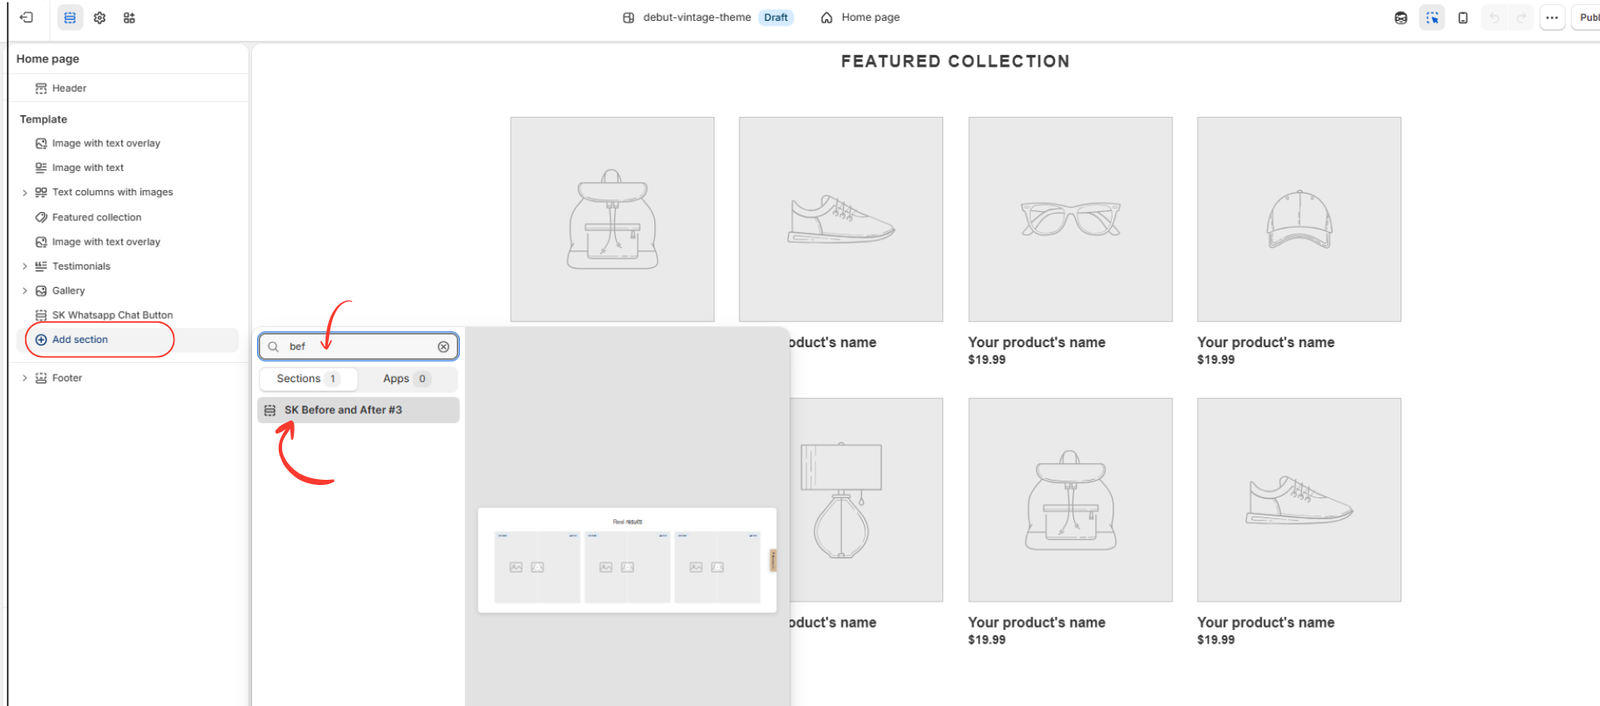
Image 5: Search for SK Before and After #3 in Shopify’s theme editor and add the section to the page.
Once selected, the section will appear in your page layout.
You can now customize the comparison images, headings, labels, and visual settings.
Step 8: Customize the Comparison Images and Publish Your Changes
After adding the section, click SK Before and After #3 in the theme editor sidebar.
The comparison section contains individual comparison blocks that can be customized.
In your example, the section displays three image comparisons with a heading that says Real results.
To customize a comparison, click its block and upload the appropriate images.

Image 6: Customize the Before and After image comparisons, update the labels, and save your changes.
Upload your Before image
Select the Before image setting and upload the original product or transformation image.
Upload your After image
Select After image and upload the image showing the later result or comparison state.
Customize the labels
You can edit the labels displayed on each image.
For example:
- Before: Original
- After: Final Result
Or retain the default BEFORE and AFTER labels.
Adjust the section heading
Use a clear title such as “Real Results,” “See the Difference,” or “Before & After Transformation.”
Customize the layout
Depending on the selected section settings, adjust the image dimensions, spacing, appearance, and comparison layout to match your storefront.
Save your work
Once you are satisfied with the section, click Save in the top-right corner of the Shopify theme editor.
If you are editing a draft theme, click Publish only when you are ready to make that theme live.
Your Before and After section will then appear on the storefront pages using the published template.
Best Practices for Creating Before and After Sections
Use high-quality images
Upload clear product images so customers can easily understand the comparison.
Maintain consistent photo angles
Whenever possible, photograph both images from the same angle, under similar lighting, and at the same distance.
This makes the comparison easier to understand and more trustworthy.
Keep the section heading simple
Headings like “See the Difference” or “Real Customer Results” help visitors quickly understand the purpose of the comparison.
Optimize images for mobile
Use appropriately sized, compressed images and preview the sliders on mobile devices to help maintain performance and usability.
Use genuine product results
Avoid digitally altering before and after images in ways that misrepresent product performance.
Position the section strategically
Consider placing the section near your product benefits, testimonials, or other supporting information, where shoppers are evaluating whether the product meets their needs.
Frequently Asked Questions (FAQs)
1. How do I add a Before and After slider to Shopify without coding?
Install Section Kit: Theme Sections, search for a Before and After section, add it to My Sections, install it into your theme, and customize it using Shopify’s theme editor.
2. Is the Section Kit Before and After section free?
The SK Before and After #3 section is shown as Free in the provided screenshots. Check the app for its current pricing and availability.
3. Can I add multiple Before and After comparisons to one page?
Yes. The example section supports multiple comparison blocks, allowing you to showcase several results on one page.
4. Can I customize the Before and After labels?
Yes. The section provides settings to change the labels displayed on the comparison images.
5. Does the Before and After section work on mobile?
The section is designed to support responsive layouts. Preview it on different screen sizes to confirm that the appearance and slider interaction work well with your theme.
6. Can I add a Before and After section to a Shopify product page?
Yes, you can add it to a suitable product page template through Shopify’s theme editor, provided the template supports the section.
7. Do I need to hire a Shopify developer?
No. The installation and customization workflow shown in this tutorial can be completed through Section Kit and Shopify’s visual editor.
8. Can Before and After sections improve Shopify conversions?
They can help customers understand visual differences and product benefits more clearly, which may support buying decisions. However, conversion improvements are not guaranteed.
Conclusion
Adding a Before and After section to your Shopify page is an effective way to demonstrate product transformations and provide customers with interactive visual comparisons.
Whether you are running a beauty store, haircare business, cleaning product store, or home improvement shop, a comparison slider can help communicate the value of your products.
With Section Kit: Theme Sections, you can create these interactive comparisons without writing Liquid, CSS, or JavaScript code.
Simply choose a section, add it to your library, install it into your Shopify theme, upload your images, and customize the appearance.
Ready to improve your Shopify store’s visual presentation?Install Section Kit: Theme Sections