How to Build a Shopify Landing Page with Ready-Made Sections
A Shopify landing page gives visitors a focused place to discover an offer, explore a product, or learn why your brand deserves their attention. Unlike a general homepage, it should guide visitors toward one clear action, such as shopping a collection, viewing a featured product, or joining an email list.
Building that page does not always require designing every element from scratch. Ready-made sections provide a starting layout that you can personalize with your own images, copy, colors, and links. This guide follows the supplied images in order, using Section Kit: Theme Sections and its SK About Us Full Page layout as the example.
The Main Challenge Shopify Merchants Face
Many merchants know what they want their landing page to communicate but struggle to build it with the options available in their theme. A basic page may support text and an image yet lack the structure needed for a compelling brand story, a benefits grid, or several coordinated content areas.
Custom development can add time and expense to a campaign. Learning another editing interface can also slow progress, especially when the merchant only needs a few additional layouts. The result is often a page with inconsistent spacing, weak visual hierarchy, or no obvious next step for visitors.
A useful landing page needs more than an attractive design: its headline, supporting content, images, and call to action should all serve the same goal.
Why Use Section Kit for Ready-Made Sections?
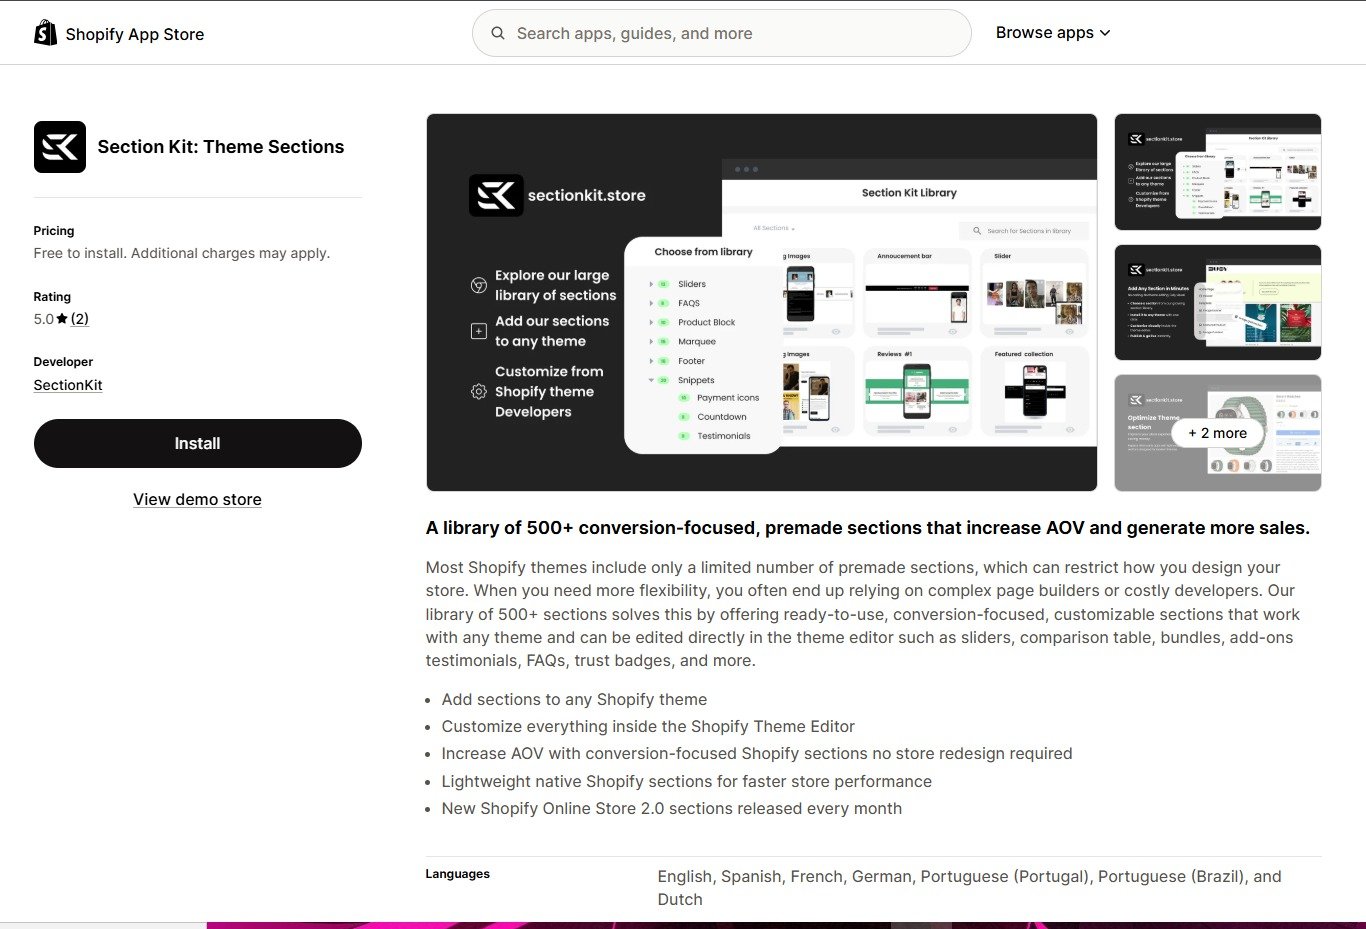
Section Kit provides premade sections that merchants can add to a theme and customize in the Shopify Theme Editor. Its App Store listing describes a library of 500+ sections, including image layouts, testimonials, FAQs, and other content elements. The app is free to install, with free sections and premium sections available for one-time purchase.
For this tutorial, the images show a full-page About Us layout. It is a practical starting point for a brand-story landing page: several coordinated content areas are already arranged, leaving you to replace the example material and tailor the page to your audience. Review the selected section’s details and current price before adding it.
Why Ready-Made Sections Matter
- A quicker starting point: Begin with an existing layout and spend more time refining your message.
- Consistent presentation: Use coordinated content areas instead of assembling disconnected elements.
- Familiar editing: Manage supported settings in Shopify’s native Theme Editor.
- Flexible content: Adapt the layout to your brand story, campaign, or featured offer.
Ready-made sections can help you present information clearly, but results depend on the quality of your offer, content, traffic, and customer experience. A layout alone does not guarantee sales.
Before You Begin
Choose the page’s main goal and prepare your headline, original images, benefit statements, and destination links. In this example, the template is named about-us. For a separate campaign, use a dedicated page template so that changes do not affect other pages sharing the same template.
Step 1: Install Section Kit: Theme Sections
Open the Section Kit: Theme Sections listing in the Shopify App Store. Click Install, select your store if prompted, and review the installation permissions before completing the process. Then open the app from your Shopify admin.
Step 2: Explore the Ready-Made Full-Page Layouts
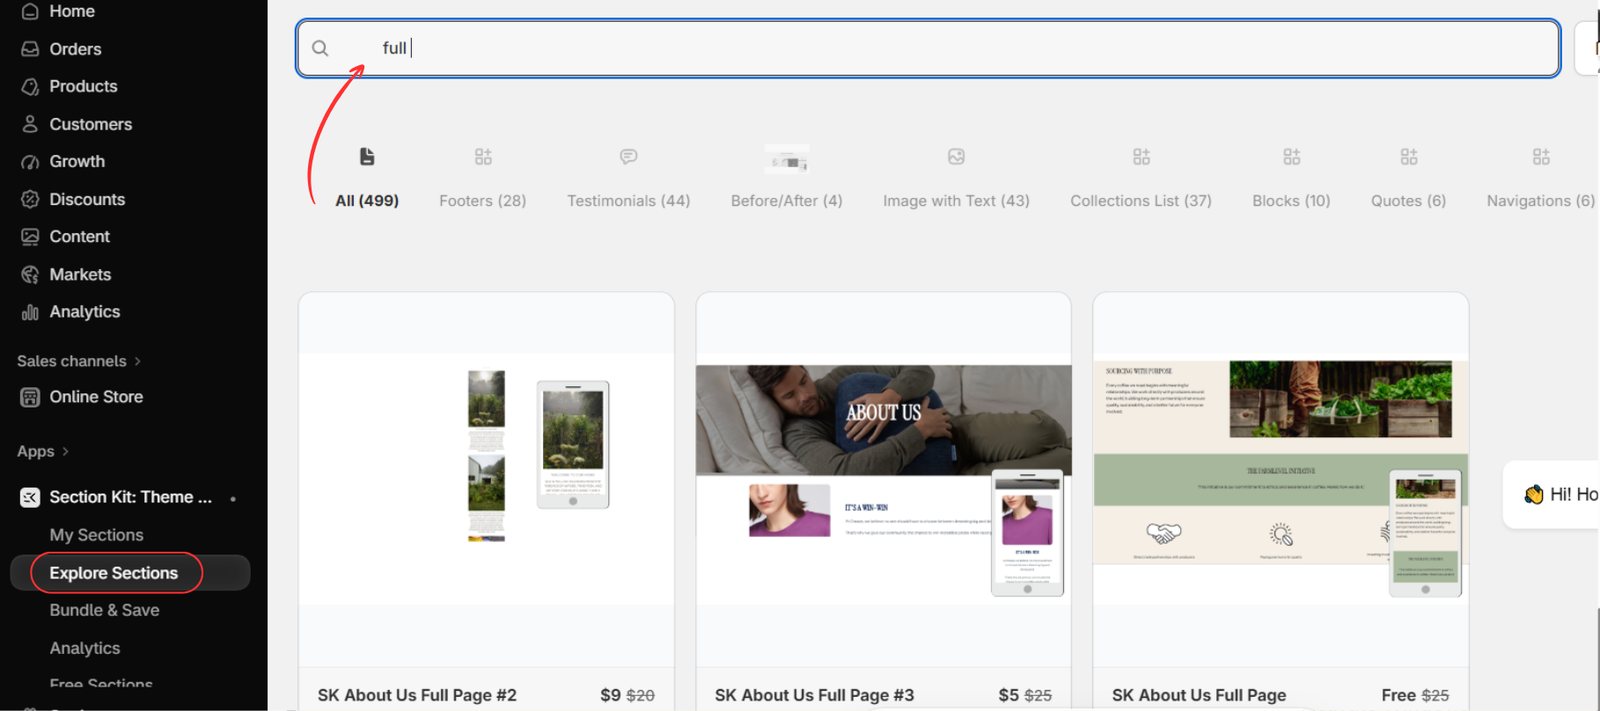
Inside Section Kit, click Explore Sections. Use the search field to find a layout suited to your goal. The image shows the search term full, which helps locate full-page options such as SK About Us Full Page.
Compare the available designs by their content structure. For a brand-story landing page, look for room to explain your story, highlight your values, and give visitors a clear next action.
Step 3: Add Your Selected Layout to My Sections
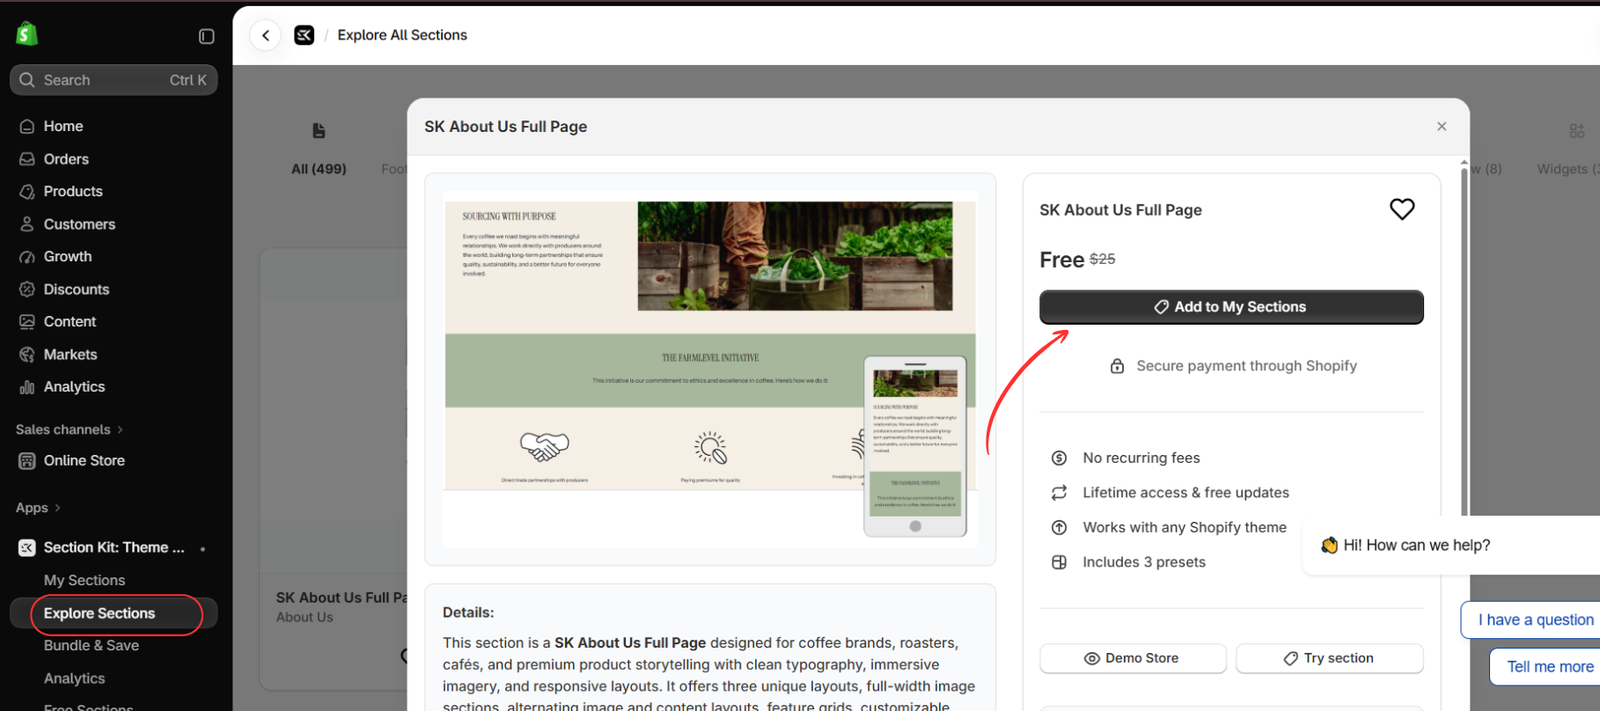
Open SK About Us Full Page to review its preview and details. Check whether its content areas fit your page before clicking Add to My Sections.
The selected layout is marked Free in the provided image. Other layouts may have a purchase price, so confirm the amount displayed for your chosen section.
Step 4: Find the Layout in My Sections
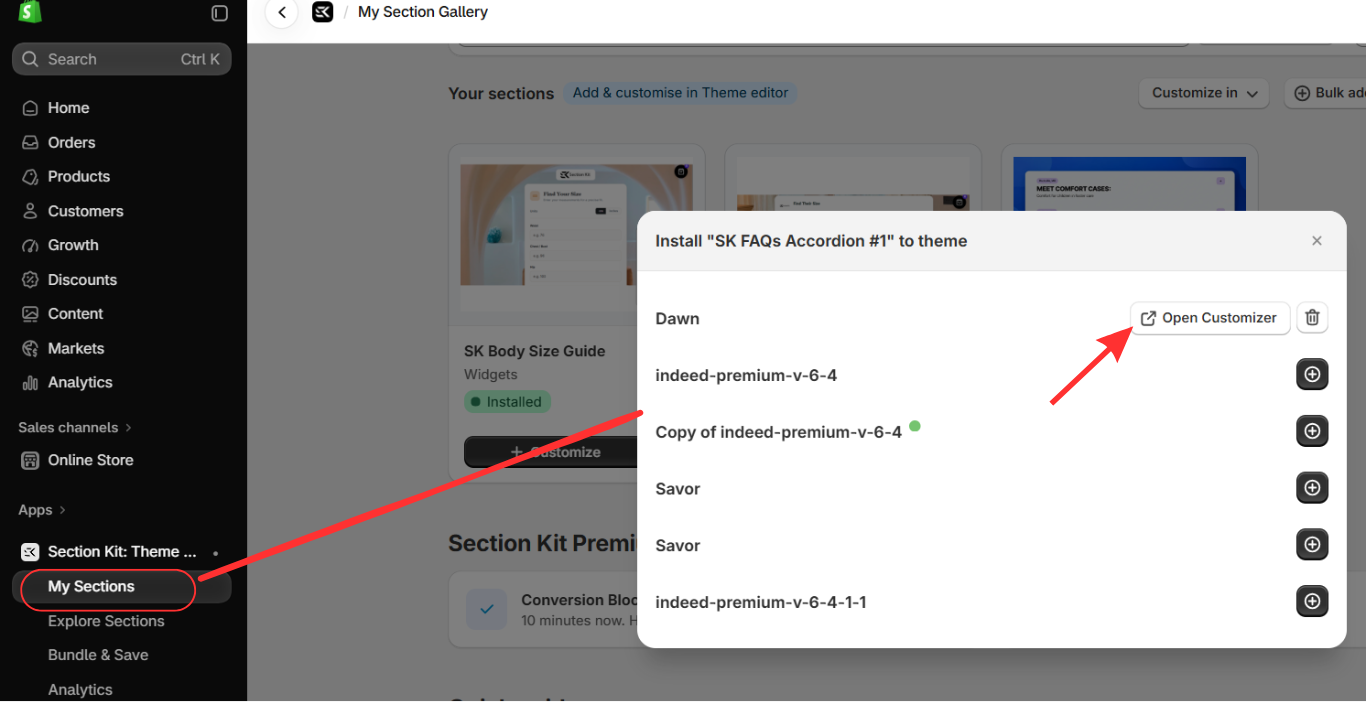
Click My Sections in the app menu. Locate the SK About Us Full Page card and click Customize. This is the layout you will use for the landing page.
Step 5: Choose the Theme and Open the Customizer
Use the theme-selection window to choose the theme where you want to work. If the section has not been installed in that theme, use the available add control to install it. When available, click Open Customizer to open the Shopify Theme Editor.
Image clarification: The supplied image demonstrates the theme-selection window with “SK FAQs Accordion #1.” For this tutorial, perform the same theme-selection action for SK About Us Full Page, the layout selected in the previous steps.
Step 6: Select Your Landing Page Template
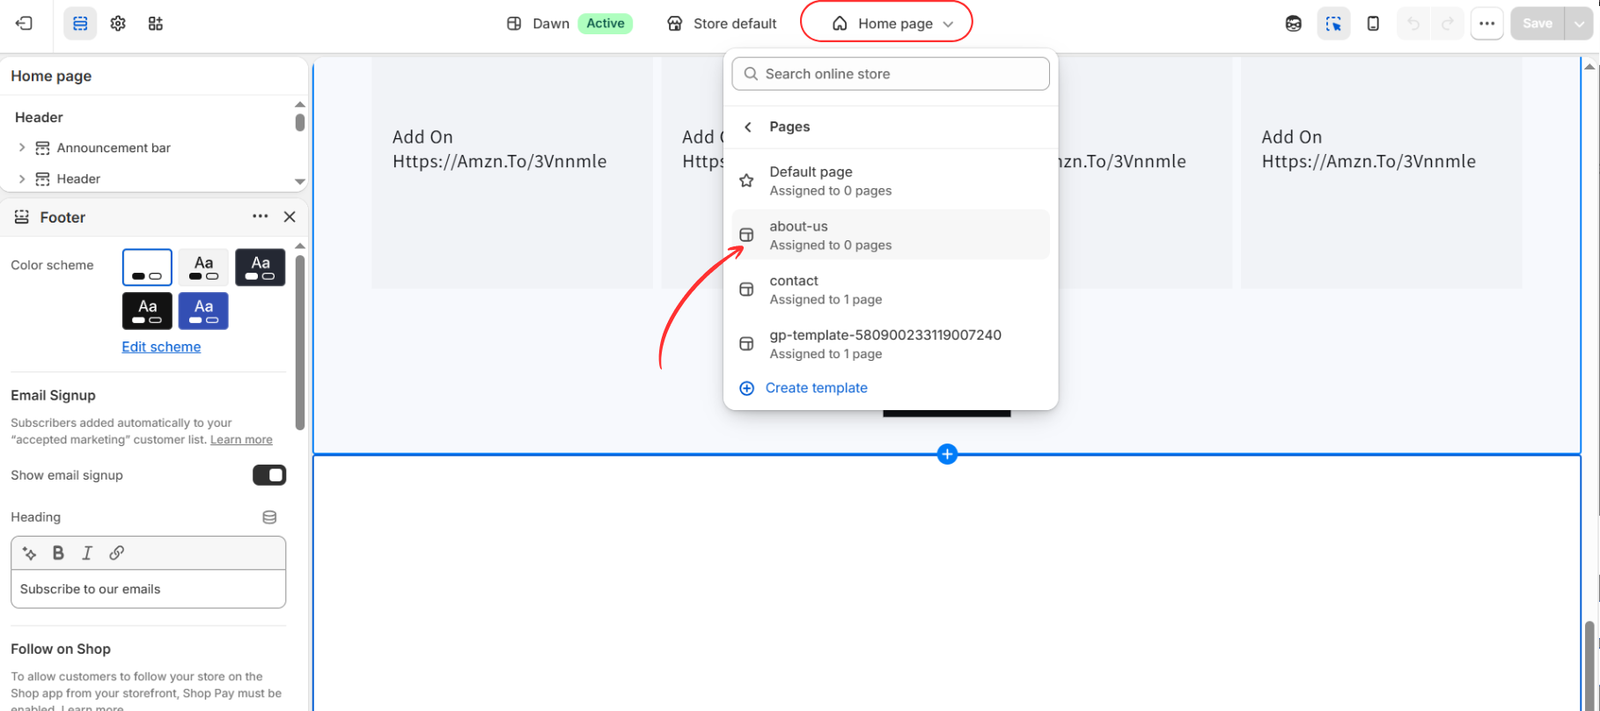
In the Theme Editor, open the page selector at the top. Go to Pages and select about-us, as shown in the image. If you need a separate landing page design, use Create template to create a dedicated page template instead.
The image shows “Assigned to 0 pages.” This means the template has not yet been connected to a page. You can design it now, but you must assign it to a page before visitors can view that page using the layout.
Step 7: Add SK About Us Full Page
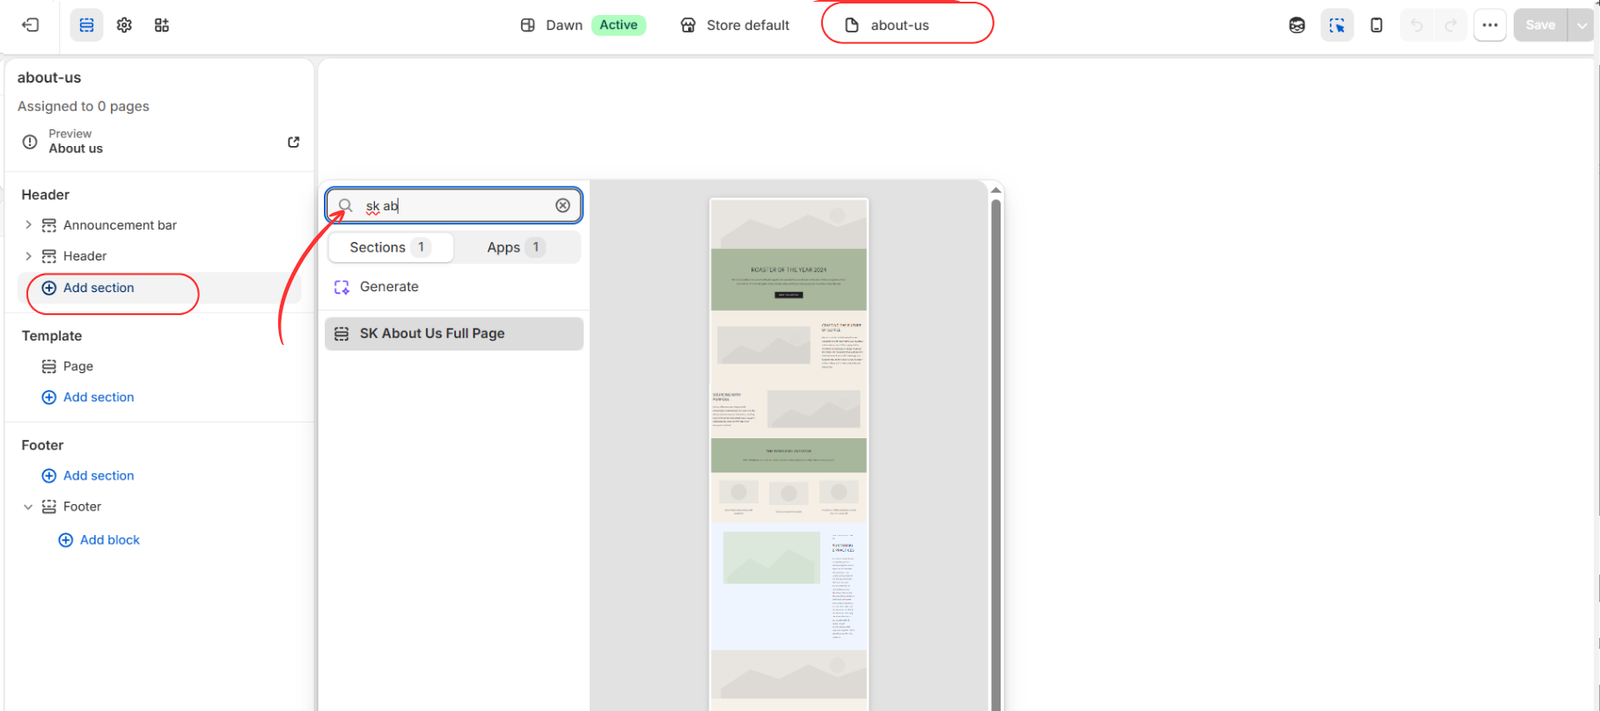
With the correct template selected, click Add section and search for SK About Us Full Page. Select the result to add the layout.
Placement matters: The image highlights Add section inside the Header group. Header groups are typically shared across pages. For a layout that should appear only on this landing page, use Add section under Template instead, where the section is supported. Confirm its placement before saving.
Step 8: Customize the Layout and Save
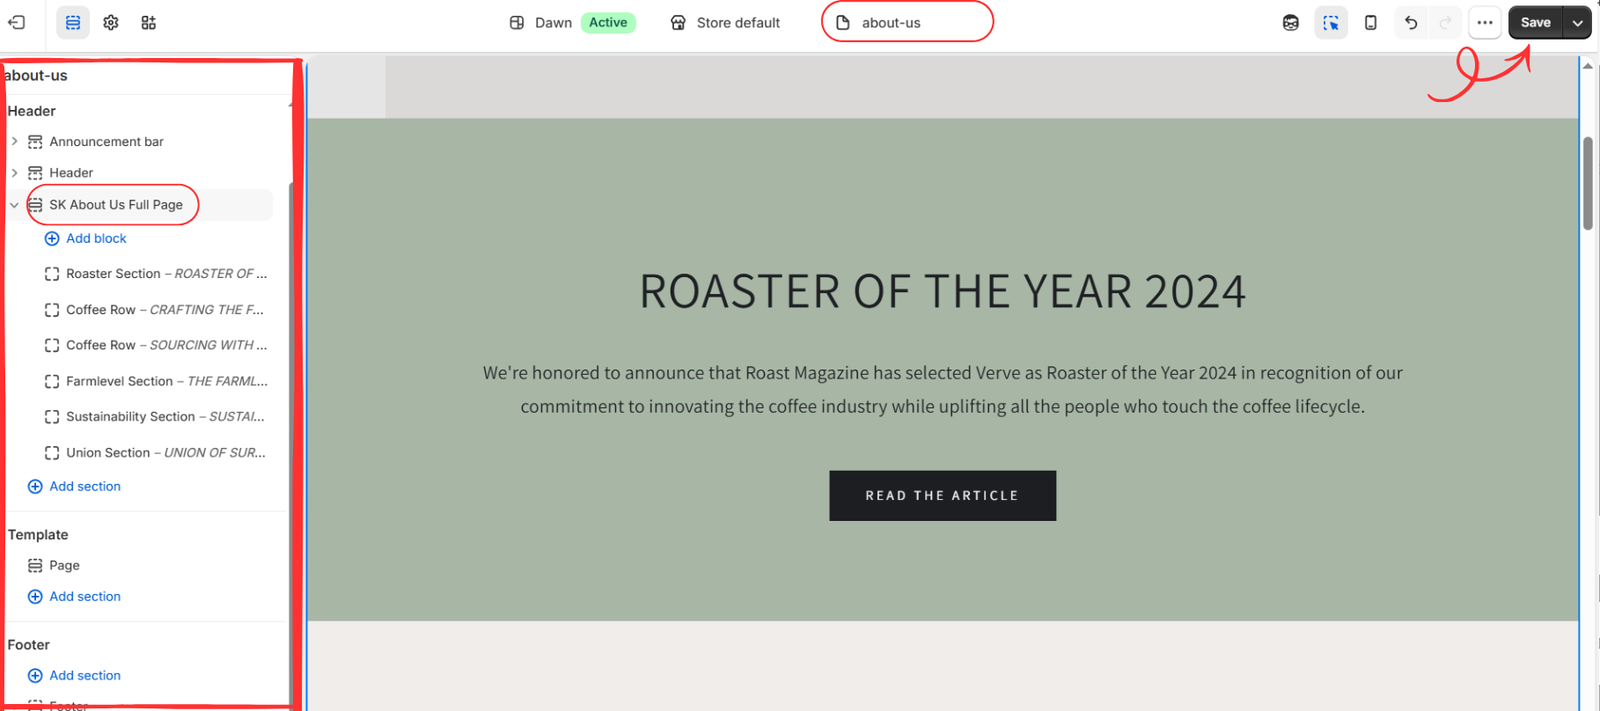
Select SK About Us Full Page in the editor sidebar. Expand its available content blocks and replace the demonstration text and images with your own material.
- Headline: Tell visitors what the page offers and why it matters.
- Images: Use relevant product, team, or brand photography.
- Supporting content: Explain your story or benefits in short, specific sections.
- Buttons: Set clear labels and link them to the intended product, collection, or next step.
- Design settings: Adjust available colors, spacing, and typography to suit your store.
The final image shows example coffee-brand content, including an award headline and a “Read the Article” button. Replace those details with accurate information about your business. Check the desktop and mobile previews, test the links, and click Save.
The layout is shown inside Header in the image. Before completing your page, confirm it is placed in the intended template area so it does not appear across unrelated pages.
Connect the Template to a Page and Make It Available
Saving the design completes the template, but a template is not a standalone page. Open Online Store → Pages in Shopify admin and create or open the page you want to use. Add a suitable title and select your landing page template in the Theme template field, then save.
The template must be available in your current published theme to assign it. If you designed it in an unpublished theme, complete the appropriate theme publishing process when ready. Set the page’s visibility as intended, open its storefront URL, and check that the correct layout appears.
For an advertising campaign, use the page URL as the campaign destination. For a brand-story page, add a relevant navigation link so visitors can find it. Test the finished page on a phone and confirm that its buttons lead to the right destinations.
Tips for a More Effective Shopify Landing Page
- Keep one main objective: Make the desired next action easy to understand.
- Match your campaign message: Use a headline that reflects the promise visitors clicked on.
- Use credible proof: Add genuine testimonials, verifiable achievements, or clear product details where relevant.
- Make content easy to scan: Keep paragraphs concise and use descriptive headings.
- Review mobile usability: Check image crops, text size, spacing, and button visibility.
Build a Landing Page That Fits Your Brand
Ready-made sections give Shopify merchants a practical foundation for building a landing page without starting from an empty layout. The example above takes you from installing Section Kit and selecting a full-page design to customizing it, saving the template, and connecting it to a live page.
Choose a layout that supports your goal, replace every piece of example content, and verify the finished experience before sharing it with customers.
Explore Section Kit: Theme Sections: https://apps.shopify.com/sectionkit




