HOW TO CHOOSE TRUST BADGES THAT MATCH YOUR STORE’S PROMISES
Trust badges should help shoppers understand what your store actually offers. A shipping icon, return message, or guarantee can be useful near the purchase buttons, but only when the promise behind it is accurate. Choosing a badge because it looks convincing can create expectations your store cannot meet.
This guide explains how to choose trust badges that match your store’s promises and configure them with SA Trust Badges. Start with your policies, choose a suitable format, and check the finished result on your storefront.
The problem: attractive badges can send the wrong message
A storewide Free Shipping badge may be misleading when shipping is free only above a minimum order value. Easy Returns may leave shoppers confused if certain products are excluded. A generic Guarantee message can also be unclear when it does not explain what support or coverage customers receive.
The challenge is to communicate reassurance in a small space without hiding important conditions. Your badge should summarize a real policy, while the detailed policy remains easy to find.
Why use a trust badge app?
SA Trust Badges supports trust badges, guarantee banners, and payment icons on product and cart pages. Its official listing describes styling controls, product or collection targeting, and integration through Shopify Theme App Embeds. These features help you manage presentation and relevance from the app. Review current plans and limits before choosing your setup.
Match each badge to a real promise
| Badge | What to verify | Clearer wording when conditions apply |
|---|---|---|
| Free Shipping | Eligible destinations, products, and minimum spend | Free shipping on eligible orders over your actual threshold |
| Easy Returns | Return window, exclusions, item condition, and return costs | Returns accepted within your actual policy window |
| Guarantee | Coverage, duration, exclusions, and how to request help | A specific description of your actual guarantee |
| Payment icons | Methods available to the customer at checkout | Icons for the payment methods you accept |
| Secure Checkout | The checkout process and the meaning of the wording | A general checkout reassurance without invented certification claims |
These are wording guidelines, not ready-made promises for every store. Replace any conditions with your real terms. An icon does not add payment security or certify your store, and a guarantee badge does not create new warranty coverage.
Step 1: Review your policies and install the app
List the shipping, return, payment, and guarantee information you can support. Identify which promises apply across your store and which apply only to selected products. Keep the list short and prioritize information shoppers need before ordering.
Open SA Trust Badges on the Shopify App Store, click Install, review the installation details, and complete setup for your store.
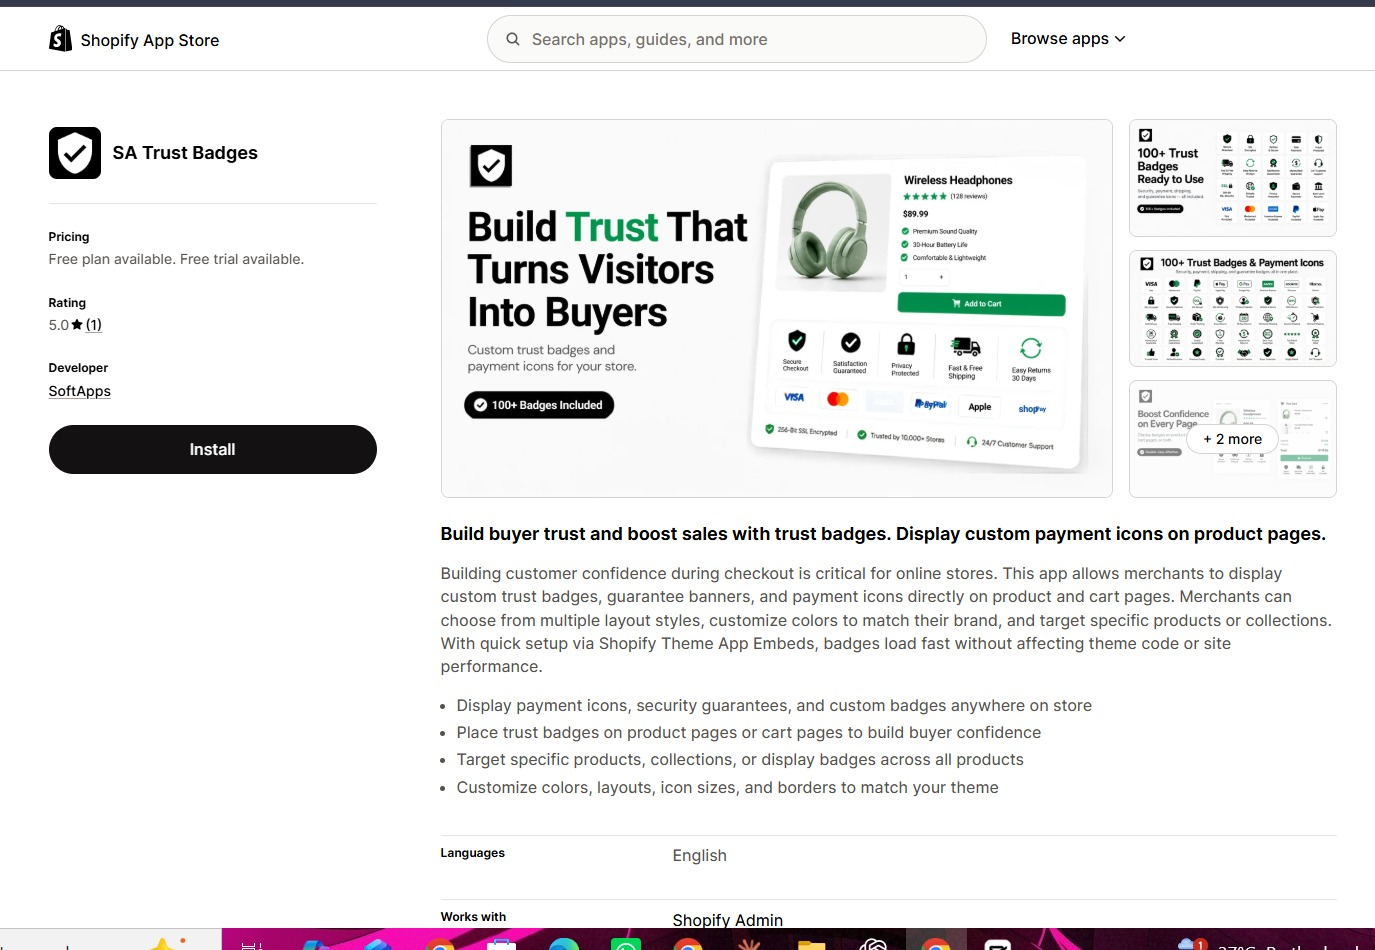
Step 2: Start a new badge
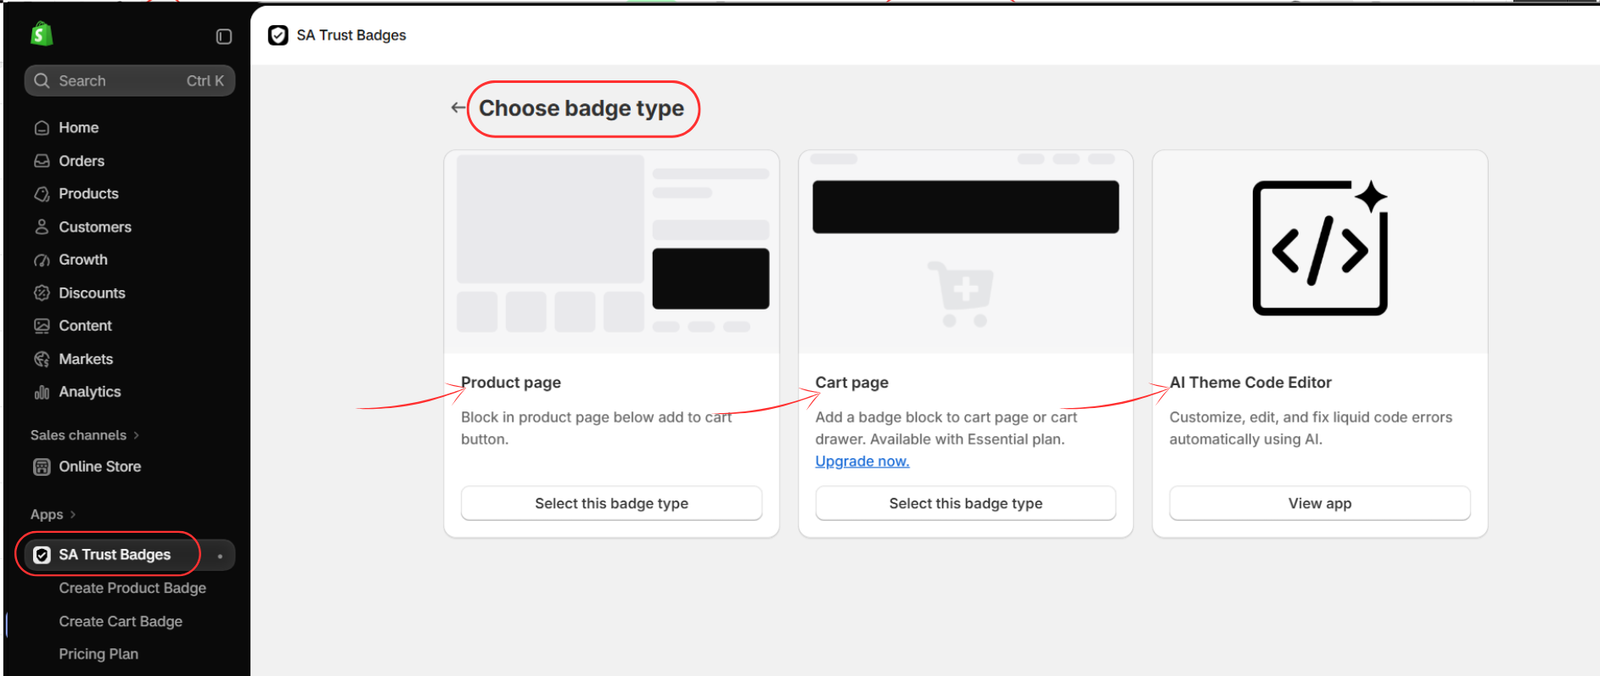
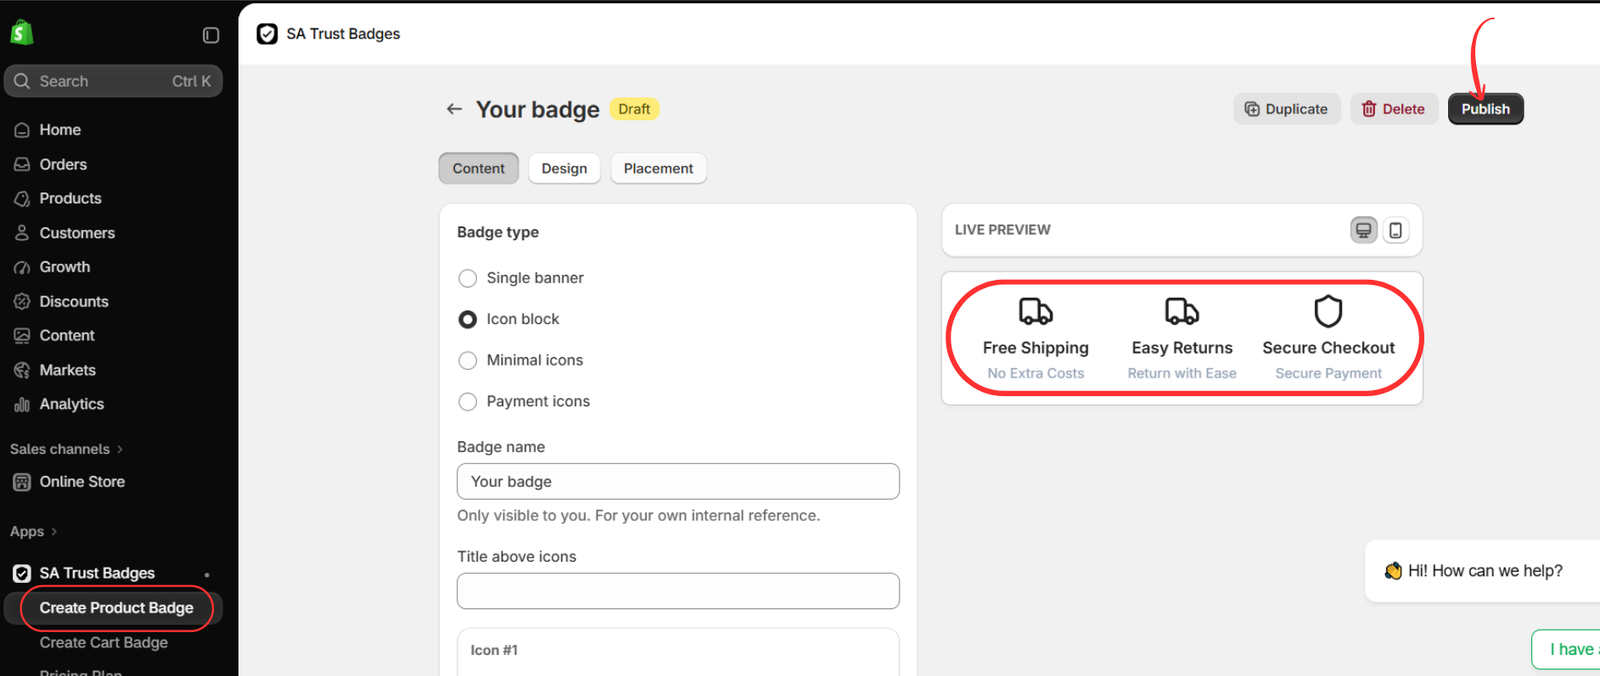
Open SA Trust Badges in Shopify admin. Start a new badge using the app’s creation action, or open Create Product Badge or Create Cart Badge for the location you need. Give each configuration a clear internal name so you can manage it later.
Image 2 pending: the uploaded file f82aa7c0-b092-4646-b150-e61e4e56cac7.png was unavailable. Insert the original image here before publishing.
Step 3: Choose the page where the promise matters
The next image shows the Choose badge type screen. Select Product page when the message belongs near a product’s purchase controls, or Cart page when it should reassure shoppers reviewing their order. Confirm the current plan requirements for cart functionality.
The AI Theme Code Editor card is a separate app promotion, not a trust badge format. Use the Product page or Cart page option for this workflow.
Step 4: Use a single banner for one clear promise
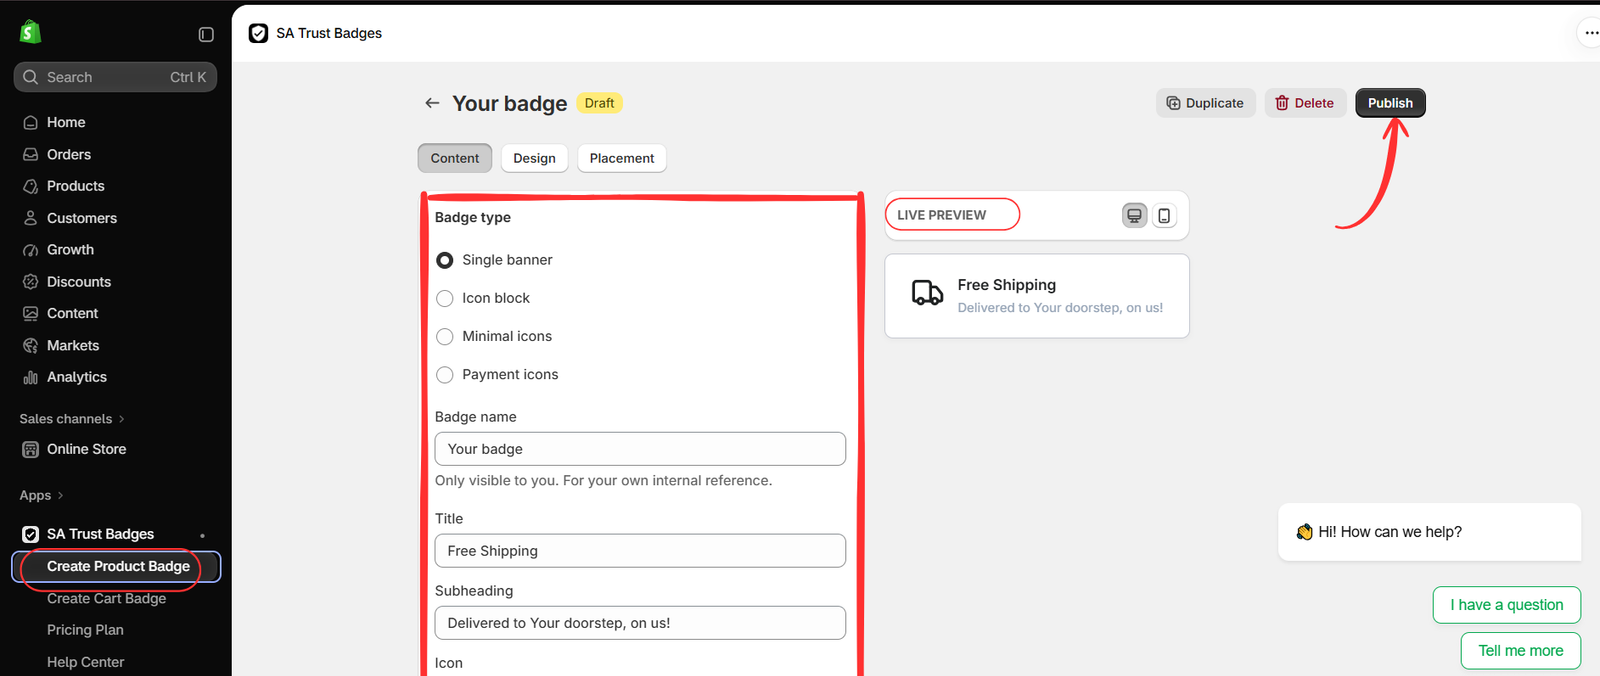
In Content, choose Single banner to highlight one message. Enter an internal Badge name, a customer-facing Title, a Subheading, and an appropriate icon using the available fields.
The example displays Free Shipping with “Delivered to Your doorstep, on us!” Use this wording only when it reflects the applicable offer. If there is a threshold or destination restriction, make the condition clear instead of presenting shipping as universally free.
Review Design to keep the banner readable and consistent with your theme. Review Placement to match its display to eligible products or locations. Finish these settings before publishing.
Step 5: Use an icon block for several supported promises
Choose Icon block when several short messages belong together. The example shows Free Shipping, Easy Returns, and Secure Checkout. Treat these as examples to evaluate against your policies rather than a required set.
Select recognizable icons and keep the text concise. A truck suits shipping; a return arrow or check can represent your return message; a shield can represent general reassurance. Choose each icon deliberately—the example uses a truck for Easy Returns, which you may want to replace for clarity.
Remove any promise that does not apply. If different products have different conditions, create separate badge configurations and review product or collection targeting. Check the preview on desktop and mobile, then click Publish when ready.
Step 6: Open your theme editor
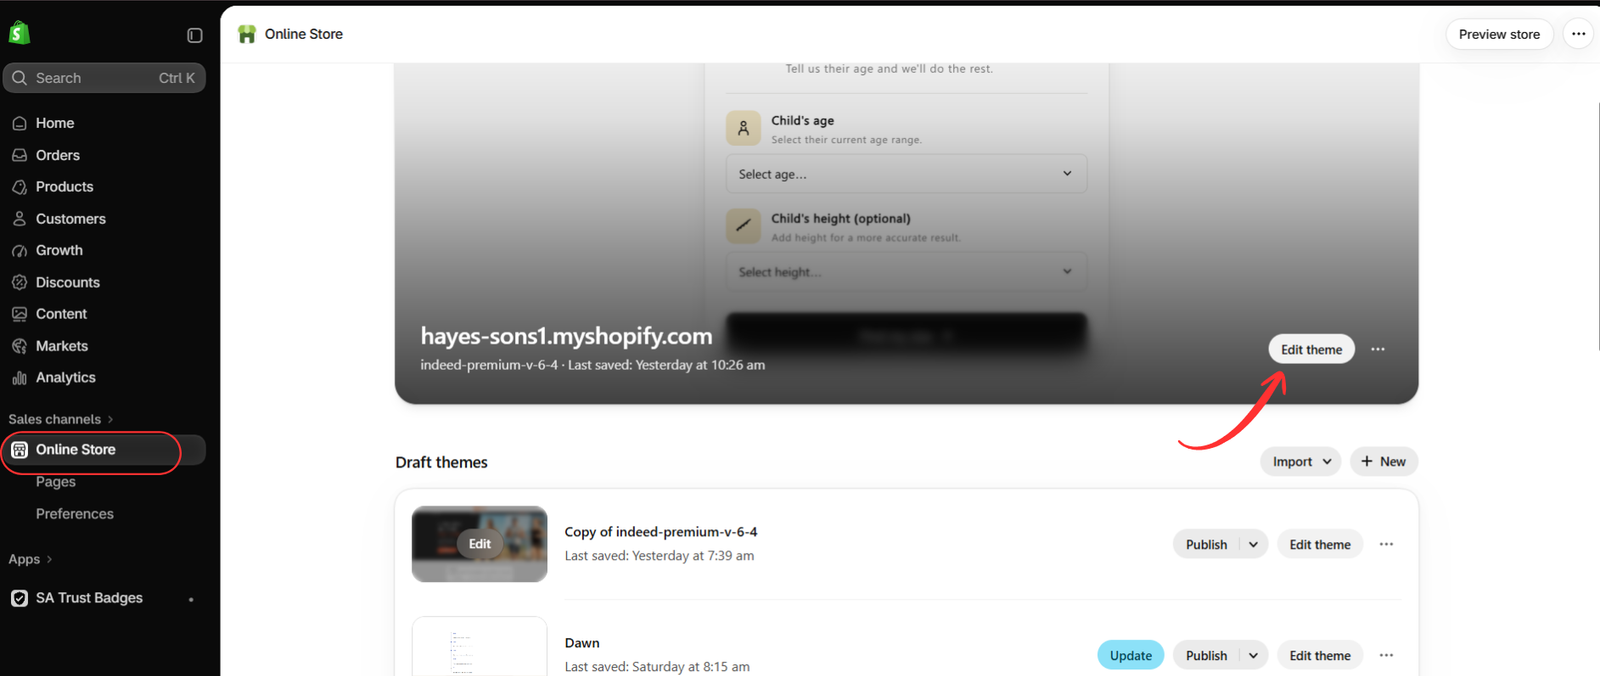
Go to Online Store → Themes and select Edit theme for the intended theme. This action may be labeled Customize in your admin. If you configure a draft theme, inspect its preview before expecting a change on your live storefront.
Step 7: Review the message beside the purchase controls
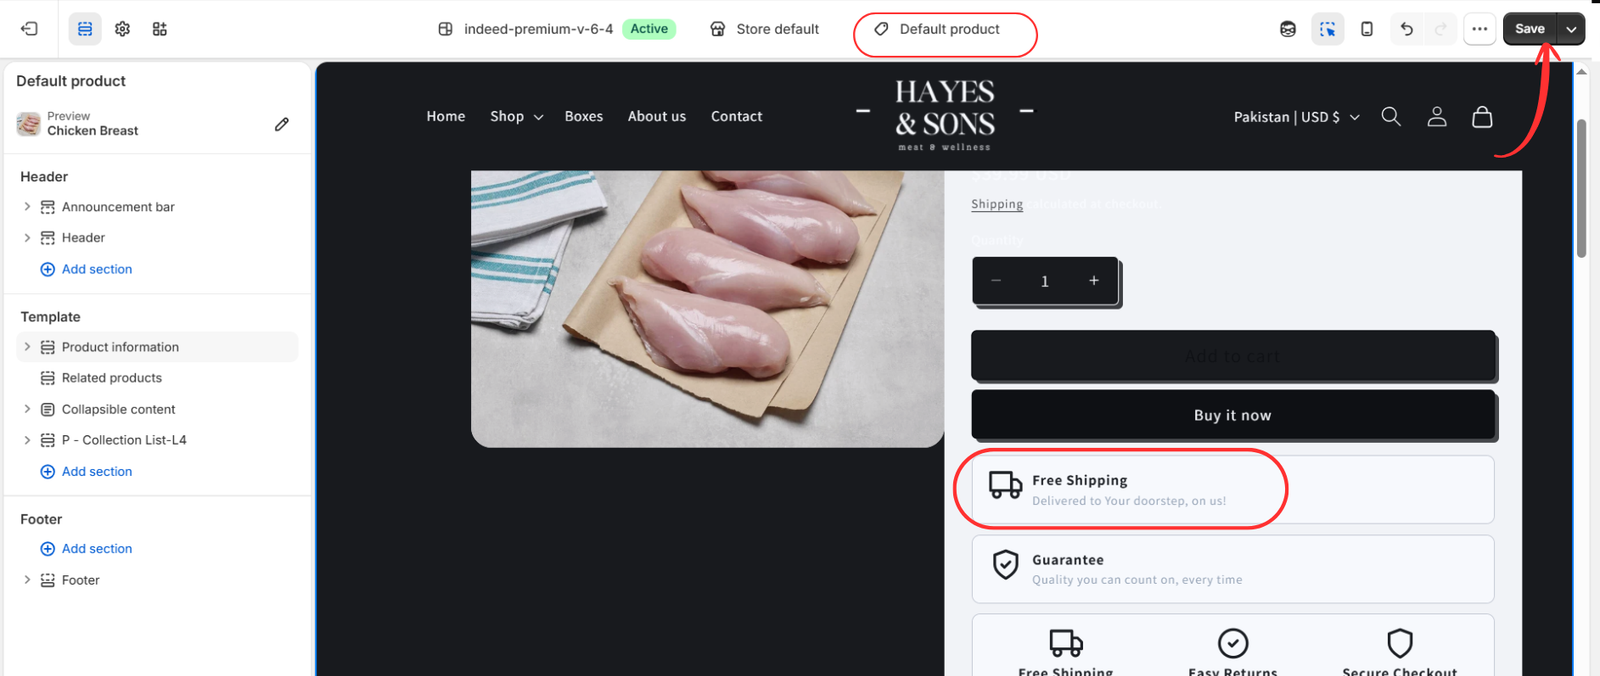
Open a relevant product template and inspect the customer-facing wording. The image highlights a Free Shipping banner beneath the purchase buttons. Confirm that the selected product qualifies and that the text remains readable on a phone.
If the badge is not visible yet, enable the app embed as shown in the next step. After enabling it, return to this preview to review the result. Save any theme changes.
Step 8: Enable the app embed and save
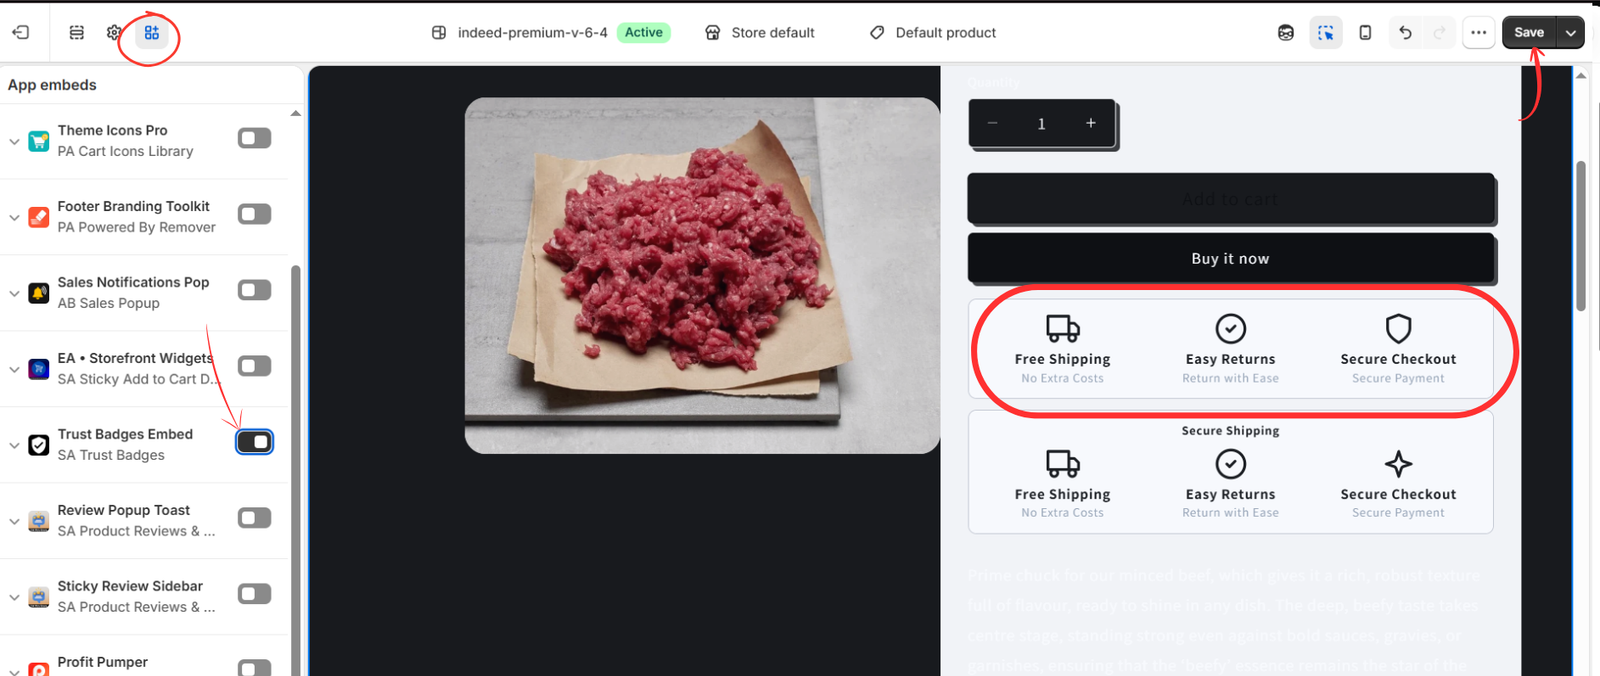
Open App embeds, locate Trust Badges Embed under SA Trust Badges, turn it on, and click Save. Confirm that the badge is also published in the app.
The final image shows an icon block under the purchase buttons. Check every visible message against the product’s eligibility and your store policies. For a cart badge, open an actual cart containing representative items and verify its display separately.
Check accuracy before publishing your storefront content
Review eligible and ineligible products, mobile layout, and any geographical conditions. Remove overlapping badges that repeat the same message. If a badge is missing, check its published status, the active theme’s embed, targeting, and your plan limits.
Keep detailed policies accessible and update badge wording when your terms change. Avoid invented certification seals, unsupported refund periods, or payment logos for methods you do not accept.
Choose clarity over a longer badge list
The strongest badge selection is a small set of useful, accurate messages. Begin with what your store delivers, then choose the layout and placement that communicate those promises clearly.
Use SA Trust Badges to configure the presentation, and finish by checking the messages customers actually see on your storefront.
Feature reference: SA Trust Badges official listing. Seven available images are included in their original sequence, with Image 2 reserved for the missing upload.




