HOW TO ADD A COMPARISON TABLE SECTION TO A SHOPIFY PRODUCT PAGE

Introduction
When customers shop online, they often compare products before making a purchase. They want to know which product offers better features, value, quality, and benefits.
A comparison table section on a Shopify product page makes this process easier by displaying important product differences in a clear, organized format.
Instead of forcing customers to read lengthy descriptions or switch between multiple products, a comparison table allows them to evaluate features side by side.
However, many Shopify themes offer limited comparison table functionality. Creating a fully customized comparison table manually may require knowledge of Liquid, HTML, CSS, or JavaScript.
Fortunately, Section Kit: Theme Sections provides ready-made comparison table sections that can be added to Shopify pages without coding.
In this tutorial, you will learn how to add a professional comparison table to your Shopify product page using Section Kit, with original screenshots demonstrating the process.
The Merchant’s Challenge: Why Shopify Stores Need Comparison Tables
Shopify merchants often struggle to communicate product advantages effectively.
Difficulty highlighting product differences
When multiple products offer similar features, customers may find it difficult to understand which option best suits their needs.
Lengthy product descriptions
Important information can become buried inside long product descriptions, making it harder for shoppers to compare benefits.
Limited theme customization
Not every Shopify theme includes advanced comparison table designs with flexible layouts, colors, headings, and feature rows.
Custom coding requirements
Building a comparison table from scratch can require technical knowledge or developer assistance.
Unclear product advantages
Without an easy-to-understand comparison, merchants may struggle to explain how their products differ from alternatives.
These challenges make comparison tables a useful addition to Shopify product pages.
Why Add a Comparison Table to Shopify?
A comparison table helps customers understand product differences by presenting information in a consistent format.
For example, a merchant selling nutritional drinks might compare ingredients, protein content, sugar levels, and other product features.
Comparison tables can help customers make more informed decisions, highlight genuine product advantages, and reduce unnecessary confusion.
They can also improve the presentation of technical specifications and provide a more structured shopping experience.
Introducing Section Kit: Theme Sections
Section Kit: Theme Sections helps merchants customize their Shopify storefronts using professionally designed, ready-made sections.
Rather than manually developing custom comparison tables, store owners can install a section and configure it through Shopify’s visual theme editor.
For this tutorial, we will use SK Comparison Table #13.
This section provides a multi-column product comparison layout with customizable headings, feature rows, colors, and typography.
Key Features of SK Comparison Table #13
- Multi-column comparison: Display different products or options side by side.
- Customizable headings: Change table titles and product headings.
- Editable feature rows: Compare specifications, benefits, ingredients, and other attributes.
- Flexible typography: Adjust heading fonts, sizes, weights, and alignment.
- Visual differentiation: Use colors to highlight meaningful product differences.
- Responsive design: Create layouts suitable for desktop and mobile viewing.
- No-code customization: Edit the comparison table using Shopify’s theme editor.
App Link: Install Section Kit: Theme Sections
Step-by-Step Guide: How to Add a Comparison Table Section to Shopify
Step 1: Open the Shopify App Store
Start by opening Google and searching for Shopify App Store.
Select the official Shopify App Store result, as shown in the screenshot.
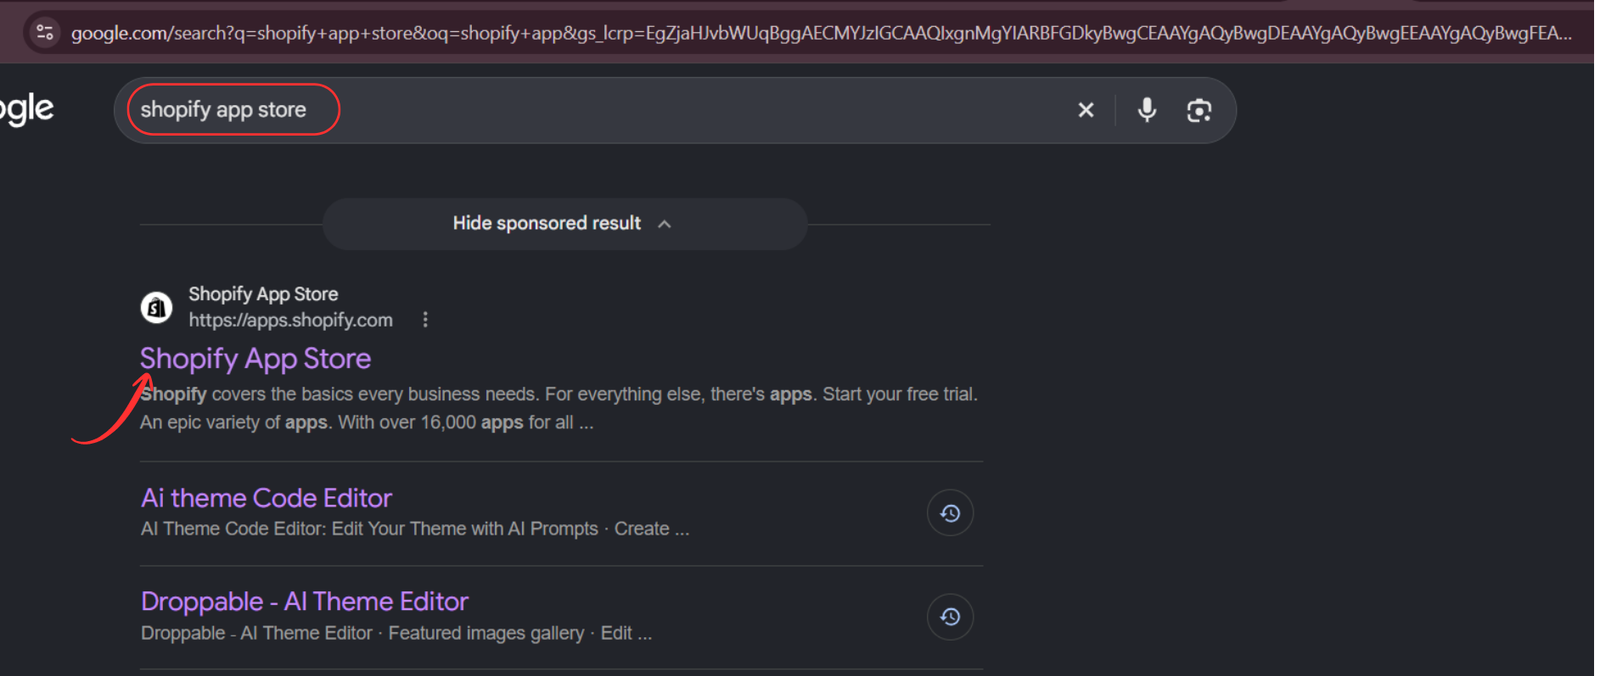
Image 1: Find and open the official Shopify App Store.
You can also visit Shopify App Store directly.
Step 2: Search for Section Kit: Theme Sections
Once inside the Shopify App Store, use the search bar to enter Section Kit Theme Sections.
Locate the app named Section Kit: Theme Sections, identifiable by its black-and-white app icon in the provided screenshot.
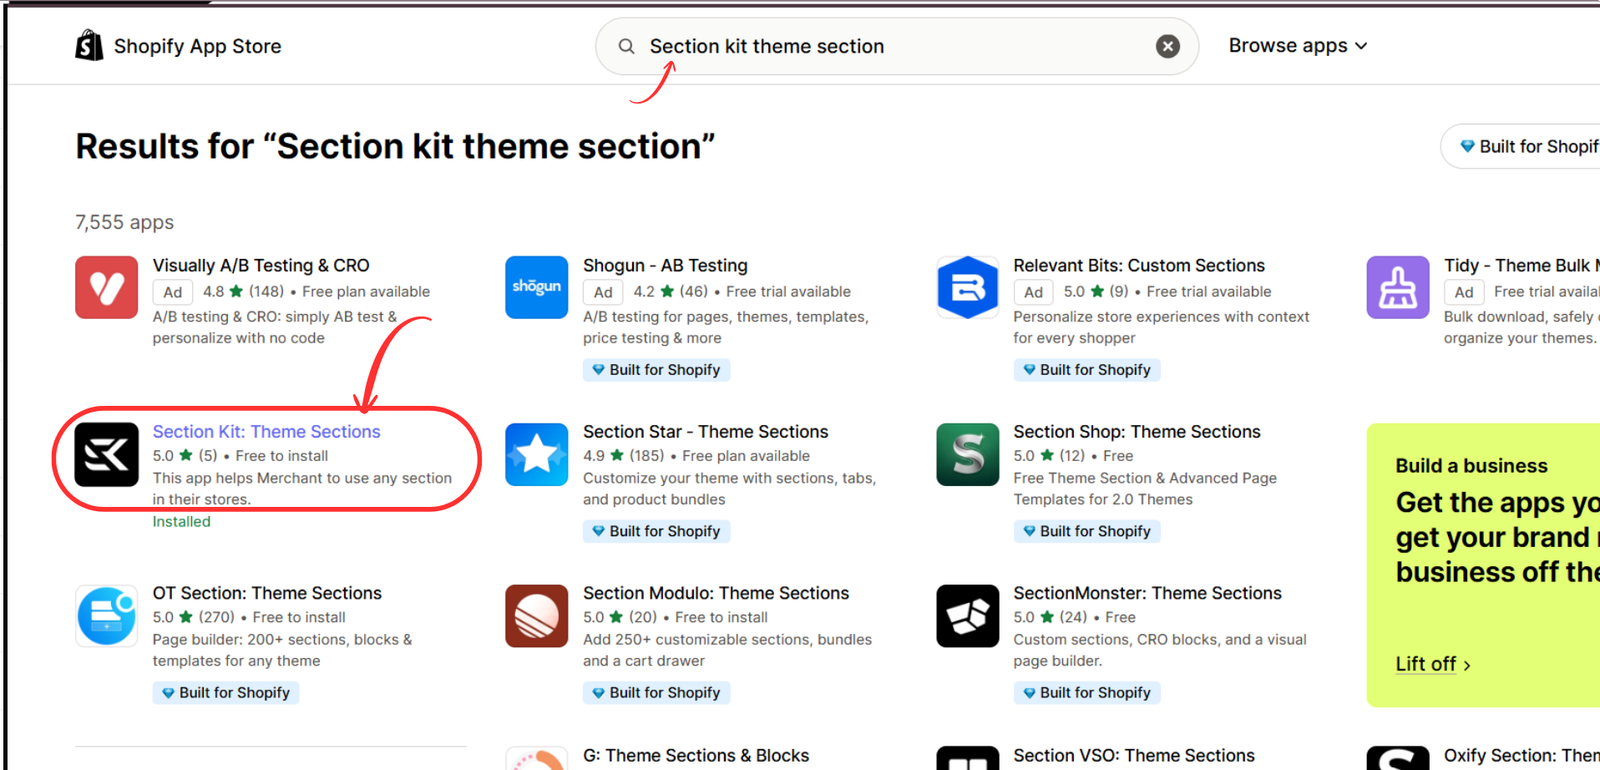
Shopify App Store search results highlighting Section Kit Theme Sections
Image 2: Search for Section Kit: Theme Sections and select the correct app.
Open the app listing and follow the installation process if you have not already installed it.
Step 3: Open the App in Your Shopify Admin
After installation, open Section Kit from your Shopify admin.
The app gives you access to its section library, allowing you to explore different layouts and design elements for your storefront.

You can begin by selecting Explore Sections from the left-hand menu.
Step 4: Open Section Kit and Search for Comparison Tables
First, log in to your Shopify admin dashboard and open Section Kit: Theme Sections.
From the left sidebar, click Explore Sections.
Find the search bar and type table.

The search results will display different comparison table designs, including SK Comparison Table #10, #13, #3, and #6.
For this tutorial, locate SK Comparison Table #13.
Section Kit Explore Sections showing comparison tables
Image 1: Search for “table” inside Section Kit and locate SK Comparison Table #13.
The section preview shows a three-column comparison layout that can highlight product differences.
Select the section you want to use. You can review it through More Info and add it to your sections library.
Step 5: Open My Sections and Customize the Comparison Table
After adding the comparison table to your Section Kit library, navigate to My Sections.
This page displays the sections you have added to your collection.
Find SK Comparison Table #13.
The card shows a preview image, the section’s name, and a Customize button.
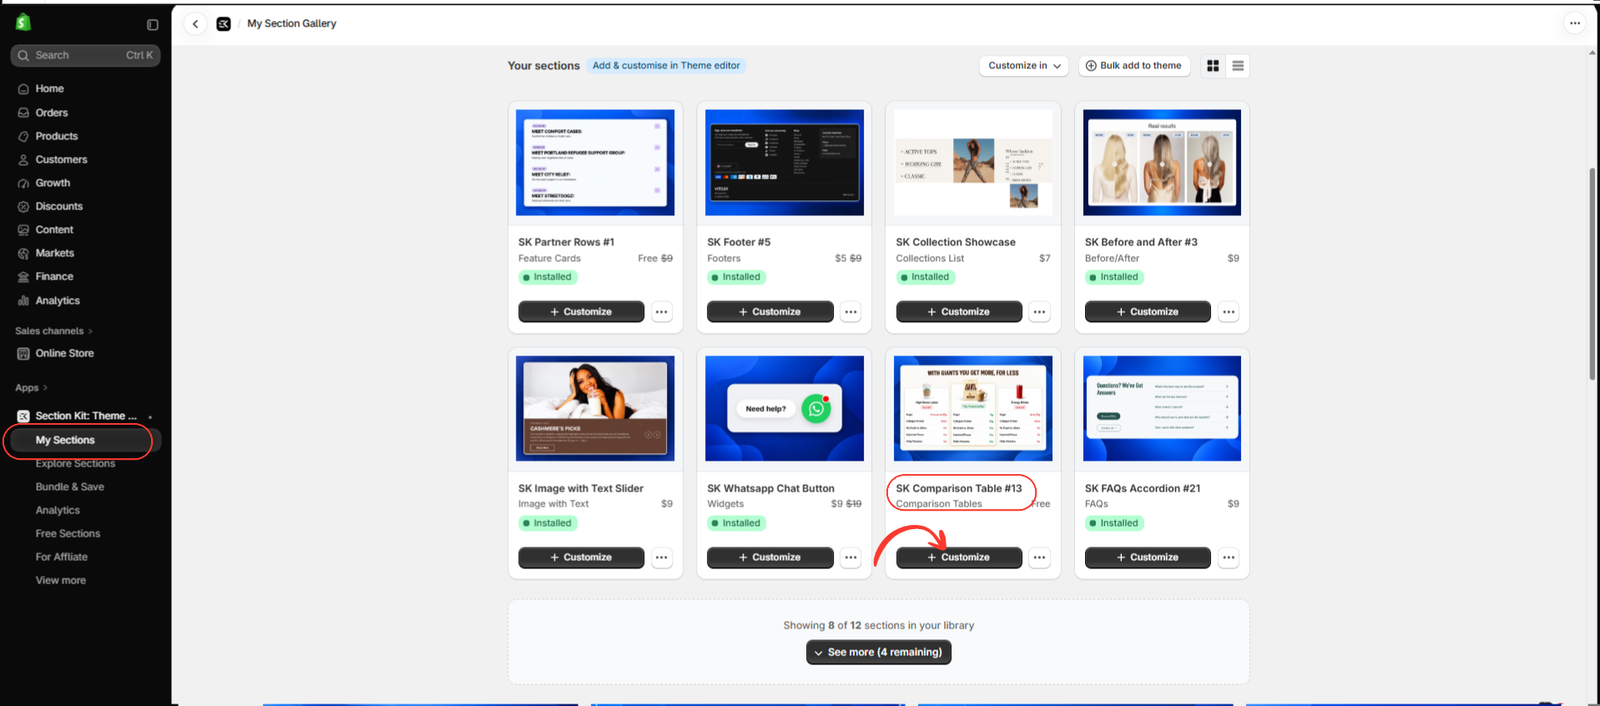
Image 2: Locate SK Comparison Table #13 in My Sections and click Customize.
Click Customize to continue.
This allows you to choose the Shopify theme where you want to install the comparison table.
Step 6: Install the Comparison Table Into Your Shopify Theme
Once you click Customize, Section Kit opens a theme installation window.
Choose the theme you want to edit.
You may install the section into your published theme or test it in a draft theme before making the changes live.
After installing the section, click Open Customizer.

Image 3: Example of the theme selection and Open Customizer workflow. The screenshot shows a previously installed WhatsApp section, but the same process applies to the comparison table.
Shopify’s theme editor will open.
You can now add the comparison table to a compatible page template.
Step 7: Add the Comparison Table to Your Shopify Product Page
Inside the Shopify theme editor, select the template where you want the comparison table to appear.
For a product page, use the page selector at the top of the editor to navigate to Products, then choose the appropriate product template.
Next, follow these instructions:
- Click Add section in the left sidebar.
- Type table into the search bar.
- Find SK Comparison Table #13.
- Click the section to add it to your selected template.
- Position the section where customers can easily find it.

Image 4: Search for SK Comparison Table #13 in the theme editor. This example shows the homepage template; select a product template to place the table on a product page.
A useful location is below the main product information or near the product benefits section, where customers are likely to evaluate the differences between options.
Step 8: Customize the Comparison Table and Save
After adding the section, click SK Comparison Table #13 in the theme editor sidebar.
The customization panel allows you to edit the table’s heading, layout, typography, and feature rows.
Your screenshot shows a comparison between High Street Lattes, 74p / Protein Coffee, and Energy Drinks.

Image 5: Customize SK Comparison Table #13, including its heading, comparison rows, colors, and typography.
Customize the heading
Change the comparison table heading to something relevant to your products.
For example:
WHY CHOOSE OUR PRODUCT?
Other suitable headings include “Compare the Benefits,” “See the Difference,” or “Why Our Product Stands Out.”
Edit the product columns
Update the column titles to represent the products or options you want to compare.
For example, a skincare merchant might use “Our Moisturizer,” “Standard Moisturizer,” and “Basic Cream.”
Customize comparison rows
Use the Add Comparison Row option to include important details.
Depending on your products, these could include material, ingredients, capacity, compatibility, warranty, or available features.
Edit feature values
Click individual comparison rows to customize the information displayed in the table.
Use accurate product specifications and avoid unsupported claims.
Adjust the typography
The theme editor includes settings for heading alignment, font selection, heading size on desktop and mobile, line height, and font weight.
Customize these settings to match your storefront design.
Adjust the layout
Select an available section layout and configure the table’s appearance to ensure the content remains easy to read.
Save the comparison table
Once you have finished customizing, click Save in the top-right corner of Shopify’s theme editor.
If you are editing a draft theme, publish it when you are ready for the changes to appear on your live store.
Your comparison table is now ready to display on the product pages using that template.
Best Practices for Shopify Comparison Tables
Compare relevant features
Choose attributes that customers genuinely care about, rather than filling the table with unnecessary information.
Keep the information accurate
Verify product specifications, prices, and competitive claims before publishing them.
Use a clear heading
Headings such as “Compare Your Options” or “Why Choose Us?” help customers immediately understand the table’s purpose.
Keep the design consistent
Use the same typography, colors, and spacing principles as the rest of your Shopify storefront.
Optimize for mobile users
Preview the table on mobile devices to ensure that columns and feature text remain usable.
Highlight meaningful advantages
Emphasize genuine differences without making misleading claims about competing products.
Frequently Asked Questions (FAQs)
1. How do I add a comparison table to a Shopify product page without coding?
Install Section Kit: Theme Sections, add SK Comparison Table #13 to your library, install it into your theme, select a product template, and add the section through Shopify’s theme editor.
2. Is the Section Kit comparison table free?
The provided screenshots show SK Comparison Table #13 as free in the user’s Section Kit library. Check the current app for pricing and availability.
3. Can I compare multiple products?
Yes. The example shows a multi-column comparison table suitable for displaying differences between multiple products or options.
4. Can I customize the comparison table colors and fonts?
Yes. The theme editor provides customization settings for typography, headings, layouts, and other visual elements.
5. Can I add more comparison rows?
Yes. The section includes an Add Comparison Row option for extending the table with additional attributes.
6. Can I add a comparison table to every Shopify product page?
You can add the section to a product template. Every product assigned to that template can display the section. Different content for individual products may require separate templates or other supported dynamic-data configurations.
7. Does the comparison table work on mobile devices?
The section is designed to support responsive layouts, but you should test the finished table on mobile devices to ensure readability.
8. Can comparison tables increase Shopify conversions?
A well-designed table can help customers understand product differences and make informed decisions. Conversion improvements are possible but not guaranteed.
Conclusion
Adding a comparison table section to your Shopify product page is an effective way to present product information in a clear and structured format.
Instead of making customers compare lengthy product descriptions, a comparison table helps them review important features side by side.
With Section Kit: Theme Sections, merchants can create customizable comparison tables without editing Shopify theme code.
The process is simple: choose a comparison table design, add it to your library, install it into your theme, customize the information, and save your changes.
If you want to improve how your Shopify store communicates product differences, Section Kit provides a practical no-code solution.Get Section Kit: Theme Sections on Shopify