HOW TO ADD PAYMENT ICONS TO A SHOPIFY FOOTER

Introduction
When customers visit your Shopify store, they want to know whether they can pay using their preferred payment method.
Displaying recognizable payment icons in your store’s footer helps customers identify supported payment options before reaching checkout.
Icons such as Visa, Mastercard, PayPal, Apple Pay, Google Pay, and Shop Pay can make your storefront look more professional and help customers understand which payment methods are available.
However, adding and customizing these icons isn’t always straightforward, especially if you want more control over their appearance without editing your theme’s code.
In this guide, you’ll learn how to add payment icons to a Shopify footer using PA Powered By Remover, with screenshots and step-by-step instructions.
Why Are Payment Icons Important for Shopify Stores?
1. Help Customers Recognize Payment Options
Customers often look for familiar payment methods before making a purchase. Displaying supported payment icons helps them quickly understand their checkout options.
2. Build Customer Confidence
Recognizable payment logos can reassure customers that your store supports familiar payment services. They do not, however, independently certify a store’s security.
3. Improve Your Store’s Professional Appearance
A clean row of payment icons makes your footer look more complete and consistent with other professional ecommerce websites.
4. Improve Payment Method Visibility
Rather than making customers proceed to checkout to discover their payment options, footer icons provide useful information earlier in the shopping experience.
What Is PA Powered By Remover?
PA Powered By Remover is a Shopify app designed to help merchants customize their store’s footer without manually editing theme code.
Alongside removing the default “Powered by Shopify” attribution and adding custom copyright text, the app includes a Footer Toolkit with payment gateway icons and other footer customization options.
The toolkit allows you to select the payment methods you want to display, preview their appearance, and save your settings.
The payment icon customization shown in this tutorial is a Pro feature, with the screenshot displaying a price of $3.99/month. Check the current app listing for up-to-date pricing.
Explore PA Powered By Remover on the Shopify App Store
Step-by-Step Guide: How to Add Payment Icons to a Shopify Footer
Step 1: Search for the Shopify App Store
Open your browser and visit Google.
In the search bar, enter Shopify App Store and press Enter.
Find the official Shopify App Store website in the search results and click it.
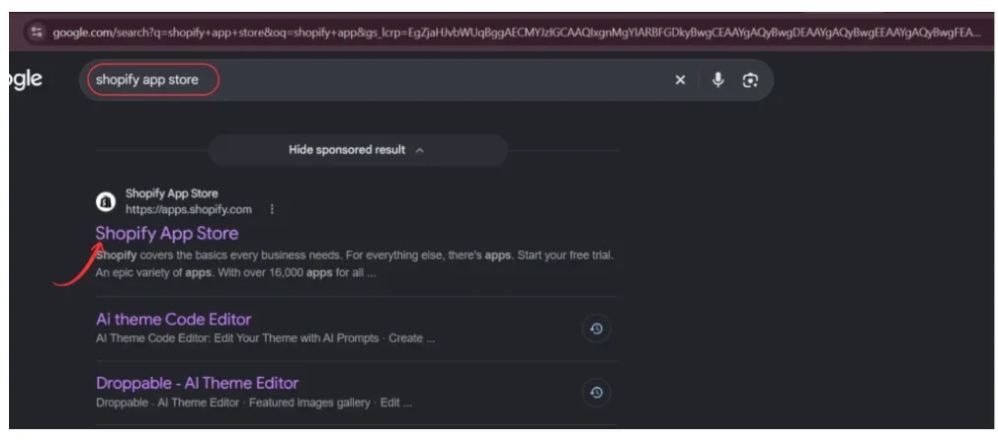
The Shopify App Store provides applications that help merchants customize their storefronts, improve customer experiences, and manage different aspects of their online businesses.
Once the website opens, you can search for the footer customization application.
Step 2: Find PA Powered By Remover
Locate the search bar at the top of the Shopify App Store.
Enter:
PA Powered By Remover
Press Enter to display the search results.
Find the application named PA Powered By Remover, developed by PeakApps.

Click the app name to open its listing.
Before installing any Shopify application, review its functionality, pricing, and requested permissions.
Step 3: Install and open PA Powered By Remover
On the app listing page, you can review the available features, screenshots, pricing information, and description.
PA Powered By Remover is designed to help merchants manage default footer attribution without manually editing theme files.
Click Install to add the application to your Shopify store.
If the app is already installed, Shopify may display an Open button instead.
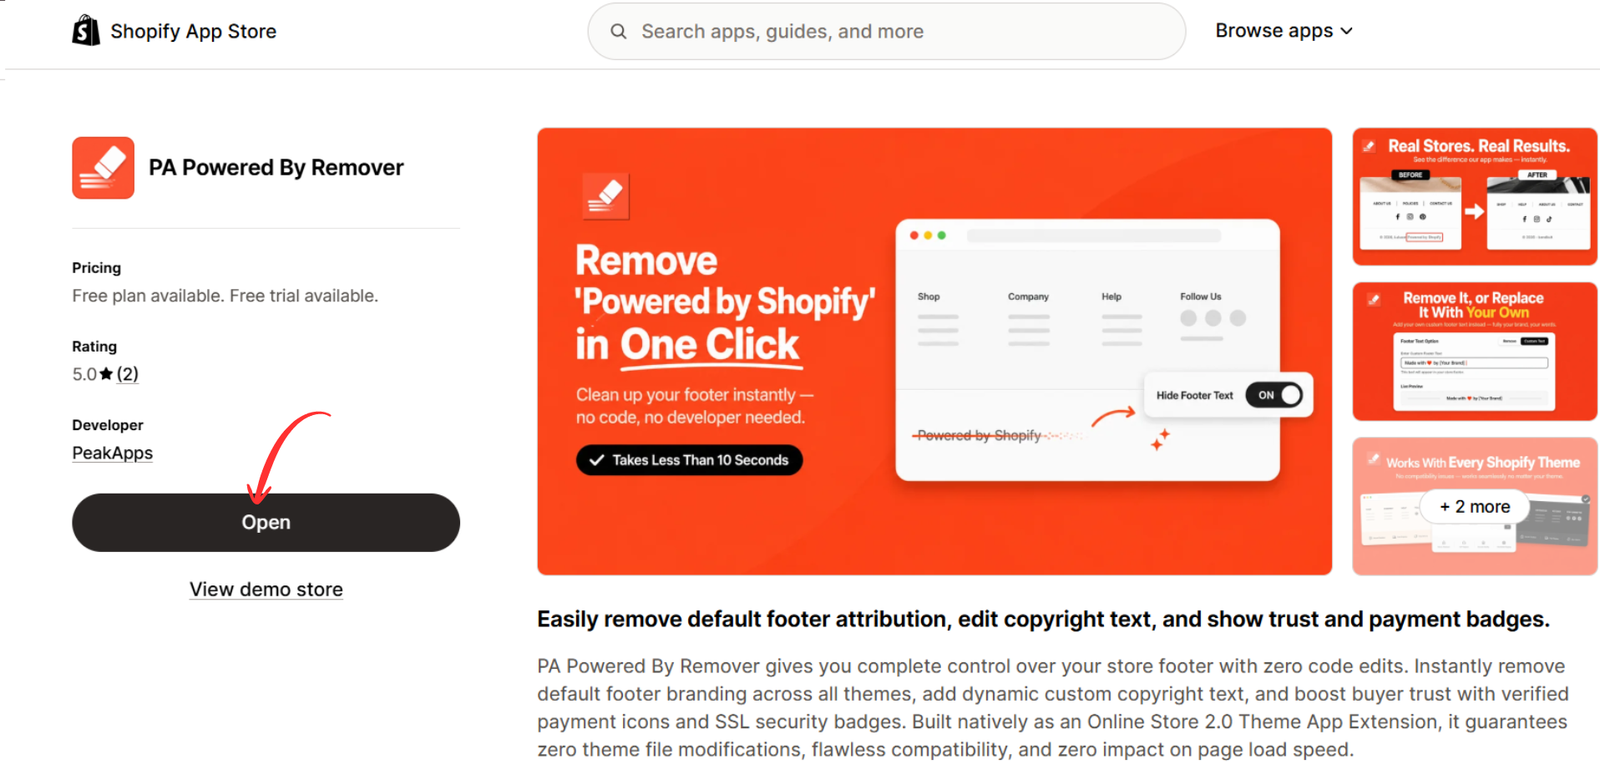
Follow Shopify’s authorization instructions to complete installation.
Once installed, the app becomes accessible through your Shopify admin dashboard.
Step 4: Configure the footer attribution settings
Open PA Powered By Remover from your Shopify admin.
Navigate to the Remove Branding section.
Inside the Branding & Footer Dashboard, locate the Store Attribution Settings panel.
Find the checkbox labeled:
Remove 'Powered by Shopify' credit
Enable this option to configure the removal of the default Shopify attribution.
Next, locate the Custom Copyright Text field.
Enter your preferred copyright information, such as:
© 2026 Your Brand Name. All Rights Reserved.
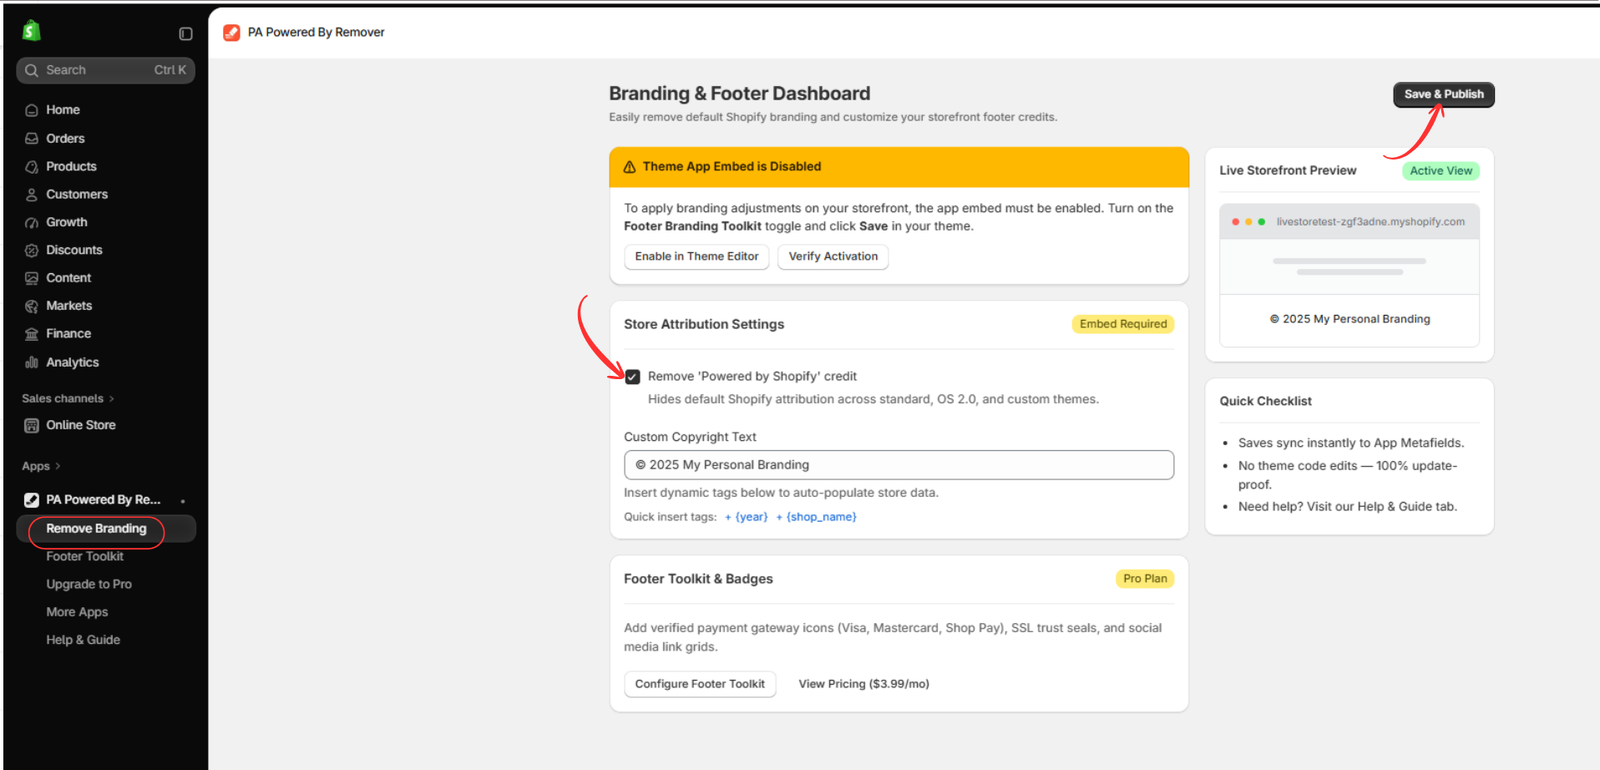
You may also be able to use dynamic placeholders for the current year and store name, depending on the app’s available functionality.
After updating the settings, click Save & Publish.
If the dashboard indicates that the theme app embed is disabled, continue to the next step.
Step 5: Open the Footer Toolkit and Select Payment Icons
From the app’s left sidebar, click Footer Toolkit.
This opens the Footer Customizer & Toolkit dashboard.
Scroll down to the Payment Gateway Icons section.
Enable Display Verified Payment Methods, then select the payment icons you want to show in your store’s footer.
The screenshot displays options including Visa, Mastercard, Amex, PayPal, Apple Pay, Google Pay, Shop Pay, Klarna, and Afterpay.
[2024 Updated] How to Add, Remove & Edit Shopify Payment Icons
Illustrative example of payment method logos. Use the actual app screenshot below for the configuration steps.
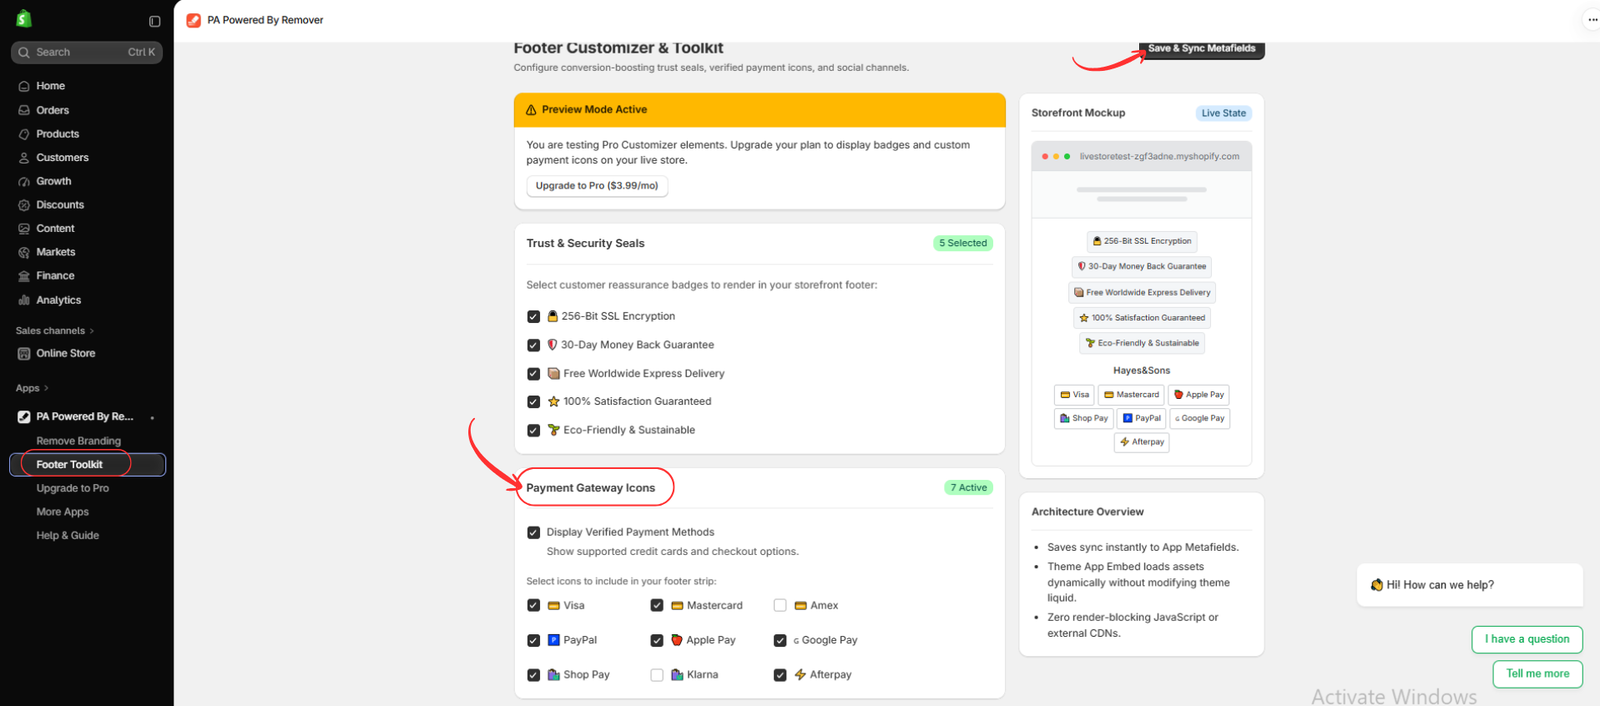
Image 1: The Footer Toolkit dashboard lets you select payment gateway icons and preview them before saving.
Important: Only select payment methods that your store actually accepts. Showing unsupported payment logos can mislead customers.
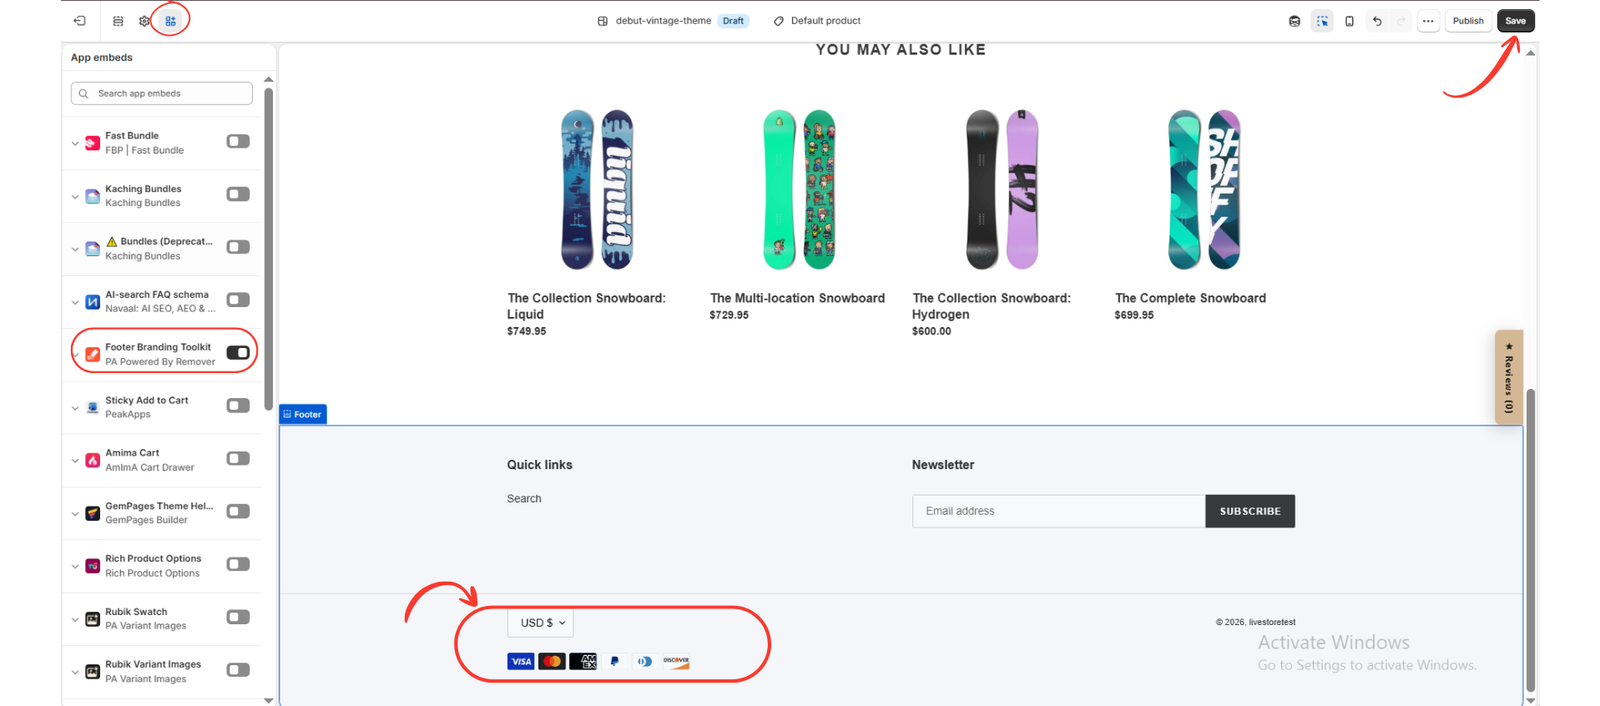
Step 6: Enable the Footer Branding Toolkit App Embed
Next, open your Shopify theme editor.
- Go to Shopify Admin → Online Store → Themes.
- Click Customize on the theme you want to edit.
- Select App embeds from the theme editor toolbar.
- Find Footer Branding Toolkit — PA Powered By Remover.
- Turn on the app embed toggle.
- Click Save in the top-right corner.
- Step 5: Save Your Payment Icon Settings
- After selecting your preferred payment icons, review the Storefront Mockup on the right side of the dashboard.
- This preview shows how the selected icons are expected to appear.
- Click Save & Sync Metafields at the top of the page.
- If you’re using the app’s preview mode, you’ll need to activate the required Pro plan before these customizations can appear on your live storefront.
Image 2: Enable the Footer Branding Toolkit app embed, then save your theme. The highlighted footer area shows the payment icons displayed beneath the currency selector.
Step 7: Verify the Payment Icons on Your Storefront
Open your live Shopify store and scroll down to the footer.
Check that your selected payment icons are visible and properly aligned.
Also verify their appearance on mobile devices, where limited screen width may cause the icons to wrap.
If the icons aren’t visible, confirm that your app settings are saved, the required plan is active, and the app embed is enabled on the published theme.
Best Practices for Shopify Footer Payment Icons
- Display only accepted payment methods. Match your footer icons with your actual checkout configuration.
- Keep the layout clean. Avoid overcrowding the footer with unnecessary logos.
- Use recognizable icons. Customers should be able to identify payment services easily.
- Check mobile responsiveness. Make sure the icons remain readable on smaller screens.
- Review your settings periodically. Update the displayed icons when you add or remove payment methods.
Frequently Asked Questions
Can I add payment icons to Shopify without coding?
Yes. Many Shopify themes include built-in payment icon settings. For additional footer customization, you can use an app such as PA Powered By Remover.
Can I choose which payment icons appear?
Yes. The Footer Toolkit shown in this tutorial provides individual checkboxes for selecting payment gateway icons.
Do payment icons improve Shopify conversions?
They may help reassure customers and communicate accepted payment methods, but conversion improvements aren’t guaranteed. Results depend on your store, customers, checkout experience, and other factors.
Is the payment icon feature free?
The provided app screenshot identifies the Footer Customizer as a Pro feature. Check the app’s current pricing before upgrading.
Can I add payment icons without changing my Shopify theme code?
Yes. The app uses a theme app embed to display the configured footer elements without requiring manual Liquid edits.
Conclusion
Adding payment icons to your Shopify footer is a simple way to make your storefront look more professional and help customers recognize the payment methods your business accepts.
With PA Powered By Remover, you can select payment icons, preview their appearance, and display them through Shopify’s theme editor without manually modifying theme code.
Whether your store accepts Visa, Mastercard, PayPal, Apple Pay, or other supported payment methods, keeping your footer accurate and well-organized contributes to a clearer shopping experience.
Want to customize your Shopify footer? Explore PA Powered By Remover on the Shopify App Store and get started with your payment icon settings.