How to Optimize Shopify Images for Speed and SEO
Let me start with a question that might make you a little uncomfortable.
When did you last think about the images on your Shopify store?
Not whether they look good. I’m sure they do.
But whether they’re actually optimized? Whether they’re loading fast enough? Whether Google can understand what they’re showing? Whether they’re helping your store rank or quietly hurting it?
If the honest answer is “never” or “I’m not really sure” you’re not alone.
Images are one of the most overlooked parts of Shopify SEO, and yet they’re one of the most impactful. Get them right and you’ll see improvements in your page speed, your search rankings, your Google Image Search visibility, and ultimately your sales. Get them wrong and they’ll drag down every other SEO effort you make.
The good news is that image optimization is not complicated once you know what to focus on. It’s just a set of specific things you need to do consistently.
So let’s go through all of it what it means to optimize your Shopify images, why each part matters, and exactly how to do it.
Why Images Have Such a Big Impact on Your Store
Before we get into the practical steps, let’s talk about why this even matters.
Images are almost always the heaviest files on any web page. Text is tiny in file size. Code is relatively small. But a single high resolution product photo can easily be several megabytes. And if you have ten of those on one product page, you’ve got a page that takes eight, ten, maybe even fifteen seconds to load on a mobile connection.
That’s a problem for two reasons.
First, Google has officially confirmed that page speed is a ranking factor. Slow pages rank lower. Simple as that. Google’s logic makes perfect sense if a page takes forever to load, it’s a bad experience for the user, and Google doesn’t want to send people to bad experiences.
Second, it kills your conversions. Every extra second of load time reduces the number of people who actually stay on your page long enough to buy something. If your product page takes five seconds to load and a competitor’s loads in two, a huge chunk of your potential customers are going to leave before they even see what you’re selling.
So image optimization is not just an SEO task. It’s a revenue task.
And then there’s the separate SEO benefit of making sure Google can actually understand what your images are showing so it can surface them in Google Image Search, which is a completely free source of traffic that well-optimized stores tap into regularly.
Start By Checking Where You Stand Right Now
Before you change anything, get a clear picture of your current situation.
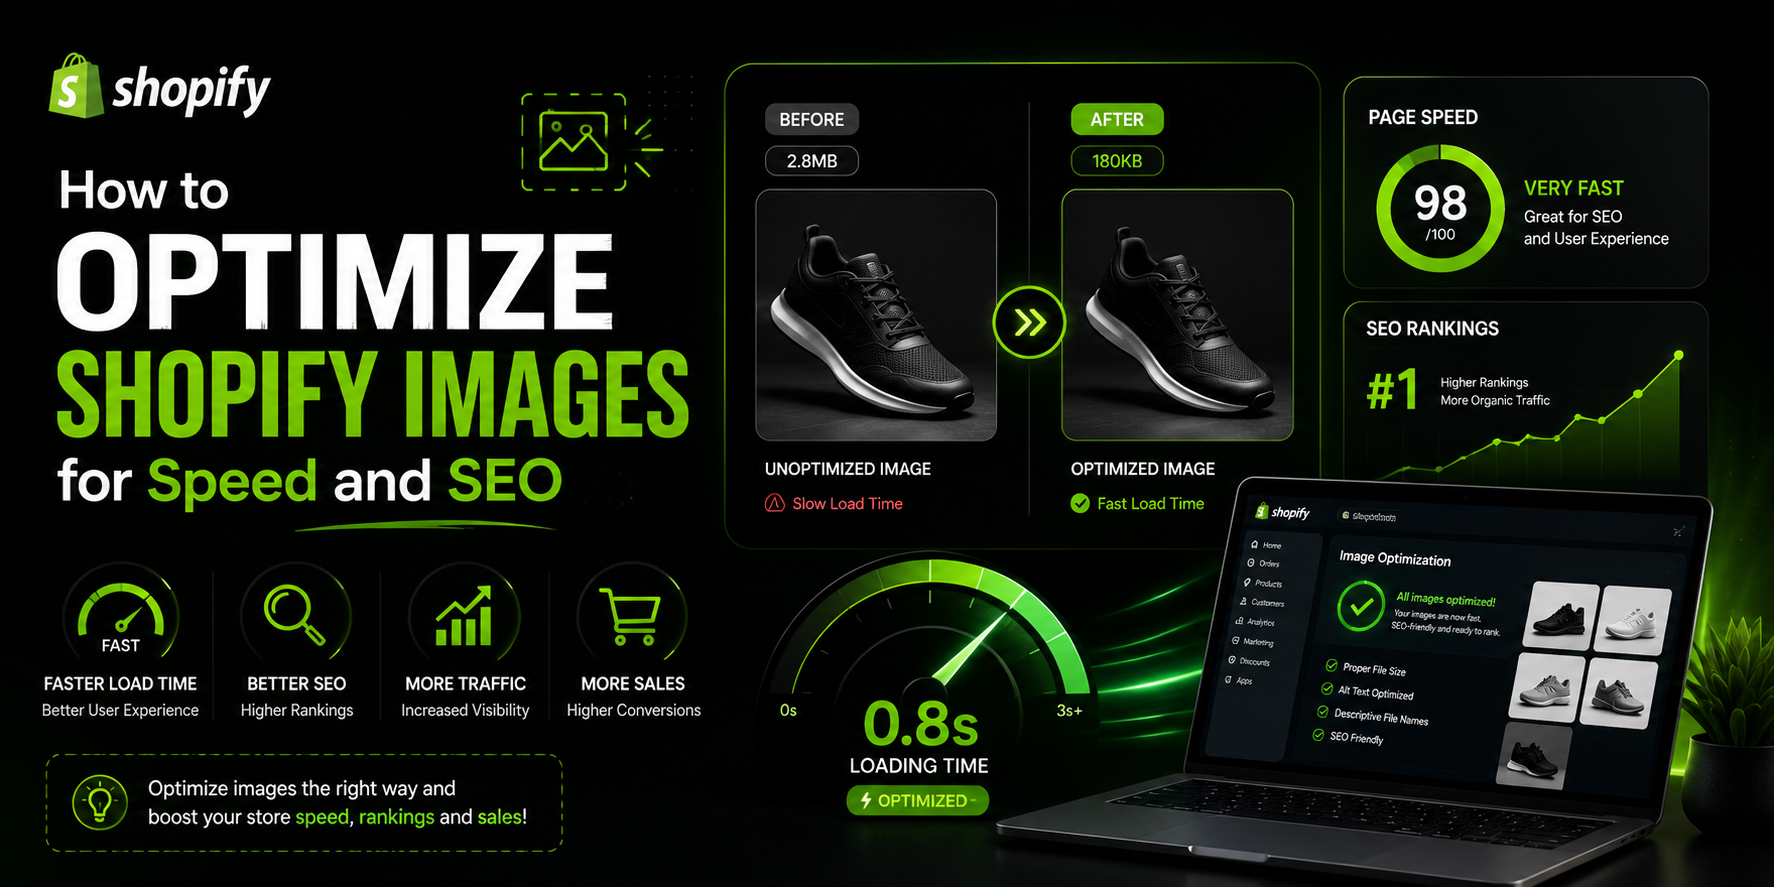
The best free tool for this is Google PageSpeed Insights. Go to pagespeed.web.dev and enter the URL of one of your product pages. It gives you a score out of 100 for both mobile and desktop performance, and it breaks down exactly what’s slowing your page down.
Pay close attention to the mobile score.
Desktop scores are almost always higher because desktop connections and processors are faster. But most of your customers are on their phones. And Google uses your mobile performance to determine your ranking. This is called mobile first indexing.
Here’s a rough guide to what the scores mean.
Below 50 means serious performance issues that need urgent attention.
Between 50 and 89 is okay but there’s meaningful room for improvement.
90 and above is where you want to be.
In the diagnostics section, look specifically for image related recommendations. Things like “serve images in next gen formats,” “properly size images,” “defer offscreen images,” or “efficiently encode images.” Each of those is telling you something specific about what needs fixing.
Take a screenshot before you make any changes. You’ll want a baseline to compare against after you’ve done the work.
File Size The Single Biggest Thing to Fix
If there’s one thing you take from this entire blog, make it this.
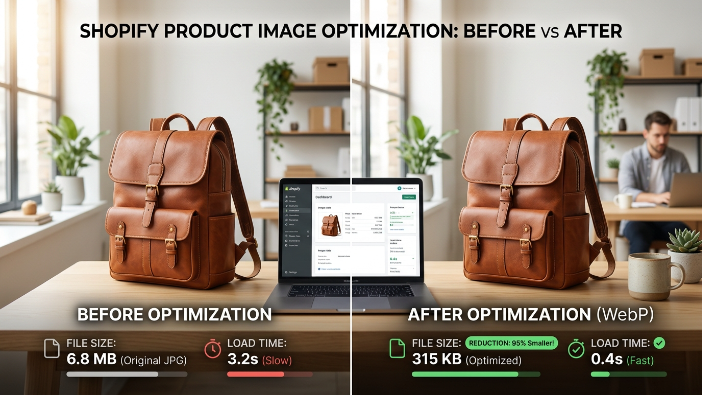
Your image file sizes are almost certainly too large. And reducing them is the single most impactful thing you can do for your page speed.
Most people upload images exactly as they come off a camera or out of a design tool full resolution, completely uncompressed, massive file sizes. A single raw product photo from a decent camera can easily be five to ten megabytes. Uploading that directly to Shopify is like strapping a weight to every visitor’s browsing experience and asking them to drag it with them.
The goal is to get your images down to the smallest file size possible while keeping them looking sharp.
For most product images, aim for somewhere between 100 and 300 kilobytes. For large homepage hero images, you might go up to around 500 kilobytes. Anything above that is generally too heavy.
The easiest free tool for compression is TinyPNG. You just drag your images onto the website and it compresses them, usually reducing file sizes by 60 to 80 percent with no visible quality loss. Squoosh is another excellent free option from Google that gives you more control over the settings.
If you’d rather handle this automatically inside Shopify, apps like TinyIMG, Crush.pics, or Avada SEO will compress your images as you upload them and can go back and compress your existing image library in bulk.
For most store owners, the automated app approach is more practical. But either way, the point is simple. Smaller files load faster, and faster pages rank higher and convert better.
Choosing the Right Image Format
PNG is better for images that need transparency like logos or icons, or images with sharp lines and text. PNG files tend to be larger than JPEGs for photos, so don’t use PNG for product photography unless you specifically need transparency.
File size also depends on the format you’re using. Different formats have very different characteristics.
JPEG is the best choice for product photography. It compresses well and looks great for photos with lots of colors and gradients. This should be your default format for product images.
WebP is a modern format developed by Google that gives you 25 to 35 percent smaller file sizes compared to JPEG at the same visual quality. The great news is that Shopify automatically converts your uploaded images to WebP when serving them to browsers that support it. Most modern browsers do. So this is largely handled for you in the background.
AVIF is even newer and compresses better than WebP. Browser support is growing fast and it will likely become the standard format within the next couple of years.
For now, the practical advice is this.
Upload your images as high-quality JPEGs for photos and PNGs for graphics with transparency. Compress them before uploading. And let Shopify handle the WebP conversion on its end.
Image Dimensions Don’t Upload Bigger Than You Need
Here’s a mistake that’s extremely common and completely unnecessary.
People upload images at much larger dimensions than they’ll ever be displayed at. A product image on most Shopify themes displays at around 800 to 1200 pixels wide. But the images people upload are often 3000, 4000, even 5000 pixels wide straight from a camera at full resolution.
When a browser loads a 4000 pixel image and displays it at 800 pixels, it still has to download the entire 4000 pixel file first. Then it scales it down for display. You’re forcing every visitor to download four or five times more data than they actually need.
It’s wasteful. And it’s slow.
The fix is simple. Resize your images to appropriate dimensions before uploading.
For standard Shopify product images, a good target is around 2000 by 2000 pixels. That’s large enough to look sharp on retina displays and support zoom functionality, but not so large that it wastes download time.
You can resize images using free tools like Preview on Mac, Paint on Windows, or online tools like PicResize. Most image optimization apps also handle resizing as part of their compression workflow, so if you’re using one of those you may be able to handle compression and resizing together in one step.
File Naming The SEO Step Almost Nobody Does
Here’s a free, zero-effort SEO improvement that the vast majority of Shopify store owners are completely missing.
When Google crawls your website, it reads everything it can to understand what each page is about. That includes your image file names.
And yet most people upload images called things like IMG 4832.jpg or photo 1.png or DSC00234.jpg. These names mean absolutely nothing to Google.
Renaming your images before you upload them is one of the simplest SEO wins available to you.
A good image file name is descriptive, uses your target keyword naturally, and separates words with hyphens rather than spaces or underscores.
So instead of IMG 4832.jpg, you’d use mens brown leather bifold wallet.jpg.
Instead of photo 1.png, you’d use organic green tea loose leaf 250g.png.
Think about what someone would type into Google if they were searching for a photo of this product. That’s essentially what your file name should be — clear, accurate, and relevant.
One important note. This needs to happen before you upload. Once an image is in Shopify, changing the filename is complicated. Build the habit of renaming images before uploading and you’ll never have to go back and fix it later.
Alt Text Telling Google What Your Images Actually Show
Alt text is a short description you add to each image that tells both search engines and visually impaired users what the image is showing.
It’s one of the most important parts of image SEO. And it’s also one of the most commonly skipped.
Here’s the thing. Google still can’t fully understand the contents of an image the way a human can. It relies on the surrounding text, the page context, and the alt text to figure out what an image is showing and what it’s relevant to.
If your images have no alt text, Google is guessing. Those guesses might be right. But they might also be wrong or incomplete.
Good alt text removes the guesswork entirely.
It also affects your visibility in Google Image Search. When someone searches for a product image and people do this regularly for things like home decor, fashion, food, and beauty Google uses alt text as one of its main signals for which images are relevant. Without alt text, your images are essentially invisible to those searches.
Writing good alt text is straightforward. Describe what the image actually shows. Include your target keyword naturally if it fits. Keep it concise usually one sentence is enough.
For a product photo of a blue ceramic coffee mug, something like “handmade blue ceramic coffee mug with a large handle on a wooden table” is perfect.
What you want to avoid is keyword stuffing. Writing “coffee mug blue mug ceramic mug handmade mug buy coffee mug online” is not alt text. It’s spam. Google can tell the difference and it can actually hurt your rankings.
In Shopify, you add alt text by going to the product in your admin panel, clicking on the image, and entering the description in the alt text field. It takes about thirty seconds per image. There’s really no excuse for skipping it.
Lazy Loading Making Your Pages Feel Faster Instantly
Lazy loading is a technique that changes when images load on your page.
Without it, every image on your page starts downloading the moment a visitor arrives even images that are way down at the bottom of the page that most people will never scroll to.
With lazy loading, only the images currently visible on screen load immediately. The rest load progressively as the visitor scrolls down.
This makes your page feel significantly faster from the moment someone lands on it. The content they can actually see loads almost instantly. Everything else loads quietly in the background as they engage.
Many modern Shopify themes have lazy loading built in already. To check if yours does, open a product page, scroll down slowly, and use your browser’s developer tools to watch the network requests. You should see images loading progressively rather than all at once.
If your theme doesn’t include it, apps like TinyIMG and Avada SEO both add lazy loading as part of their feature set. It’s one of those small improvements that takes almost no effort but creates a noticeably better experience for your visitors.
Responsive Images Serving the Right Size to Every Device
People are browsing your store on everything from small smartphones to large desktop monitors. A single image size doesn’t work perfectly for all of them.
If you serve a 2000-pixel-wide image to someone on a phone with a 400 pixel screen, you’re making them download five times more data than they need. But if you serve a 400-pixel image to someone on a large desktop monitor, it’ll look blurry.
Responsive images solve this by serving different sized versions of the same image to different devices. Mobile visitors get a smaller version. Desktop visitors get a larger one. Everyone gets the right size for their screen.
The good news is that Shopify handles most of this automatically. When you upload an image, Shopify generates multiple sizes and serves the appropriate one based on the visitor’s device.
However, older or custom-built themes sometimes don’t take full advantage of this. If your theme was built a few years ago, it might be requesting the same large image for all devices regardless.
A developer can check your theme’s image tags to make sure they’re using Shopify’s image sizing parameters correctly. If they’re not, it’s usually a quick fix that can have a meaningful impact on mobile load times.
Homepage and Banner Images These Need Extra Attention
Product images are the main focus for most stores. But homepage hero images and banner images deserve a separate mention because they often cause disproportionate speed problems.
These images are usually large, full-width, and visually dramatic. And because of that, they’re often the heaviest images on your entire store. A single unoptimized hero image can be five or ten megabytes and it’s the very first thing that loads when someone visits your store.
If that image is slow to load, your whole homepage is slow to load. And a slow homepage is one of the worst first impressions you can make on both visitors and on Google.
The same rules apply. Compress aggressively, resize to appropriate dimensions, name the file descriptively, add alt text. But the stakes are higher here because of how prominent these images are.
For homepage hero images, aim for around 500 kilobytes or less. That’s very achievable without sacrificing visual quality, and the loading difference compared to a two or three megabyte image is significant.
Auditing Your Existing Image Library
If your store has been live for a while, you probably have a whole library of images uploaded before you started thinking about optimization.
Going back and fixing all of those manually sounds like a nightmare. Doing it one by one would be.
But most Shopify image optimization apps can scan your existing library and apply compression in bulk automatically. TinyIMG, Crush.pics, and Avada SEO all have this feature. You run the bulk optimization once and the app works through your entire library for you.
For alt text, bulk editing is more nuanced because you want each image’s description to be accurate and unique. Apps that auto-generate alt text from product titles can help speed things up, but the results often need some manual review to make sure they’re actually describing the image well.
A practical approach is this.
Use an app to handle the bulk compression automatically. Then go through your most important product pages your best sellers, your highest margin items, your most searched-for products and manually write proper alt text for those first. Then work through the rest of your catalog over time.
You don’t need to fix everything in one day. Start where it matters most and expand from there.
Building Good Image Habits Going Forward
Here’s the mindset shift I want you to take away from this blog.
Image optimization shouldn’t be a one time cleanup project. It should become a standard part of how you add products to your store.
Every time you add a new product, rename the images before you upload them. Compress them to the right size. Set the dimensions appropriately. Write descriptive alt text after uploading. These steps add maybe five minutes to your product upload process but have a compounding positive effect on your store’s speed and SEO over time.
Build a simple checklist and keep it visible wherever you work on your store.
Something like this.
Resize images to around 2000 by 2000 pixels. Compress using TinyPNG or your chosen app. Rename files descriptively using your product keyword. Upload to Shopify. Add alt text to each image. Done.
Follow that checklist every single time, for every single product, and you’ll never have to do a big cleanup project again.
Measuring Your Progress
Once you’ve done the optimization work, actually measure whether it’s making a difference.
Go back to PageSpeed Insights and run the same product pages you tested at the beginning. Compare your new scores against your baseline. After properly compressing and resizing your images, you should see a meaningful improvement especially on mobile.
Also check Google Search Console a few weeks after making your changes. Look at the Core Web Vitals report under the Experience section. Core Web Vitals are Google’s official metrics for page experience, and several of them are directly affected by image optimization particularly Largest Contentful Paint, which measures how quickly the main visual content of a page loads.
If your Core Web Vitals scores improve, that’s a direct positive signal to Google about your store’s quality. And that signal shows up in your rankings.
Keep an eye on your organic traffic too. Improved page speed and better image SEO can open up new traffic from Google Image Search that you weren’t getting before, and that shows up as a real increase in visitors to your store.
Final Thoughts
Image optimization is one of those areas of Shopify SEO where the effort to impact ratio is genuinely excellent.
You don’t need advanced technical knowledge. You don’t need a big budget. You just need to understand a handful of key principles and apply them consistently.
Compress your images before uploading. Get the dimensions right. Use descriptive file names with your target keywords. Write unique, natural alt text for every image. Enable lazy loading. Let Shopify handle the responsive serving and WebP conversion. Audit your existing library with a good app. And build these habits into your standard process going forward.
Every one of those steps is manageable.
And together they add up to a faster store, better rankings, more visibility in Google Image Search, and a better experience for every customer who visits.
In a world where most of your competitors are still uploading five-megabyte uncompressed images with filenames like DSC00234.jpg and zero alt text, doing this properly is a genuine competitive advantage.