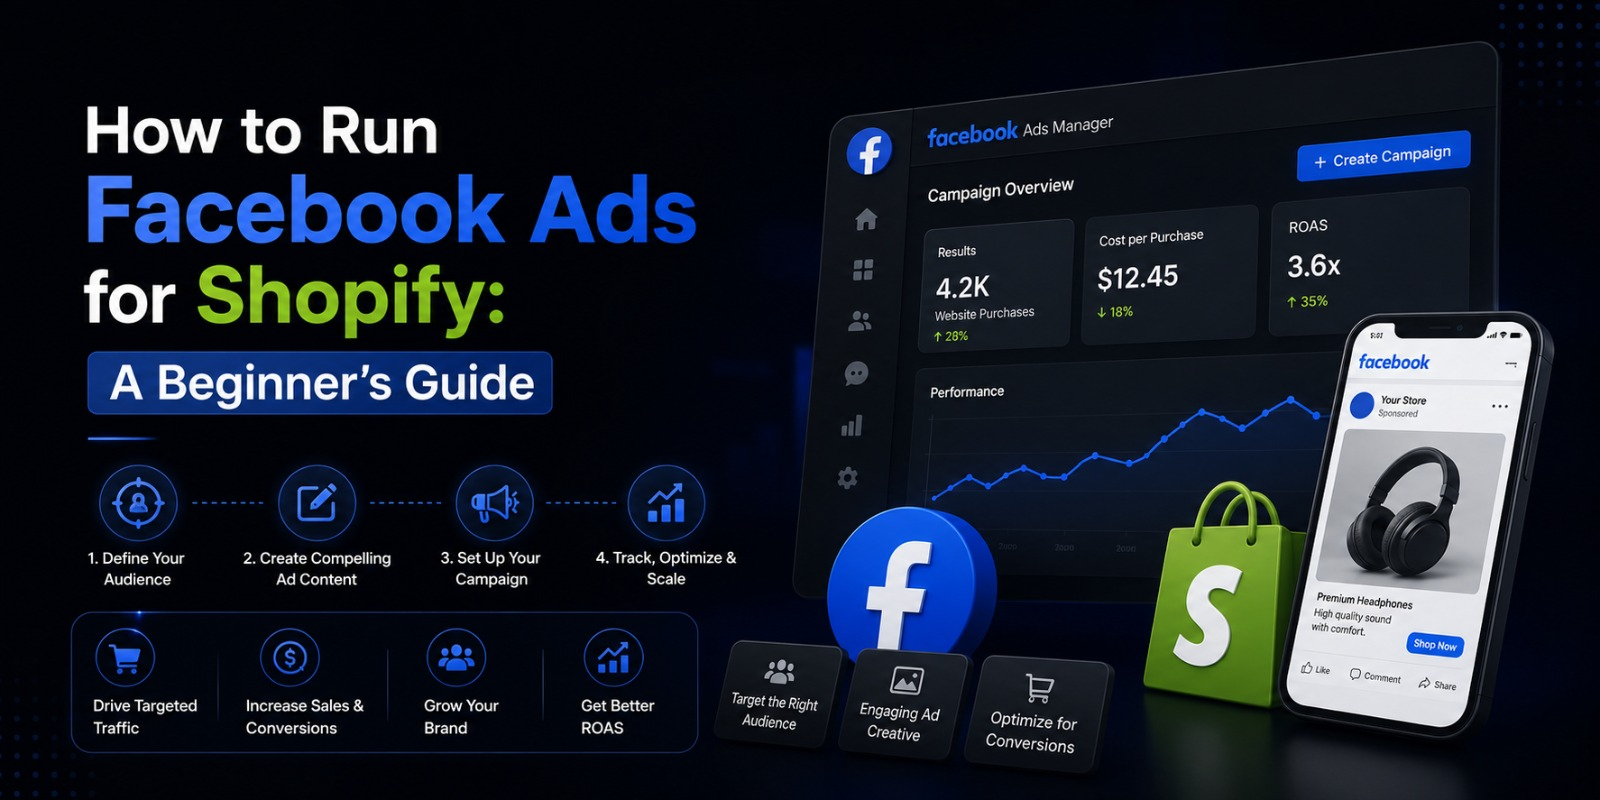
How to Run Facebook Ads for Shopify: A Beginner’s Guide
If you’ve been relying only on organic traffic to grow your Shopify store, you already know how slow and unpredictable that can be.
SEO takes months. Social media reach keeps shrinking. Word of mouth is great but you can’t control it.
Facebook Ads are different. You can turn them on today and have real customers seeing your products within hours. You control who sees your ads, how much you spend, and exactly what message you put in front of them.
But if you’ve never run Facebook Ads before, the platform can feel overwhelming. There are campaigns, ad sets, audiences, pixels, objectives, placements, creatives — and if you set things up wrong, you can burn through your budget fast without a single sale to show for it.
This guide is going to walk you through everything from scratch. By the end, you’ll know exactly how to set up and run Facebook Ads for your Shopify store the right way.
Why Facebook Ads Work So Well for Shopify Stores
Before we get into the how, it’s worth understanding why Facebook Ads are so powerful for e commerce specifically.
Facebook has over three billion active users. More importantly, it has years of behavioral data on all of them what they like, what they buy, what they search for, what content they engage with. That data is what makes Facebook’s targeting so precise.
You’re not just running ads and hoping the right people see them. You’re choosing exactly who sees them based on age, location, interests, purchase behavior, and a dozen other factors.
For Shopify stores, this is enormous. You can put your product directly in front of people who are already interested in what you sell. Someone who follows fitness accounts, shops for activewear, and has recently browsed athletic brands online can see your fitness apparel ad today.
That level of targeting is why Facebook Ads consistently deliver strong returns for e commerce when done correctly.
And with Shopify’s direct integration with Meta, the setup is cleaner and more powerful than ever.
Step One: Set Up Meta Business Suite
Before you run a single ad, you need to get your business infrastructure in place on Meta’s side.
Go to business.facebook.com and create a Meta Business Suite account if you don’t have one. This is the central hub where you manage your Facebook Page, Instagram account, ad account, pixel, and everything else related to running ads.
Inside Business Suite, make sure you have:
A Facebook Business Page for your store. This is required to run ads you can’t run them from a personal profile. If you don’t have a Page yet, create one. Add your logo, fill out your business information, and make it look professional.
An Ad Account. Your Business Suite comes with a default ad account. Add your payment method here credit card, debit card, or PayPal. Without a payment method, you can’t run anything.
Instagram connected. If you want your ads to also run on Instagram and you should connect your Instagram business account inside Business Suite.
Once this is set up, you have the foundation everything else is built on.
Step Two: Install the Meta Pixel on Your Shopify Store
The Meta Pixel is a small piece of code that sits on your Shopify store and tracks what visitors do. It tells Facebook when someone views a product, adds something to their cart, starts checkout, or completes a purchase.
This data is what makes Facebook Ads so powerful for Shopify. Without the pixel, you’re flying blind. With it, Facebook knows exactly which ads are driving real purchases and can automatically optimize to show your ads to more people like those buyers.
Here’s how to install it:
Go to your Shopify admin. Click on Sales Channels and add Facebook as a channel if you haven’t already. Follow the prompts to connect your Facebook account and your Meta Business Suite.
Inside that setup flow, Shopify will automatically install the Meta Pixel on your store. You don’t need to touch any code.
Once it’s installed, go to Meta Events Manager inside Business Suite and confirm the pixel is firing correctly. You should see events coming in page views, product views, add to carts within a few minutes of visiting your store.
Make sure you also set up Conversions API alongside the pixel. This is Meta’s server side tracking tool that captures purchase data even when browser privacy settings would normally block the pixel. Shopify supports this natively through the Facebook Sales Channel. Together, the pixel and Conversions API give you the most complete and accurate tracking possible.
Don’t skip this step. Good data is the foundation of profitable Facebook Ads.
Step Three: Sync Your Shopify Product Catalog
If you’re going to run product focused ads which you absolutely should be as a Shopify store owner you need your product catalog connected to Facebook.
When your catalog is synced, Facebook can automatically pull your product images, titles, prices, and links and use them in your ads. This powers dynamic ads, which are one of the most effective ad formats for e commerce.
To sync it, go to your Facebook Sales Channel in Shopify and follow the catalog connection steps. Shopify will push your product feed to Meta automatically and keep it updated whenever you make changes to your products.
Once the catalog is live in Meta’s Commerce Manager, you can see all your products there and start using them in your ad campaigns.
Step Four: Understand the Campaign Structure
Facebook Ads are organized in three levels. Understanding this structure makes everything else much clearer.
Campaigns are at the top level. This is where you choose your objective what you want the ad to achieve. Are you trying to drive purchases? Get people to visit your website? Build brand awareness? The objective you choose tells Facebook’s algorithm what to optimize for.
For a Shopify store focused on sales, you almost always want to choose the Sales objective. This tells Facebook to show your ads to people most likely to buy.
Ad Sets sit inside campaigns. This is where you define your audience, your budget, your schedule, and your placements. You can have multiple ad sets inside one campaign, each targeting a different audience.
Ads sit inside ad sets. This is the actual creative the image or video, the headline, the copy, and the call-to-action button. You can have multiple ad versions inside one ad set to test which performs best.
Campaign → Ad Set → Ad. Remember that structure. Every decision you make in Facebook Ads fits into one of those three levels.
Step Five: Choose the Right Campaign Objective
When you create a new campaign, the first thing Facebook asks is what your objective is.
For most Shopify store owners running ads for the first time, here’s what you need to know about the most relevant objectives.
Sales is the objective you want for driving purchases. Facebook will show your ad to people most likely to complete a purchase on your website. This requires your pixel to have some conversion data ideally at least 50 purchases in the past 30 days for the algorithm to optimize well. If you’re brand new, you might need to build up that data first.
Traffic sends people to your website. It’s less focused on buyers specifically but can be useful early on to start generating pixel data when you don’t have purchase history yet.
Engagement optimizes for likes, comments, and shares. This is for building social proof and brand awareness rather than direct sales.
For a Shopify store focused on revenue, start with the Sales objective and Purchase as your conversion event. If your pixel is too new to optimize for purchases, start with Traffic or Add to Cart as your conversion event until you’ve built up enough data.
Step Six: Build Your Audience
This is where most beginners either get it right and see great results, or get it wrong and wonder why their ads aren’t working.
Facebook gives you several types of audiences to work with.
Core Audiences (Interest Based Targeting)
This is what most beginners start with. You build an audience based on demographics, interests, and behaviors.
You can target people by age, gender, and location. You can layer in interests if you sell fitness products, you might target people interested in fitness, gym workouts, health and wellness, and specific fitness brands.
The key is not to go too narrow or too broad. A hyper-narrow audience of 50,000 people doesn’t give Facebook’s algorithm enough room to optimize. An audience of 50 million is too scattered to be cost-effective. For most Shopify stores starting out, aim for an audience size between 500,000 and 5 million.
Custom Audiences
Custom audiences are built from your own data people who have already interacted with you in some way.
Website visitors anyone who visited your store in the past 30, 60, or 90 days.
Past customers you can upload your customer email list and Facebook matches them to profiles.
Video viewers people who watched a certain percentage of your videos on Facebook or Instagram.
These audiences tend to convert much better than cold interest-based audiences because they already know who you are. They’re warm. Use them for retargeting campaigns.
Lookalike Audiences
Lookalike audiences are one of the most powerful tools Facebook offers. You take one of your Custom Audiences say, your past purchasers and tell Facebook to find other people who look similar to those buyers.
Facebook analyzes hundreds of data points about your existing customers and finds new people who share the same patterns. A 1% Lookalike of your purchasers is your most qualified cold audience because it’s based on the actual behavior of people who already bought from you.
For a new store without much customer data yet, a Lookalike of your website visitors or email subscribers still works well as a starting point.
Step Seven: Set Your Budget
Budget is always one of the first questions beginners ask. How much do I need to spend?
The honest answer is that it depends on what you’re selling and what your margins look like. But here’s a practical starting framework.
For testing new campaigns and audiences, start with a budget of $10 to $20 per day per ad set. This gives Facebook enough data to start optimizing without risking a large amount before you know what works.
Don’t judge a new campaign in the first 24 or 48 hours. Facebook’s algorithm goes through a learning phase when you launch something new it’s experimenting to find the best people to show your ad to. This learning phase typically requires around 50 optimization events (add to carts or purchases, depending on your conversion event) before the algorithm stabilizes. Give it at least 5 to 7 days before making major changes.
Once you find something that works a campaign that’s delivering profitable sales then you scale the budget. Increase it gradually. A 20% budget increase every few days is a safe scaling pace. Jumping from $20 a day to $200 a day overnight can disrupt the learning phase and tank your results.
Daily budget vs. lifetime budget. Daily budget gives you consistent spending every day. Lifetime budget lets Facebook distribute spending across your whole campaign period, which can be useful for promotions with a set end date.
For most ongoing campaigns, daily budget is simpler and easier to manage.
Step Eight: Create Your Ad
Now the part most people focus on first the actual ad creative.
Here’s something important to understand. Your creative the image or video and the copy is the most important variable in your Facebook Ads. Better targeting can improve your results incrementally. Better creative can improve them dramatically.
Images vs. Video
Both work. Video generally gets higher engagement and tends to perform well in the awareness and consideration phase. Strong product images or lifestyle photos work very well for conversion focused campaigns.
For a beginner, start with both and test. A simple product photo with a clean background, a lifestyle image showing the product in use, and a short video demonstration give you three ad versions to compare.
Writing Ad Copy That Works
Your copy needs to stop the scroll, connect with the reader, and give them a clear reason to click.
Lead with the benefit, not the feature. Don’t say “Our moisturizer contains hyaluronic acid.” Say “Wake up to softer, plumper skin every single morning.”
Speak directly to the person you’re targeting. If you’re targeting new moms with a baby product, your copy should feel like it’s written specifically for a new mom not for everyone.
Include a clear call to action. Shop now. Get yours today. Claim your discount. Tell people exactly what to do next.
Keep it readable. Short sentences. Simple words. White space. People skim ads on their phones don’t write a wall of text.
Headlines
Your headline appears below the image or video. It should reinforce your key message or offer. If you’re running a promotion, lead with it in the headline. “Free shipping on orders over $50” or “Limited time: 20% off your first order” are clear and compelling.
Call to Action Button
Choose the button that matches your goal. For product sales, “Shop Now” is the standard. “Learn More” works well for higher consideration products where people need more information before buying.
Step Nine: Choose Your Placements
Placements are where your ads actually show up Facebook feed, Instagram feed, Stories, Reels, Messenger, the Audience Network, and more.
Facebook’s default setting is Advantage+ placements, which lets the algorithm automatically decide where to show your ads across all available placements to get the best results at the lowest cost.
For beginners, leaving it on Advantage+ is generally fine and often performs well because it gives the algorithm maximum flexibility.
If you want more control, you can manually select placements. Most e commerce advertisers find the Facebook feed, Instagram feed, and Stories to be the most consistently effective placements for product focused ads.
Avoid the Audience Network (ads on third party apps and websites) if you’re managing budget carefully it can drive cheap traffic that doesn’t convert.
Step Ten: Use Retargeting to Recover Lost Sales
Here’s one of the most important things to understand about Facebook Ads for e commerce.
Most people who visit your store for the first time don’t buy. They browse, they get distracted, they leave. Studies consistently show that over 95% of first-time website visitors don’t convert.
Retargeting is how you bring them back.
A retargeting campaign shows ads specifically to people who have already visited your store, viewed a specific product, or added something to their cart but didn’t check out.
These people already know your brand. They showed interest. They just needed another nudge or they got distracted and forgot. A well timed retargeting ad showing the exact product they were looking at is often all it takes to close that sale.
Set up retargeting campaigns using Custom Audiences. Create an audience of people who visited your website in the last 14 or 30 days. Create a separate audience of people who added to cart but didn’t purchase. These are your hottest audiences and they almost always have the lowest cost per purchase of any campaign you run.
For retargeting creative, dynamic product ads work extremely well. Because your catalog is synced to Facebook, it can automatically show each person the exact product they viewed or carted on your site. No manual setup for each product it all pulls from your catalog automatically.
Make your retargeting ads feel different from your cold traffic ads. These people have already seen your brand. Lean into social proof reviews, testimonials, star ratings. Add urgency limited stock, a time sensitive offer. Remind them what they were looking at and give them a reason to come back and finish what they started.
Step Eleven: Track Your Results and Know Your Numbers
Running ads without tracking your results is just burning money. You need to know what’s working and what isn’t so you can make smart decisions about where to put your budget.
Here are the key metrics to pay attention to.
ROAS Return on Ad Spend. This is the most important number. It tells you how much revenue you’re generating for every dollar spent on ads. A ROAS of 3x means you made $3 for every $1 spent. What counts as a good ROAS depends on your margins if you have high margins, a 2x ROAS might be profitable. If your margins are thin, you might need 4x or 5x.
CPC Cost Per Click. How much you’re paying every time someone clicks your ad. Lower CPC usually means your creative is resonating with your audience.
CTR Click Through Rate. The percentage of people who see your ad and click it. A higher CTR means your ad is stopping people and getting them interested. A low CTR usually means your creative or copy needs work.
CPM Cost Per Thousand Impressions. How much it costs to show your ad to 1,000 people. This is influenced by your audience, your placement, and how competitive the auction is at a given time.
Cost Per Purchase. The most direct measure of campaign profitability. How much did it cost you in ad spend to generate one purchase? Compare this to your average order value and your margins to know if the campaign is profitable.
Check your numbers in Ads Manager regularly at least every couple of days when you’re starting out. Look for ad sets or individual ads that are spending without delivering results. Pause those. Identify what’s performing and put more budget behind it.
Common Mistakes Beginners Make
Knowing what to avoid is just as valuable as knowing what to do.
Changing things too fast. A lot of beginners turn off a campaign after two days because they haven’t seen sales yet. Facebook’s algorithm needs time to learn. Give new campaigns at least 5 to 7 days before making major changes or shutting them down.
Testing too many things at once. If you change your audience, your creative, and your copy all at the same time, you have no idea which change made the difference. Test one variable at a time.
Ignoring creative. Many beginners obsess over audience targeting and barely think about the ad itself. Great creative is the single biggest driver of Facebook Ad performance. Invest time in making your images and videos genuinely good.
Skipping the pixel setup. Running Facebook Ads without the pixel installed means you have no conversion tracking and Facebook can’t optimize for purchases. Always set up the pixel first.
Going too broad or too narrow. Both extremes hurt performance. Too broad and your budget gets wasted on completely irrelevant people. Too narrow and the algorithm doesn’t have room to find buyers.
Scaling too fast. Doubling or tripling your budget overnight disrupts the learning phase and often tanks results. Scale gradually.
A Simple Starting Plan for New Shopify Advertisers
If you’re starting from zero, here’s a simple approach to follow.
In week one, set up your Meta Business Suite, install the pixel, and sync your product catalog. Create one cold traffic campaign using the Sales objective targeting an interest-based audience relevant to your products. Set your budget at $15 to $20 per day and run three ad variations one product image, one lifestyle image, and one short video if possible.
In week two, review performance data. Which ad variation got the most clicks and lowest CPC? Let that inform what you create next. Keep the best performer running and pause the weakest.
In week three, set up your first retargeting campaign targeting website visitors from the past 30 days. Use dynamic product ads. Set a separate budget for this even $5 to $10 per day here often delivers strong returns because the audience is so warm.
In week four, if you have enough purchase data, create a Lookalike Audience based on your purchasers and launch a new cold traffic campaign to that audience. Compare its performance to your interest-based audience.
From there, you keep testing, learning, and scaling what works.
Final Thoughts
Facebook Ads are one of the most powerful tools available to Shopify store owners. They let you reach exactly the right people, at scale, with a message that’s built for them.
But they reward patience and learning. The stores that win with Facebook Ads aren’t necessarily the ones with the biggest budgets. They’re the ones that test consistently, pay attention to their numbers, and keep improving their creative.
Start with the right setup. Install your pixel. Sync your catalog. Launch one simple campaign. Learn from the data. Build from there.
Every successful Shopify advertiser started exactly where you are right now. The difference is they started.