How to Set Up Shipping Rates on Shopify
If you’ve ever stared at the Shopify shipping settings and thought “where do I even start” this blog is for you.
Setting up shipping rates sounds technical, but once you understand how it works, it’s actually pretty straightforward. And getting it right from the beginning saves you a lot of headaches down the road.
Let’s walk through the whole thing together.
Why Your Shipping Rates Matter So Much
Before we get into the how, let’s talk about the why.
Your shipping rates show up at checkout. That moment when a customer sees the shipping cost is one of the most critical points in the entire buying journey. Studies consistently show that unexpected shipping costs are the number one reason people abandon their carts.
So your rates aren’t just a logistics setting. They’re a sales tool. Get them right and you’ll see more completed orders. Get them wrong and you’ll lose customers who were ready to buy.
Step One: Get to Your Shipping Settings
Log into your Shopify admin. On the left sidebar, scroll down and click on Settings. Then click Shipping and Delivery.
This is your shipping headquarters. Everything zones, rates, carriers, fulfillment lives here.
The first section you’ll see is Shipping. Under that, you’ll find your shipping profiles. By default, Shopify gives you a General shipping profile that applies to all your products. You can also create custom profiles for specific products that ship differently more on that later.
Step Two: Set Your Shipping Origin
Your shipping origin is the address your packages ship from. Shopify uses this to calculate carrier rates and generate labels.
If you haven’t set this yet, do it now. Go into your shipping profile and make sure the origin address is correct. If you’re shipping from multiple locations like a warehouse and a home office you can add multiple origins.
Getting this right matters especially if you’re using calculated carrier rates because the distance from your origin to the customer’s address directly affects the price.
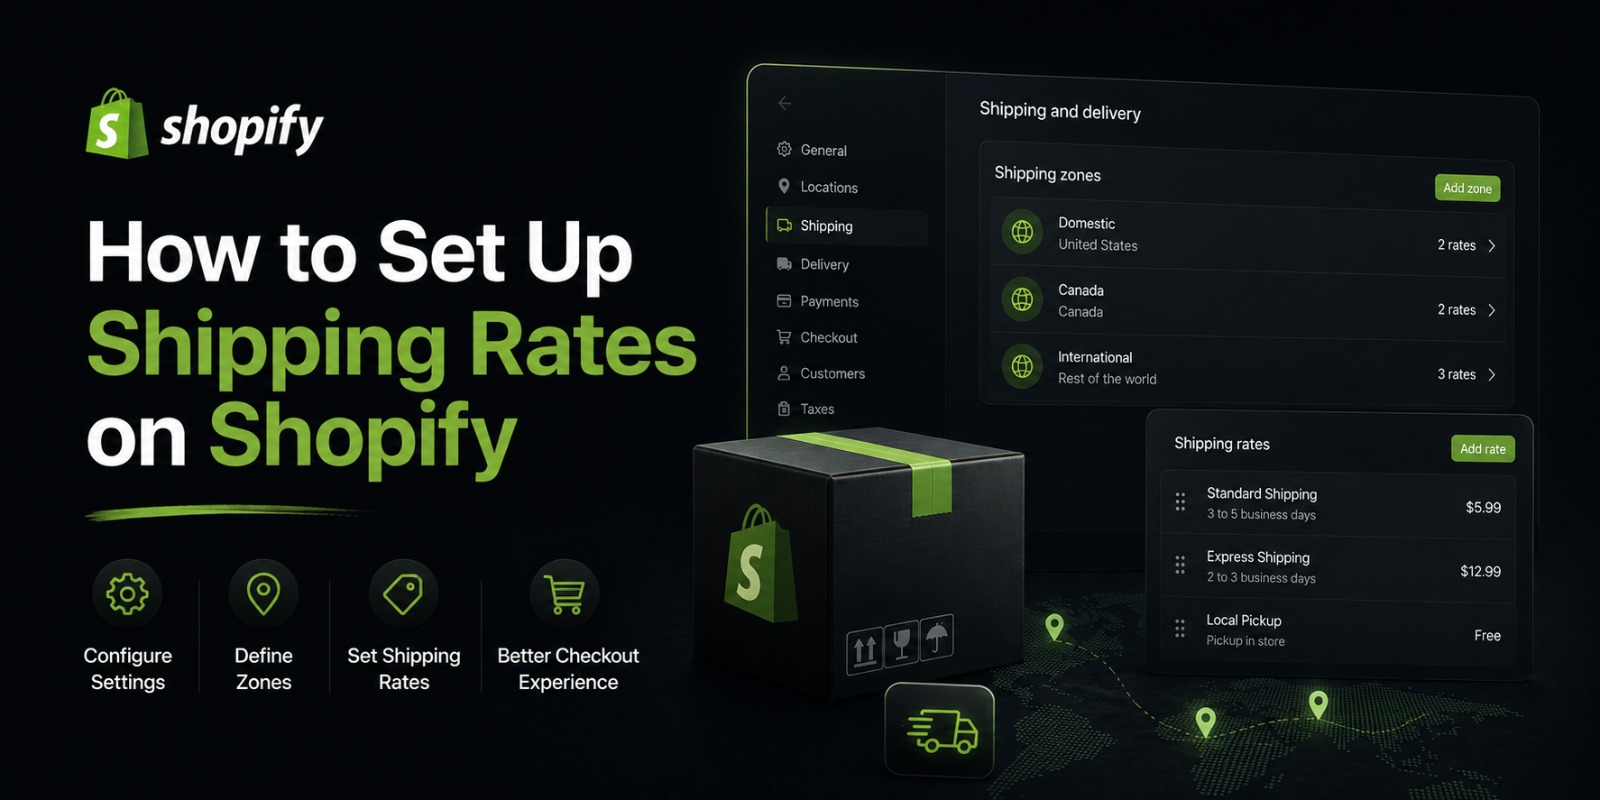
Step Three: Create Your Shipping Zones
A shipping zone is a group of countries or regions that share the same shipping rates. You need at least one zone before you can add any rates.
Click on your General shipping profile and you’ll see the option to add zones.
Think about where your customers are. If you only sell locally, you might just need one zone. If you sell across your whole country, create a domestic zone. If you ship internationally, create separate zones for different regions one for Europe, one for the Middle East, one for North America, and so on.
Give each zone a clear name so you know exactly what it covers. “Pakistan Domestic,” “Gulf Countries,” “UK and Europe” — whatever makes sense for your business.
You can add as many countries or regions to a zone as you want. And you can create as many zones as you need.
Step Four: Add Shipping Rates to Each Zone
Once your zones are set up, it’s time to add rates inside each one. Click on a zone and then click Add Rate.
This is where you choose what kind of rate you want to use. Let’s go through every option.
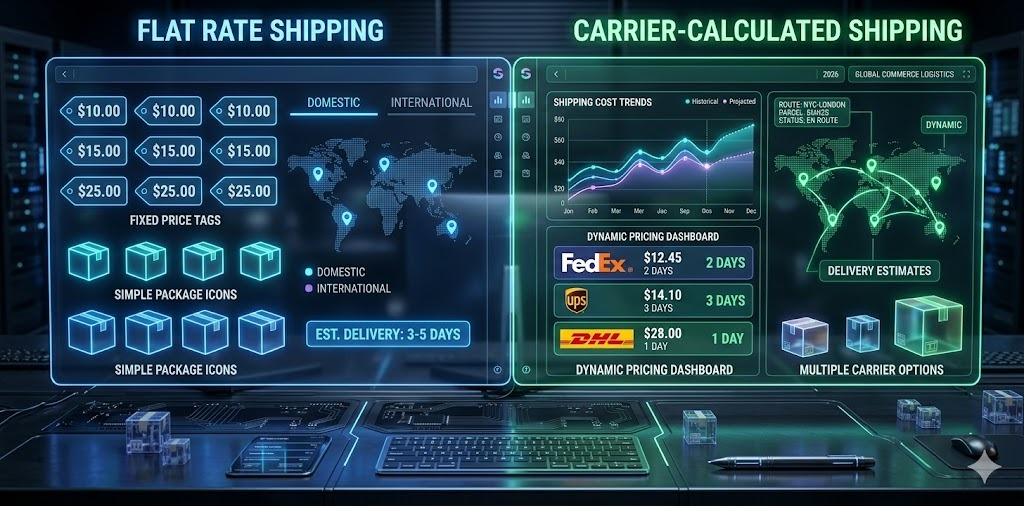
Flat Rate Shipping
A flat rate means every customer in that zone pays the same shipping fee regardless of what they order or how heavy it is.
For example, you set a flat rate of $4 for all domestic orders. Whether someone orders one t-shirt or five, they pay $4.
Flat rates are simple and predictable. Customers like knowing upfront what they’ll pay. You like not having to think about it on every order.
The downside is that flat rates can be too low for heavy orders meaning you lose money or too high for light orders meaning customers feel overcharged. You need to find a middle ground that works for your average order.
To set up a flat rate, click Add Rate, give it a name like “Standard Shipping,” enter the price, and save. Done.
Free Shipping
Free shipping is the most powerful conversion tool you have. Customers love it. And it’s easier to offer than most people think.
You don’t actually absorb the cost — you build it into your product prices. If shipping costs you $5 on average, you add $5 to your product price and offer free shipping. The customer pays the same total, but seeing “$0 shipping” at checkout feels like a win to them.
To set up free shipping, click Add Rate, name it “Free Shipping,” and set the price to $0.
But here’s where it gets smart. You can add a condition to your free shipping rate specifically a minimum order value. Set it to trigger only when the order is above a certain amount.
So instead of offering free shipping on everything, you say “Free shipping on orders over $60.” Customers who are close to that threshold will often add one more item just to qualify. This increases your average order value automatically.
To add a condition, toggle on “Add conditions” when creating the rate and select “Based on order price.” Enter your minimum amount and save.
Weight Based Rates
Weight based rates let you charge different amounts depending on how heavy the order is.
This makes sense for stores selling products with very different weights. A customer ordering one lightweight item pays less than a customer ordering five heavy ones.
You can set up multiple weight tiers. For example:
0–0.5 kg: $3
0.5–2 kg: $6
2–5 kg: $10
5 kg and above: $15
To set this up, click Add Rate, set a name, toggle on “Add conditions,” and select “Based on item weight.” Set your minimum and maximum weight and enter the corresponding price.
Create a new rate for each weight bracket. Shopify will automatically apply the right rate based on the total weight of the order.
Price Based Rates
Similar to weight-based, but the rate changes based on the order value instead of weight.
You might charge $5 for orders under $30 and $3 for orders between $30 and $60 — and free for orders above $60. This rewards bigger spenders and encourages higher order values.
Setting this up works the same way. Click Add Rate, add conditions based on order price, and set the price for each bracket.
Calculated Carrier Rates
Calculated rates pull real time pricing from actual shipping carriers USPS, UPS, FedEx, DHL, Canada Post — based on the package weight, dimensions, and the customer’s location.
The customer sees exactly what the carrier charges, not a number you made up. This is the most accurate and transparent option.
To use calculated rates in Shopify, you need to be on the Shopify plan or higher. Once you’re on the right plan, click Add Rate and select “Use carrier or app to calculate rates.” Choose your carrier and enter your package dimensions and default weight.
A few things to keep in mind with calculated rates. First, you need to make sure your products have accurate weights entered in Shopify otherwise the calculated rate will be off. Go to each product and fill in the weight field under Shipping.
Second, you can add a handling fee on top of the calculated rate to cover packaging costs. Even $0.50 or $1 per order adds up and covers your materials.
Third, calculated rates can sometimes feel unpredictable to customers because the price varies. Some shoppers prefer the certainty of a flat rate. Test both and see what works better for your audience.
Step Five: Set Up Shipping Profiles for Specific Products
Not all products ship the same way. A small piece of jewelry ships very differently from a large piece of furniture.
Shopify lets you create custom shipping profiles for specific products. Inside your Shipping and Delivery settings, scroll down to where it says “Custom shipping” and click Create new profile.
Give the profile a name, add the products it applies to, and then set up zones and rates specifically for those products. This profile overrides the general profile for the products you assign to it.
This is really useful when you have oversized items that cost more to ship, fragile products that need special handling, or products that ship from a different location than your main inventory.
Step Six: Set Up Local Delivery and Pickup
If you serve customers in your local area, Shopify has two more options worth setting up local delivery and local pickup.
For local delivery, scroll down in your Shipping and Delivery settings to the Local Delivery section. Turn it on and set your delivery area. You can define the area by distance radius or by specific zip or postal codes. Set your delivery fee or offer it free. You can also set a minimum order requirement.
For local pickup, scroll to the In Store Pickup section. Turn it on and select which locations offer pickup. Customers who choose this option won’t be charged for shipping at all. Shopify sends them a notification when their order is ready.
These two options are perfect for small businesses, local brands, or stores with a physical presence.
Step Seven: Add Rates for International Shipping
If you ship outside your home country, you need separate zones and rates for international orders.
Go back to your shipping profile and create a new zone for each international region you ship to. Add the countries, then add the rates.
For international shipping, calculated carrier rates work really well because pricing varies so much by destination. You can use DHL Express, FedEx International, or other international carriers depending on what Shopify has available in your region.
You’ll also want to think about customs and duties. When a package crosses a border, the customer may be charged import duties or taxes by their country’s customs authority. Make sure your product listings have accurate product descriptions and HS codes Shopify has a field for this in your product settings under Shipping.
Being clear about duties at checkout avoids nasty surprises for your customers and reduces disputes.
Step Eight: Test Your Shipping Rates
Once everything is set up, don’t just assume it works. Test it.
Go to your storefront and add products to your cart. Go through the checkout process using different addresses a local one, a domestic one, and an international one if applicable. See what rates appear and make sure they look right.
Shopify also has a built-in rate calculator in the admin. Go to your shipping profile and look for the option to preview rates. Enter an address and package details and see what would be charged.
If something looks off — wrong rate showing, no rate showing, or an error — go back into your settings and double-check your zones, conditions, and rate setup.
Common Mistakes to Avoid
Let’s talk about a few things that trip people up.
The first mistake is leaving the weight field blank on products. If you’re using weight-based or calculated rates, Shopify needs accurate product weights. If the weight is zero, the rate calculation breaks. Fill in weights for every product you sell.
The second mistake is forgetting to add a rest of the world zone. If you don’t create a zone for certain countries, customers from those countries won’t see any shipping options at checkout and they simply can’t complete their order. To avoid this, create a “Rest of World” zone and add at least one rate to it.
The third mistake is setting rates that don’t cover your actual shipping costs. Run the numbers before you go live. What does it actually cost you to ship a typical order? Make sure your rates at minimum cover that.
The fourth mistake is making checkout confusing with too many rate options. Giving customers five different shipping tiers with confusing names creates decision paralysis. Keep it simple — two or three options max.
The fifth mistake is never revisiting your rates after setting them up. Carrier prices go up. Your product mix changes. Your average order size shifts. Review your shipping rates every few months and adjust as needed.
How to Name Your Shipping Rates
This sounds like a small thing but it actually matters. The name of your shipping rate is what customers see at checkout.
“Rate 1” tells them nothing. “Standard Shipping (5–7 business days)” tells them exactly what to expect.
Always include the estimated delivery timeframe in your rate name. Customers care a lot about when their order will arrive, and giving them that information upfront reduces anxiety and builds trust.
Good rate names look like this:
Standard Shipping (5–7 Business Days)
Express Shipping (2–3 Business Days)
Free Shipping (7–10 Business Days)
Same Day Local Delivery
Bad rate names look like this:
Shipping Option A
Rate 1
Default
Take the extra thirty seconds to write a clear, informative rate name.
Offering Multiple Speed Options
One strategy that works really well is offering multiple shipping speeds at different price points.
Give customers a standard option that’s affordable and an express option that’s faster but costs more. Some customers will always pick the cheapest option. Others are happy to pay more to get their order quickly.
This way you’re not leaving money on the table from customers who want speed, and you’re not alienating price-sensitive customers either.
Using Shopify’s Shipping Discounts
If you’re on a paid Shopify plan and you’re in the US, Canada, or Australia, you get access to pre-negotiated discounted carrier rates through Shopify Shipping. These are rates you’d never get on your own as a small business.
These discounted rates apply automatically when you buy labels through Shopify. You don’t need to set up a separate account with USPS or UPS — it’s all built in.
The discounts can be significant — sometimes up to 88% off standard retail rates. So even if you’re offering free shipping to customers, you’re paying much less on the back end than you would walking into a post office.
Connecting Third Party Shipping Apps
If you need more flexibility than Shopify’s built-in options provide, you can connect third party apps to handle your shipping rates.
Apps like ShipStation, Shippo, EasyPost, and Easyship connect to Shopify and give you access to more carriers, better rate comparison tools, and more advanced shipping logic.
To connect these apps, go to the Shopify App Store, search for the shipping app you want, install it, and follow the setup instructions. Once connected, these apps often appear as an option inside your shipping rate settings.
Reviewing and Optimizing Your Rates Over Time
Setting up your shipping rates is not a one-and-done task. You should revisit them regularly.
Watch your cart abandonment rate. If it’s high, your shipping costs might be part of the problem. Try lowering rates or introducing a free shipping threshold and see if abandonment drops.
Track which shipping options customers actually choose. If almost everyone picks the cheapest option, your express rate might be priced too high. If almost everyone picks express, your standard shipping might be slower than people want.
Look at your shipping costs versus what you’re charging. Are you covering your costs? Are you overcharging and potentially losing customers? Find the sweet spot.
Final Thoughts
Setting up shipping rates on Shopify is one of those things that feels intimidating until you actually do it. Once you’re in the settings and you understand the structure — zones, rates, conditions — it all makes sense.
Start simple. Set up a basic flat rate or free shipping threshold, get your first orders out the door, and then optimize from there. You don’t need the perfect setup on day one. You need a setup that works and that you can improve over time.
The goal is simple: make it easy for customers to complete their purchase, give them clear expectations about delivery, and make sure you’re not losing money on every shipment.
Get those three things right and your shipping setup will do its job perfectly.