How to Use Shopify Flow for Marketing Automation
If you’re still doing everything manually in your Shopify store tagging customers by hand, sending emails one by one, trying to remember who bought what you’re working way harder than you need to.
Shopify Flow exists to fix exactly that.
It’s a free automation tool built right into Shopify, and when you use it for marketing, it changes everything. Less manual work. More consistent follow-up. Better results.
Here’s everything you need to know about using it.
What Is Shopify Flow?
Shopify Flow is an automation builder available on the Shopify, Advanced, and Plus plans.
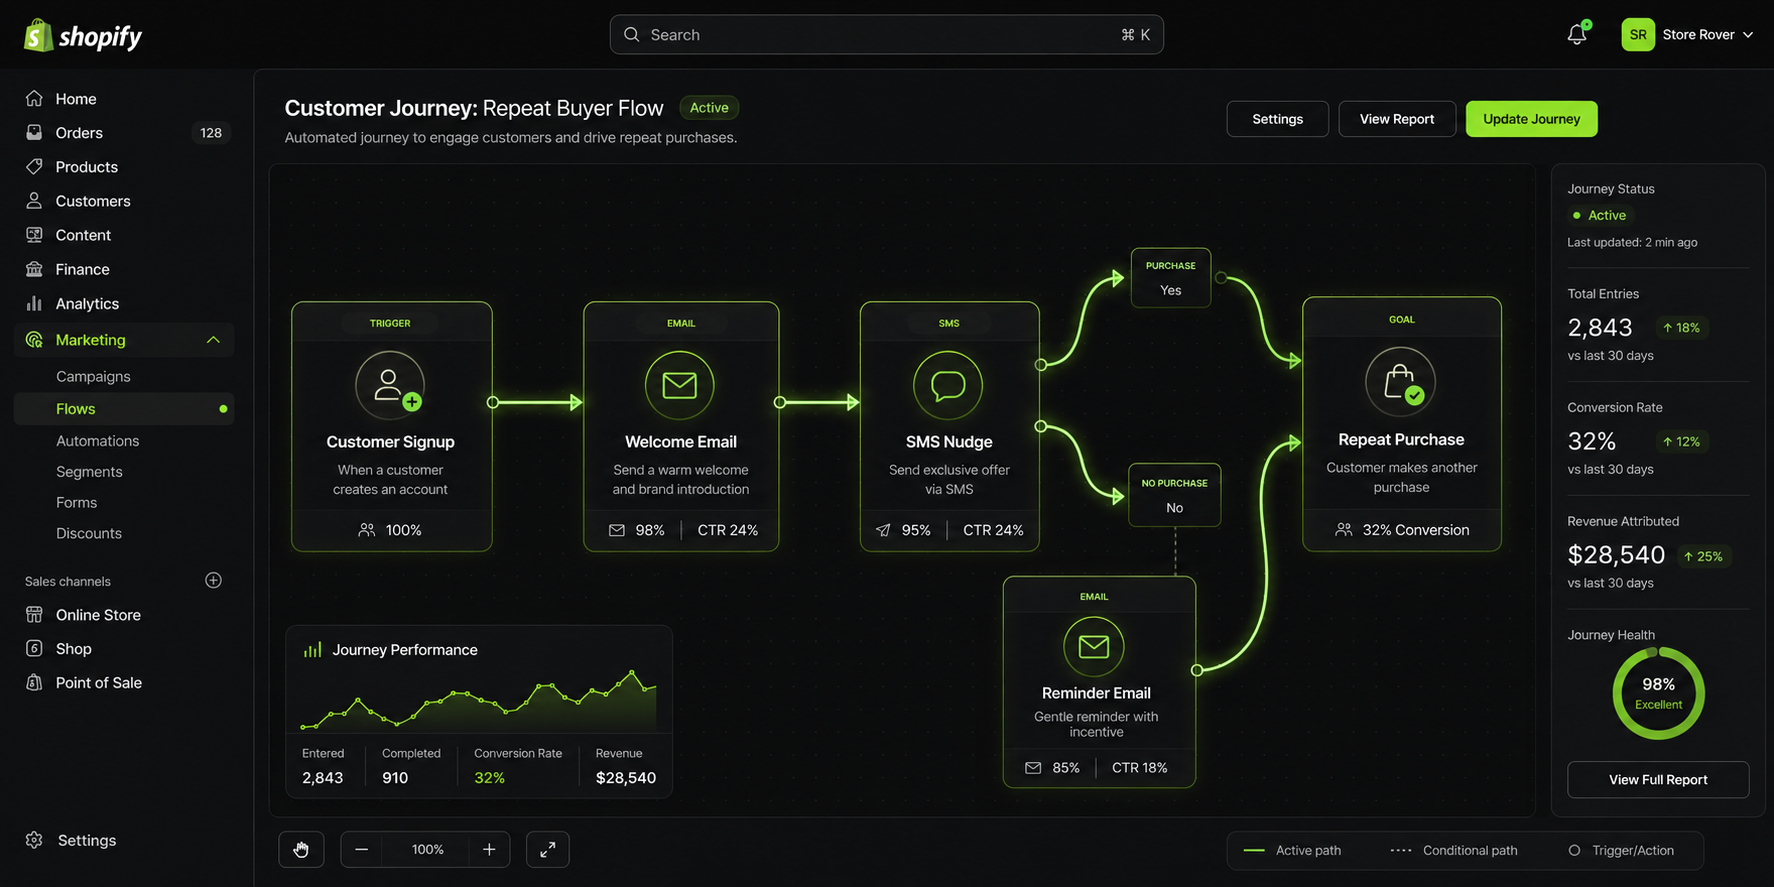
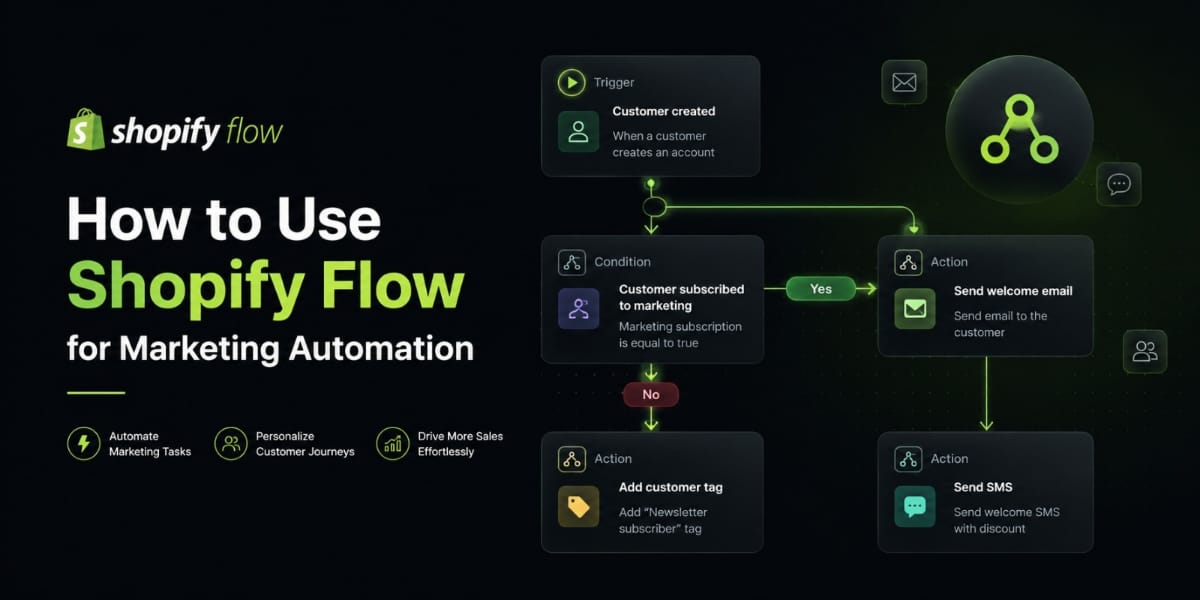
It runs on a simple three-part logic that goes like this something happens in your store, Flow checks a condition, then Flow takes an action. That’s the whole system. Trigger, condition, action.
For marketing, this means your store can automatically tag customers, trigger email campaigns, reward loyal buyers, and suppress the wrong people from the wrong messages all without you doing a thing.
It connects directly to your store data and works with apps like Klaviyo, Omnisend, Postscript, and Smile.io.
The Three Building Blocks
Before you build anything, you need to understand these three pieces.
Triggers are what start a workflow. Something has to happen first — an order is placed, a customer signs up, a product goes out of stock. That event kicks everything off.
Conditions are the filters. Once a trigger fires, Flow checks whether certain criteria are met before moving forward. For example, it might check whether the order total is over $200 or whether the customer has bought more than twice.
Actions are what Flow actually does. It can add a customer tag, remove a tag, send you a notification, hide a product, or connect to a third party app to trigger a campaign.
Those three things trigger, condition, action are how every single workflow is built.
How to Get Started
Go to your Shopify admin and open the Flow app under Apps. If you’re on an eligible plan it’s already there.
Click Create workflow and you’ll land on a visual builder that looks like a simple flowchart. You pick your trigger at the top, then build downward by adding conditions and actions.
When you’re done, save it and switch it on. Flow runs automatically from that moment forward.
There’s also a library of pre built templates if you’re not sure where to start. These are real workflows other store owners use you just tweak them to fit your store and you’re good to go.
The Best Marketing Workflows to Build
Here’s where it gets practical. These are the automations that will have the biggest impact on your marketing.
Tag Customers by Purchase Behavior
This is the foundation of everything else you’ll build.
When you tag customers based on what they do, you create clean segments that your email and SMS tools can target.
Set your trigger to “Order created,” add a condition like “Customer has placed more than 1 order,” and set the action to add the tag “repeat-buyer.”
From there, Klaviyo or Omnisend picks up that tag and you can send that segment specific messaging. First time buyer content. Repeat buyer rewards. Win back campaigns for people who’ve gone quiet.
The more specific your tags, the more targeted your marketing. And more targeted marketing always converts better.
Identify Your VIP Customers Automatically
Your highest spenders deserve different treatment. Flow can identify them for you the second they hit a threshold.
Trigger: Order created. Condition: Customer total spent is greater than $500. Action: Add tag “vip.”
Once someone is tagged VIP, your email platform can fire a VIP welcome sequence, give them access to exclusive products, or send them a personal thank-you with a special offer.
You don’t have to manually look up who your best customers are. Flow watches every order and handles it in real time.
Flag Customers Who Are About to Churn
If someone hasn’t bought in 90 days, they’re slipping away. Most stores never follow up with these people at all. With Flow, you can catch them automatically.
Set a scheduled trigger to run daily. Add a condition that checks whether the customer’s last order was more than 90 days ago. Then add a tag like “at-risk.”
Your email platform picks that up and fires a win back campaign a “we miss you” message, a discount, a look at what’s new. All of it happens without you touching anything.
Welcome New Customers the Right Way
The first 48 hours after someone’s first purchase is your biggest window to turn them into a repeat buyer.
Trigger: Order created. Condition: Customer order count equals 1. Action: Add tag “new customer.”
Your welcome email series fires immediately. You introduce your brand, say thank you, maybe offer a small incentive on their next order. That tag drops off when they buy again and they move into your repeat buyer segment automatically.
This kind of first-impression marketing makes a real difference in retention. Customers who feel welcomed come back more often.
Suppress Recent Buyers from Sale Campaigns
Sending a 20% off code to someone who paid full price yesterday is a fast way to frustrate your best customers.
Here’s how to avoid it.
Trigger: Order created. Action: Add tag “recent buyer.” Then in your email platform, exclude that tag from any promotional sends.
After two weeks, a second Flow removes the tag and they’re eligible for promos again.
It’s a small thing but it protects the relationship. Customers feel respected when you’re not immediately trying to discount the thing they just bought.
Reward Loyalty Without Doing It Manually
Loyalty programs are effective, but manually tracking spend tiers and sending rewards is exhausting.
Set up a Flow that triggers when a customer’s total spend crosses a threshold. Add a tag for that loyalty tier Bronze, Silver, Gold, whatever fits your brand. If you’re using a loyalty app like Smile.io, you can also award points as the action directly.
Customers unlock perks automatically as they spend more. They feel recognized without you ever having to check a spreadsheet.
Segment Buyers by Product Category
If you sell more than one type of product, your email campaigns should be relevant to what each customer actually cares about.
Trigger: Order created. Condition: Order contains a product from collection “Skincare.” Action: Add tag “skincare buyer.”
Now you have a clean skincare segment in your email platform. You send them skincare launches, tips, and promotions. You don’t send them your apparel sale.
Relevant emails get opened. Irrelevant ones get ignored or unsubscribed from. Segmentation by product is one of the easiest ways to improve open rates and click through rates.
Protect Your Ads with Inventory Automation
This one saves real money.
If you’re running paid ads to a product page and that product goes out of stock, you’re burning ad spend on a dead end. Flow can automatically unpublish or hide the product the moment inventory hits zero.
Trigger: Product variant out of stock. Condition: All variants are out of stock. Action: Remove from collection or unpublish.
When stock comes back, another workflow republishes it. Clean, automatic, no wasted spend.
How Flow Works with Your Email and SMS Tools
Shopify Flow handles the logic and the segmentation. Your marketing apps handle the actual messaging. Together they’re a complete system.
Klaviyo syncs customer tags from Shopify in real time. Any tag Flow applies shows up in Klaviyo almost instantly. You use those tags to trigger flows, filter segments, or set campaign conditions.
Omnisend works the same way. Tags from Flow become filters in your automation workflows and audience segments.
Postscript and SMSBump read Shopify tags too, so an SMS campaign can fire the moment Flow applies a VIP or win back tag.
The pattern is the same across every platform. Flow tags the customer. The marketing app reacts. The customer gets a timely, relevant message. You didn’t have to do anything.
Tips for Doing This Well
A few things that make a real difference.
Start with one workflow, not ten. Pick the highest-impact one — probably the VIP tagger or the win-back flag get it working, then expand from there.
Name every workflow clearly. Something like “Tag VIP $500 Threshold” or “Win-Back 90 Days No Purchase” is far more useful than “Workflow 1.”
Test before turning on. Shopify Flow has a built in test feature. Use it every time. One bad condition can tag every single customer incorrectly.
Build a cleanup flow for every time based tag. If you tag someone “recent-buyer” but never remove the tag, they’re stuck in that bucket forever. Every tag that has a time limit needs a second workflow to remove it.
Review your workflows every few months. Business changes. A workflow you built last year might not fit anymore. Audit regularly and clean out what’s outdated.
Mistakes That Trip People Up
Don’t build workflows that conflict with each other. If two automations are applying and removing the same tag simultaneously, your data gets messy fast. Map your tag logic on paper before you build.
Don’t ignore the pre built templates. They’re not just filler they’re tested workflows based on what real store owners use. Start there, customize to your needs.
Don’t use Flow only for operations. A lot of store owners set it up to manage inventory and orders but never touch the marketing use cases. That’s where the revenue impact is. Don’t leave it on the table.
Final Thoughts
Shopify Flow isn’t complicated once you understand the logic. Trigger. Condition. Action. Everything builds from there.
The stores that use it well aren’t working harder they’re working smarter. Their marketing runs in the background, reaching the right customers at the right time, every day, automatically.
Pick one workflow this week. Tag your VIPs, flag your at risk buyers, welcome your new customers properly. Just one. Get comfortable with how it works.
Then keep building.
That’s how you turn Shopify Flow into a real marketing engine.