How to Improve a Shopify Product Page Using Sections and Blocks
A Shopify product page is where shoppers decide whether your product meets their needs. Product images and pricing attract attention, but customers also need clear information about benefits, delivery, policies, and other details that influence their purchase.
Sections and blocks help you organize that information into a page that is easier to understand. Instead of placing everything inside one long description, you can create distinct areas for useful content and position smaller elements close to the purchase buttons.
In this guide, you will learn how to improve a Shopify product page using the Shopify Theme Editor and Section Kit: Theme Sections. The steps follow the screenshots in their original order, from installing the app to customizing and saving the page.
The Main Challenges Merchants Face on Product Pages
Many merchants start with their theme’s default product template. It covers the essentials, but it may not provide every layout or feature their customers need.
Important information can become buried inside a long description. Shoppers may struggle to find shipping details, promotional conditions, or answers to common questions. International customers may also hesitate when they do not understand potential import costs.
Adding more content creates another challenge: keeping the page readable. Too many elements near the Add to cart button can distract shoppers, while poorly positioned information may be overlooked.
When the theme does not include a suitable section, merchants often need custom development or another design tool. That adds work each time they want to introduce a new feature or change the layout.
The goal is to add information that helps customers make a decision while keeping the purchase process clear.
Why Use Section Kit for Product Page Improvements?
Your theme’s existing blocks are a useful starting point. For additional layouts and functionality, Section Kit provides premade sections that can be customized inside the Shopify Theme Editor.
Its app listing describes a library of more than 500 sections, including FAQs, testimonials, comparison tables, trust badges, and other layouts. This allows merchants to expand their existing design without rebuilding the entire store.
Section Kit is free to install, with free sections and premium sections available for a one-time charge. Check the selected section’s price before adding it.
The screenshots in this guide demonstrate two different tools working together: a Pop-up block provided by the theme and an SK Customs Duty Estimator section added through Section Kit. The Pop-up block is not a Section Kit feature.
Why Sections and Blocks Matter
A section is a larger area of a page, such as a testimonial area or a customs duty estimator. A block is a smaller element inside a section, such as a title, price, button, or pop-up link. The available options depend on the theme and the section you are editing.
Using them thoughtfully helps you:
- Place relevant information where shoppers are likely to need it.
- Break up long content into readable areas.
- Keep the main product details and purchase buttons easy to find.
- Update content through the Theme Editor.
- Adapt the page to the questions your customers actually ask.
Better organization can support purchase confidence, but adding a section alone does not guarantee more sales. Each addition should have a clear purpose.
Step-by-Step: Improve Your Shopify Product Page
Step 1: Install Section Kit: Theme Sections
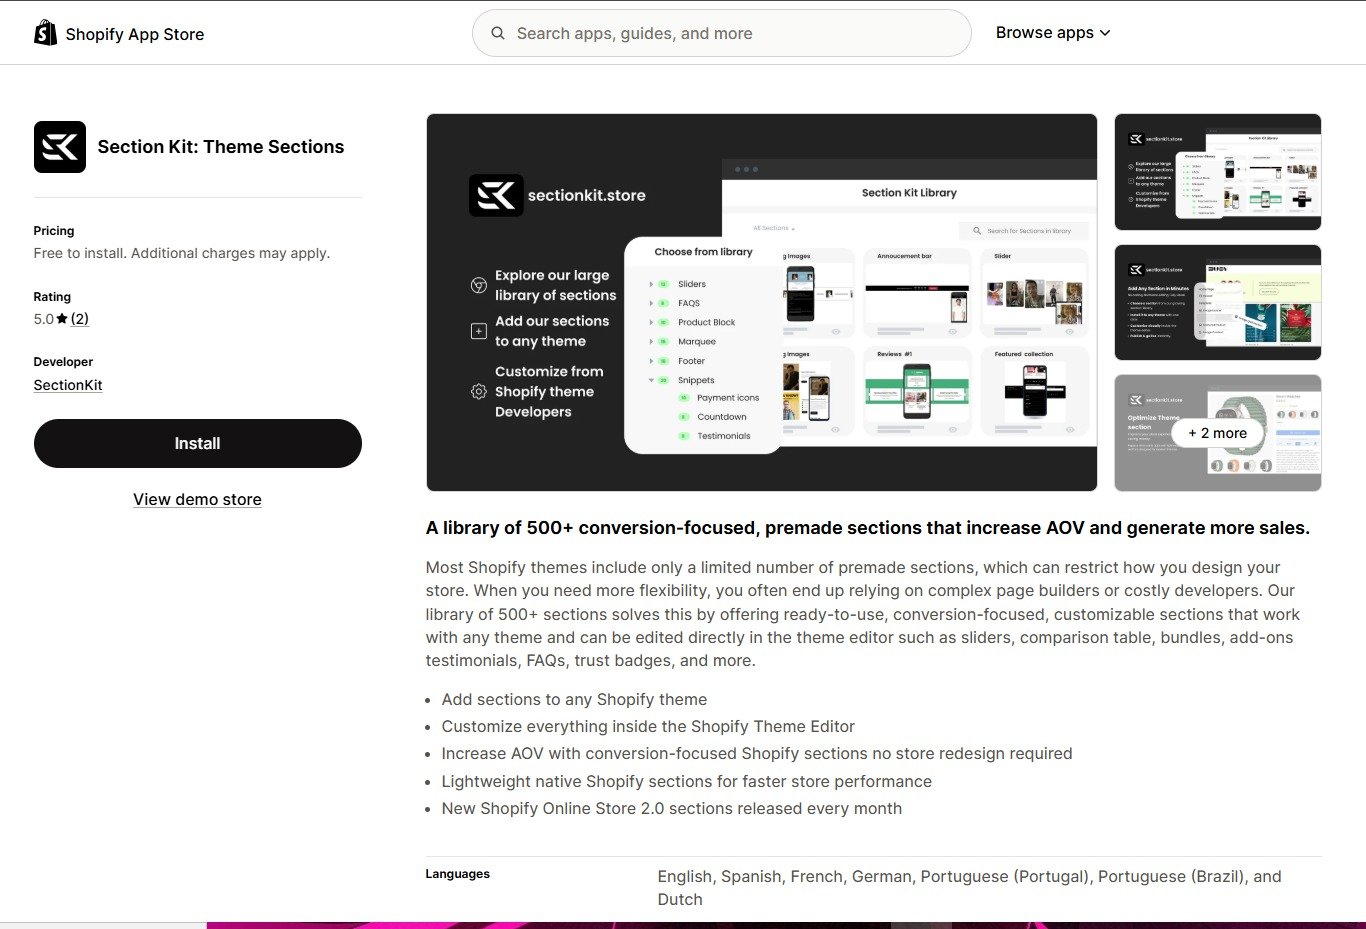
Open the Shopify App Store and search for Section Kit: Theme Sections. Review the app details and click Install, then complete Shopify’s installation process.
Once installed, open the app and make the section you want available in your chosen theme by following its setup instructions. In this guide, the later screenshots show SK Customs Duty Estimator already available in the Theme Editor.
Installing the app and adding a particular section are separate actions. If the section does not appear later, return to Section Kit and check that it has been added to the theme you are editing.
Image 1 — Section Kit’s Shopify App Store listing and Install button.
Step 2: Open Your Shopify Theme Editor
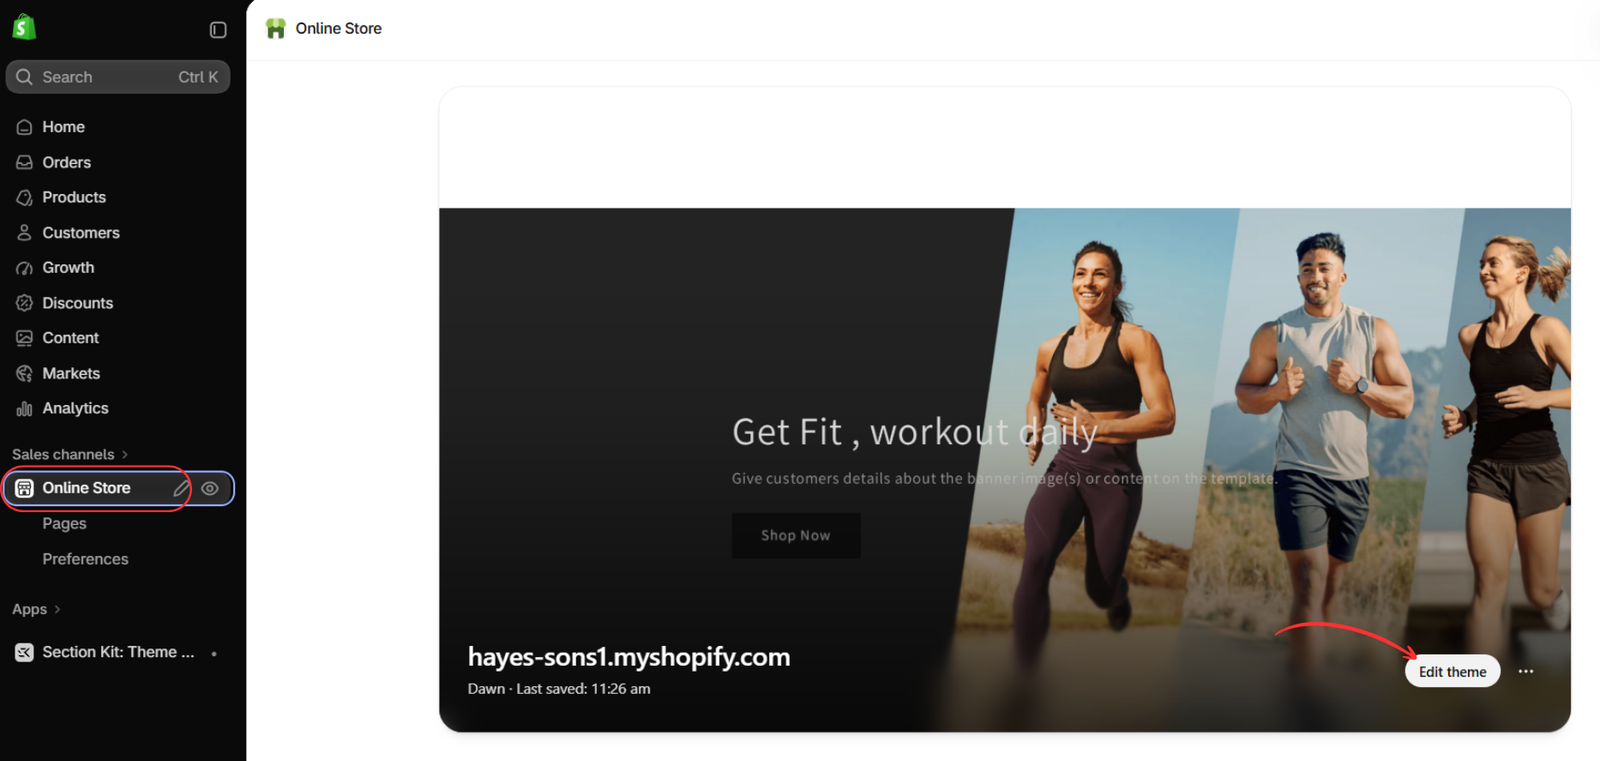
In Shopify admin, go to Online Store → Themes. Locate the theme you want to edit and click Edit theme, as shown in the screenshot. Some interfaces may label this button Customize.
The Theme Editor lets you preview your storefront while changing its sections and blocks. For substantial changes, use a duplicate theme so you can review the result before publishing.
Image 2 — Open Online Store and select Edit theme.
Step 3: Select the Product Template and Locate the Editing Controls
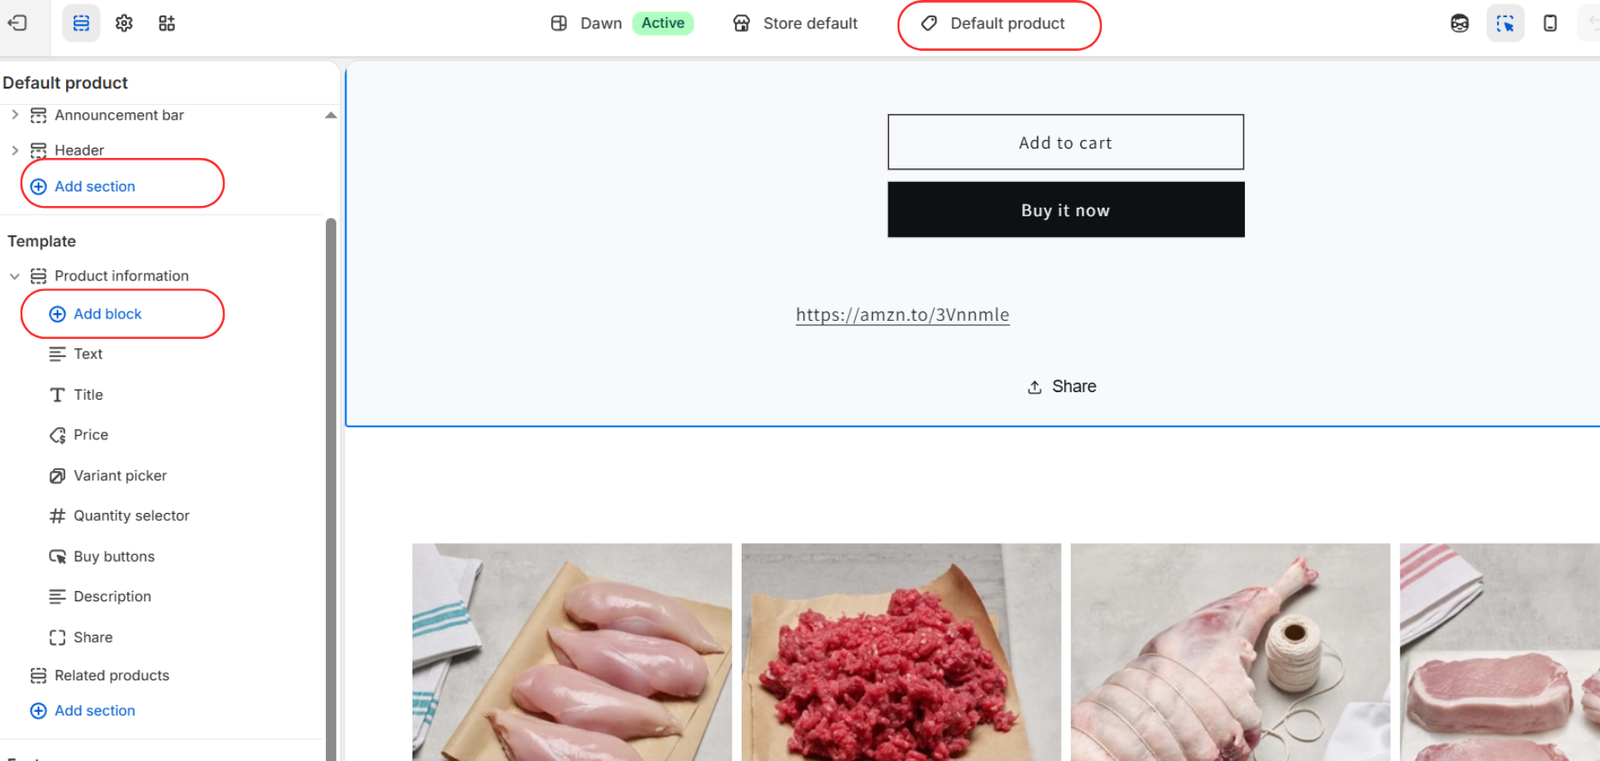
Use the template selector at the top of the editor to open Products → Default product, or choose the product template you want to improve.
In the left sidebar, locate Product information. This section contains blocks such as the title, price, variant picker, quantity selector, and buy buttons.
The screenshot highlights two controls:
- Add block adds a supported element inside an existing section.
- Add section adds a larger content area in the selected page region.
Changes to a product template can affect all products assigned to it. If your changes apply only to a particular group of products, use a separate product template.
Image 3 — Default product template with Add section and Add block controls.
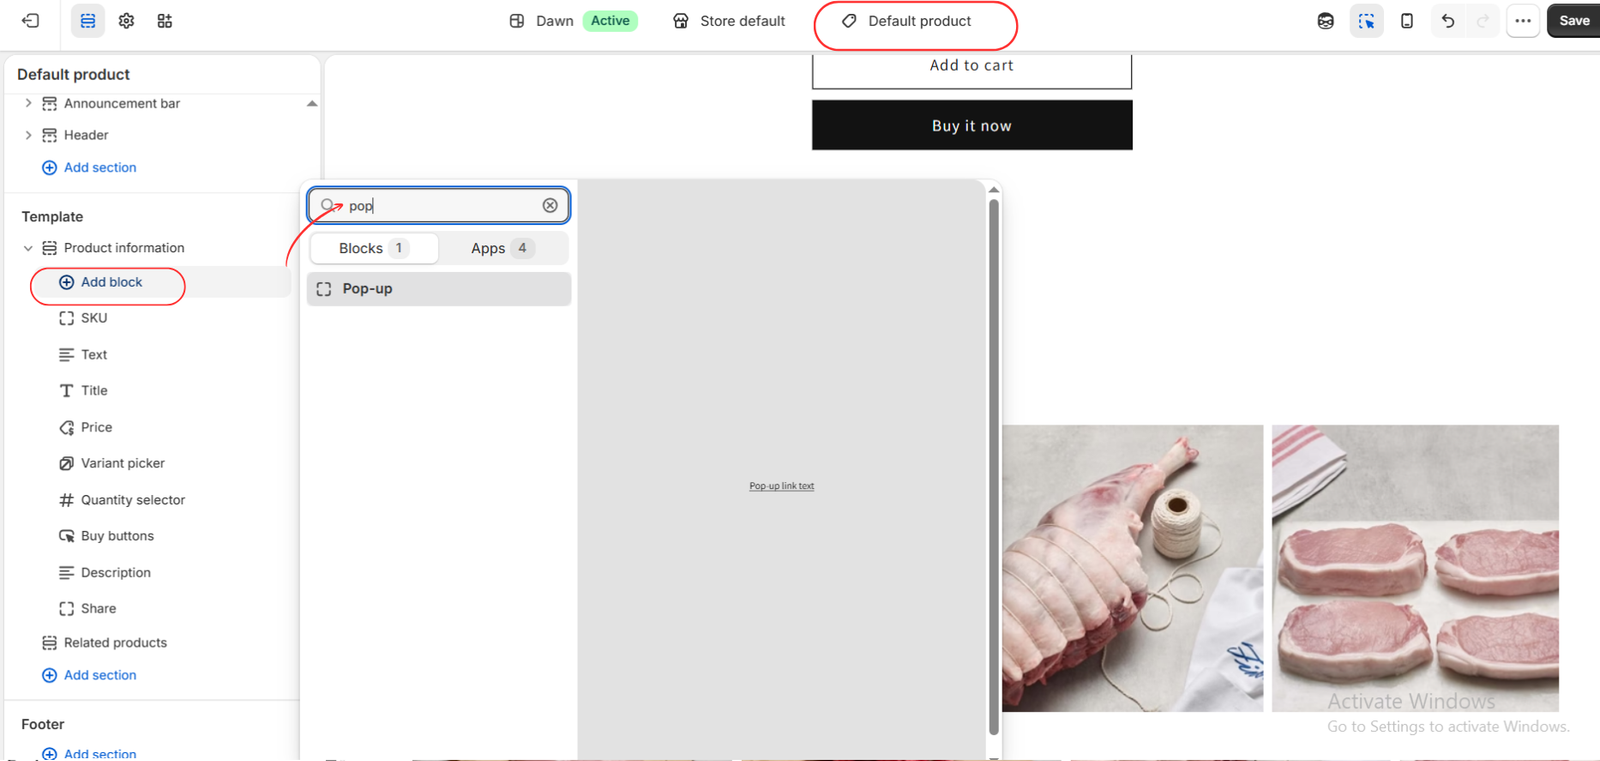
Step 4: Add a Pop-up Block to Product Information
Under Product information, click Add block. Search for “pop” and select Pop-up, matching the screenshot.
This theme block creates a link that shoppers can click to open content from a selected page. It can help keep supporting information accessible without placing all of that text directly beside the product.
Useful examples include shipping information, a size guide, or promotional terms. Available block types vary by theme.
Image 4 — Search for and select the theme’s Pop-up block.
Step 5: Customize the Pop-up Link and Select Its Content
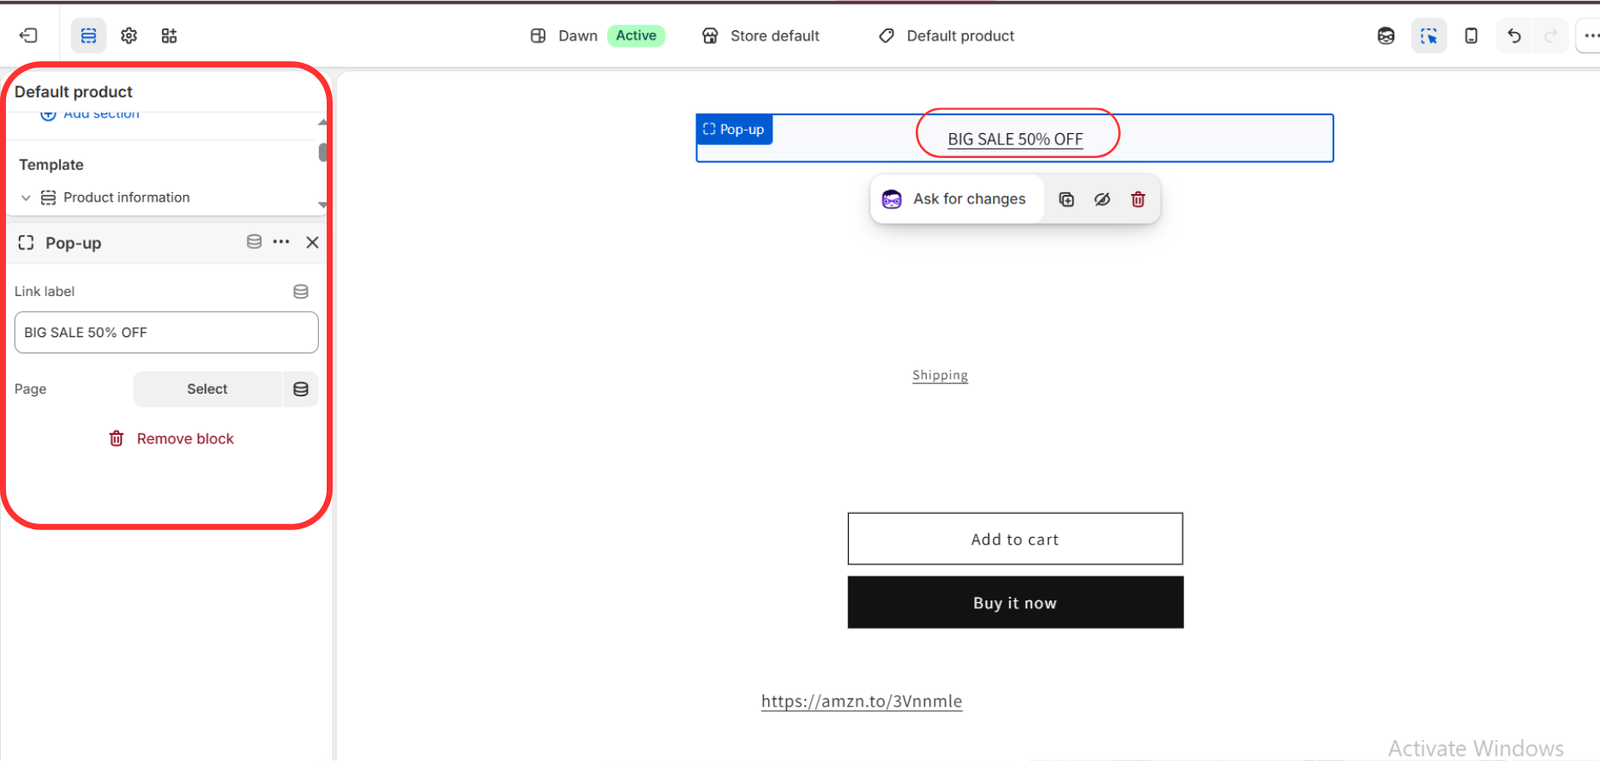
Open the newly added Pop-up block. Enter the wording you want customers to see in the Link label field.
The screenshot uses BIG SALE 50% OFF as an example. Use wording that reflects your actual offer, or choose a practical label such as “Shipping information” or “View size guide.”
Next, click Select under Page and choose the page containing the information you want the pop-up to display. The screenshot has not yet selected a page, so complete this setting before considering the block ready.
A promotional label does not create a discount. Configure any advertised discount separately in Shopify and make its terms clear.
Image 5 — Customize the Pop-up link label and choose a page.
Step 6: Add the SK Customs Duty Estimator Section
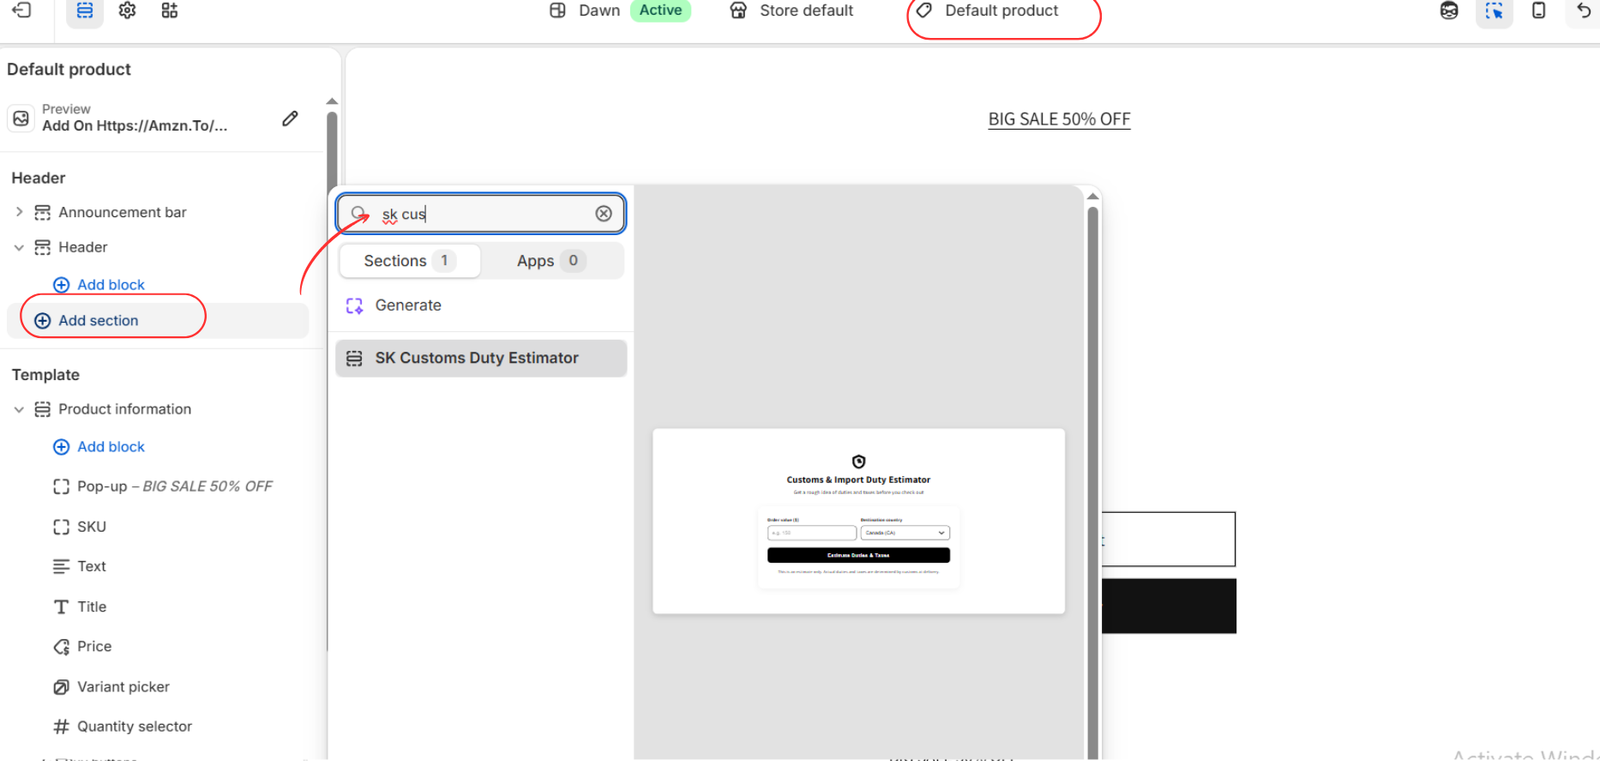
Click Add section and search for “SK Customs,” following the screenshot. Select SK Customs Duty Estimator from the results.
This section gives shoppers a place to enter an order value and select a destination country to obtain an estimate. It is relevant when international customers need more clarity about possible import costs.
The screenshot adds the section in the Header group. Content placed there may appear across templates that share that group. For an estimator intended specifically for product pages, use Add section inside the product Template area instead, where supported, and position it near relevant delivery information.
Image 6 — Search for and select SK Customs Duty Estimator.
Step 7: Customize the Estimator’s Appearance and Country Blocks
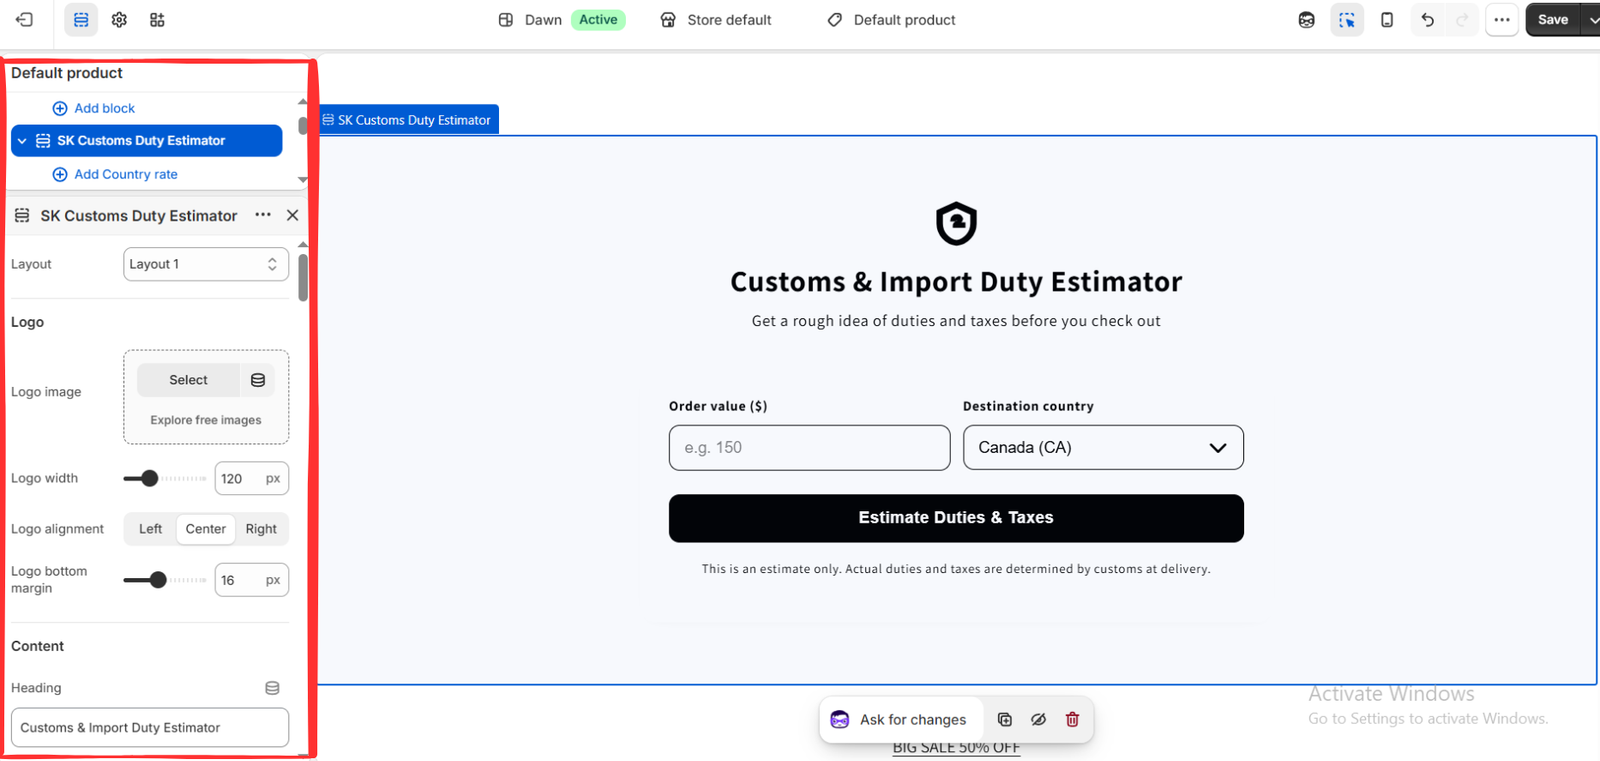
Select SK Customs Duty Estimator in the sidebar to open its settings.
The screenshot shows controls for the layout, logo image, logo width, alignment, bottom margin, and heading. Adjust these settings to match your store’s typography and visual style.
Use a clear heading such as Customs & Import Duty Estimator, with supporting text that explains what the tool does. Keep the estimate disclaimer visible so customers understand the result is not a guaranteed final charge.
The section also provides Add Country rate blocks. Open and configure the relevant country blocks according to the section’s available fields. Review those settings before relying on the estimates.
Adding this section does not, by itself, configure Shopify’s checkout duty collection.
Image 7 — Customize the estimator layout, branding, and content.
Step 8: Test the Product Page and Save
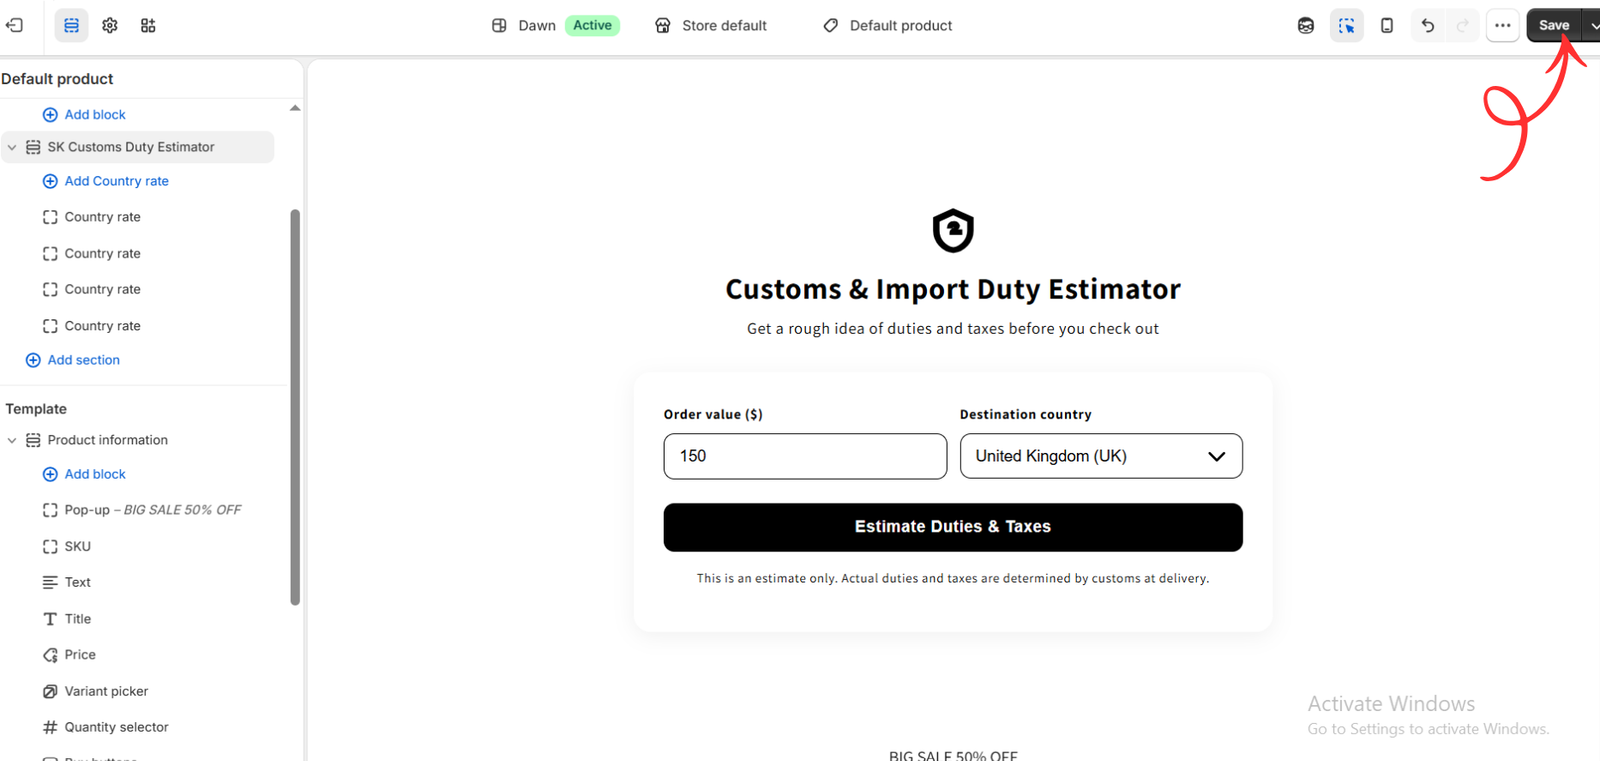
Review the page after adding the country rate blocks. The final screenshot shows an order value of 150 and United Kingdom (UK) selected.
Test the estimator with different values and destinations, and confirm that its output matches your intended configuration. Also test the Pop-up link to make sure it opens the correct page.
Switch between desktop and mobile previews. Check that headings remain readable, inputs are easy to use, and the product’s purchase buttons are easy to find.
Click Save in the top-right corner. Changes saved to the active theme can become visible immediately; changes saved to an unpublished theme remain there until you publish it.
Image 8 — Review the configured section and click Save.
Keep Every Addition Useful
An effective product page answers customers’ questions in a sensible order. Keep essential buying information prominent, use blocks for supporting details, and add sections when they provide meaningful help.
For example, a pop-up can make a shipping policy accessible without overcrowding the product information area. A customs estimator can give international shoppers an indication of potential additional costs. Other products may benefit more from FAQs, testimonials, or a clear comparison section.
Choose additions based on your customers’ needs, review the mobile experience, and measure how shoppers respond after making changes.
Improve Your Product Page with Section Kit
Shopify’s sections and blocks give you control over how product information is presented. Combining your theme’s existing blocks with suitable Section Kit sections lets you build a more useful page while continuing to work in the native Theme Editor.
Start with one customer question your current page does not answer well. Add the appropriate content, customize it to match your store, and test the experience before making further changes.
Explore Section Kit: Theme Sections: https://apps.shopify.com/sectionkit




