HOW TO REUSE THE SAME CUSTOM SECTION ACROSS MULTIPLE SHOPIFY PAGES

Introduction
Creating a professional Shopify store requires more than just choosing an attractive theme. Your storefront should also provide a consistent shopping experience across different pages.
For example, you might want to display the same FAQ section, customer testimonials, promotional banner, payment icons, or partner showcase on multiple pages of your Shopify store.
But here’s a common question:
Do you need to create a new custom section every time you want to use the same design on another Shopify page?
Not necessarily!
With Section Kit: Theme Sections, you can add ready-made custom sections to your Shopify theme and reuse the same section design across different supported pages and templates.
Instead of rebuilding layouts from scratch or manually editing Liquid code, you can use Shopify’s Theme Editor to add and customize sections wherever they are supported.
In this guide, we’ll explain how reusable Shopify sections work, why they’re useful, and how to add the same custom section design to multiple Shopify pages using SectionKit.
The Merchant’s Challenge: Recreating the Same Design on Different Pages
Many Shopify merchants want their stores to maintain a consistent design.
For example, an online fashion store might want to display the same customer testimonials on its homepage and product pages. An electronics store might want to show a FAQ accordion on multiple product templates.
However, merchants often encounter several challenges.
1. Repeated design work
Creating the same section from scratch on different pages takes time.
2. Limited theme sections
Some Shopify themes don’t include the specific layouts merchants need.
3. Liquid coding requirements
Developing reusable custom sections manually can require knowledge of Shopify Liquid, HTML, CSS, and theme schema settings.
4. Inconsistent designs
Rebuilding sections separately can lead to differences in colors, spacing, typography, and layouts.
5. Additional app installations
Some merchants install separate apps to add simple design features that could be handled through a section library.
These challenges make it useful to have a centralized library of ready-made sections.
What Does Reusing a Shopify Section Mean?
Reusing a Shopify section means adding the same section type or design to more than one supported page or template.
For example, you could use an FAQ accordion on your homepage and also add that FAQ section to a product template.
The section design can remain consistent, while its content and settings may be customized for each placement.
It’s important to understand the difference between reusing a section design and automatically synchronizing its content.
Adding the same section to multiple templates doesn’t necessarily mean that editing one instance will update every other instance. Whether settings are shared depends on how the theme and section are implemented.
Introducing Section Kit: Theme Sections
Section Kit: Theme Sections helps Shopify merchants customize their storefronts with ready-made sections.
The app offers a large library of designs, including:
- FAQ accordions and testimonials
- Promotional and hero banners
- Payment icon blocks
- Product feature sections
- Image-and-text layouts
- Comparison tables
- Partner and organization showcases
Rather than manually creating Liquid files for each design, merchants can select sections from SectionKit, install them in a compatible Shopify theme, and customize them using the Shopify Theme Editor.
App Link: Section Kit: Theme Sections
Step-by-Step Guide: How to Reuse a Custom Section Across Multiple Shopify Pages
In this tutorial, we’ll use the SK Partner Rows #1 section as an example.
The screenshots show the SectionKit installation process and how to add and customize the section in Shopify’s Theme Editor.
Step 1: Open the Shopify App Store
First, open Google and search for Shopify App Store.
Click the official Shopify App Store website in the search results.
This is where you’ll find applications for adding new features and customizing your Shopify store.

Image 1: Search for Shopify App Store on Google and click the official result highlighted in the screenshot.
Step 2: Search for Section Kit: Theme Sections
Once inside the Shopify App Store, click the search bar.
Enter Section kit theme section and press Enter.
Find the Section Kit: Theme Sections app with its black-and-white logo.

Click the listing to open the app’s details.
Step 2 — Find SectionKit in Shopify App StoreImage 2: The red circle highlights Section Kit: Theme Sections in the search results. Select the highlighted application.
Step 3: Install the SectionKit App
On the SectionKit listing page, review the app description, available features, and pricing information.
Click Install to add SectionKit to your Shopify store.
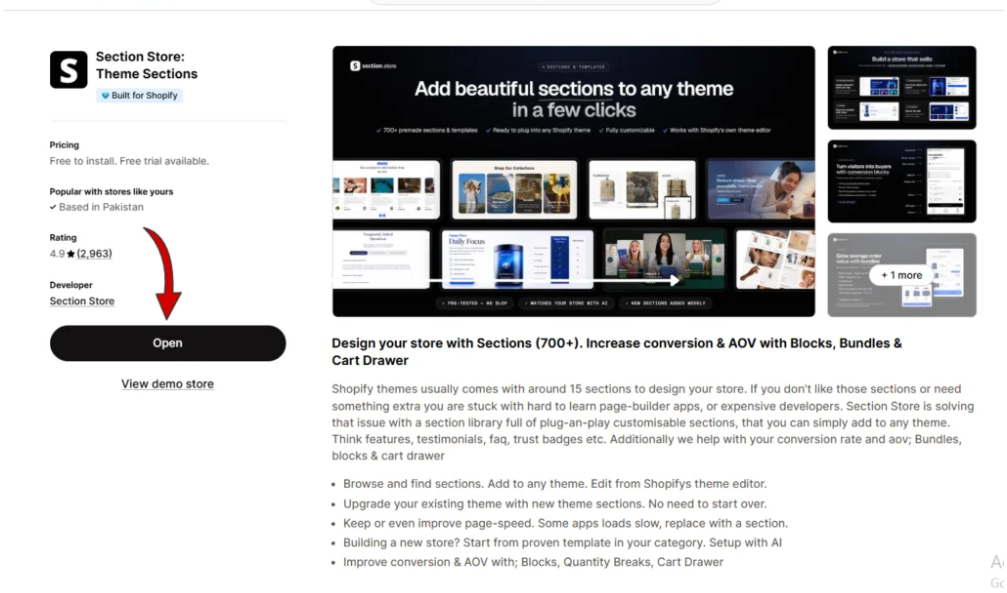
Follow the Shopify authorization process to complete installation.
Once installed, open SectionKit from the Apps area of your Shopify admin.
You can now access the section library without installing a separate app for every simple design element.
Step 4: Open the SectionKit Library
After opening SectionKit, select Explore Sections from the left sidebar.
This opens the library of available section designs.
You can browse different categories or use the search bar to find a specific layout.

Image 3: The SectionKit dashboard shows Explore Sections in the left sidebar. Click it to browse available section designs.
Step 5: Choose a Custom Section
Browse the available designs and select a section that fits your storefront.
For this example, we’ll use SK Partner Rows #1, a section that can display partners, organizations, or community initiatives.
You can also explore FAQ accordions, banners, payment icons, and other designs.

Image 4: The SectionKit library displays different section designs. The first card shows SK Partner Rows #1, which we’ll use in this tutorial.
Step 6: Explore Free Sections if Needed
SectionKit offers free and paid section options.
If you want to explore available free designs, select Free Sections from the left sidebar.
Browse the available categories and choose a section suitable for your store.

Image 5: The Free Sections area allows merchants to browse available free layouts before selecting a design.
Step 7: Add Your Selected Section to My Sections
Return to Explore Sections and open the details for your chosen section.
Review its preview, description, available features, and pricing.
Click Add to My Sections to add the design to your SectionKit library.
The screenshot below demonstrates this action using an FAQ accordion. For our partner-row example, select SK Partner Rows #1 instead.
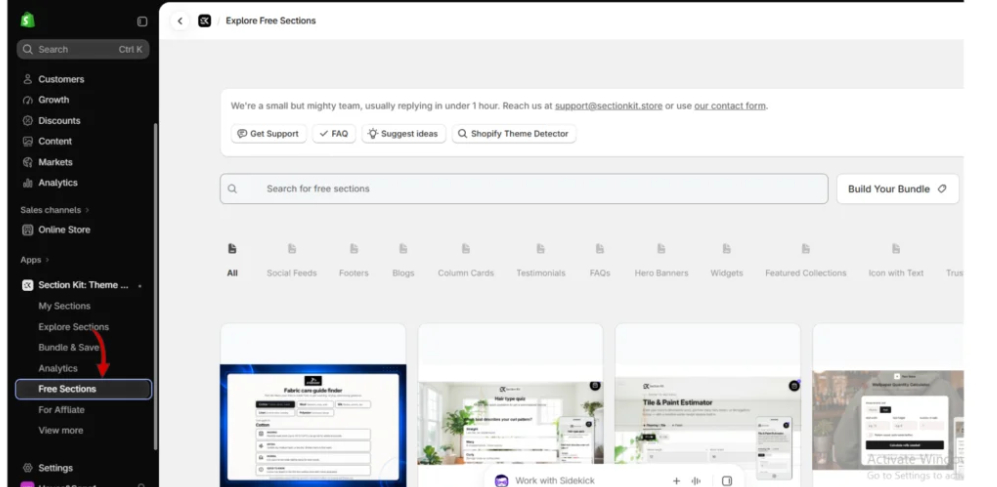
Image 6: The highlighted Add to My Sections button shows how to add a selected design to your library. The screenshot uses an FAQ section as an example.
Step 8: Open My Sections and Customize
After adding your section, navigate to My Sections from the SectionKit sidebar.
Locate the section you want to use and click Customize.
This lets you continue the setup process and open the section in your Shopify theme.

Image 7: The My Sections page displays installed sections and their Customize buttons. Choose the section you want to add to your store.
Step 9: Add the Section to Your First Shopify Page
Open the Shopify Theme Editor for the theme you want to customize.
Choose your first destination page, such as the homepage.
In the left sidebar, click Add section.
Search for the section using its name or the SK prefix.
Select the desired SectionKit section from the results.
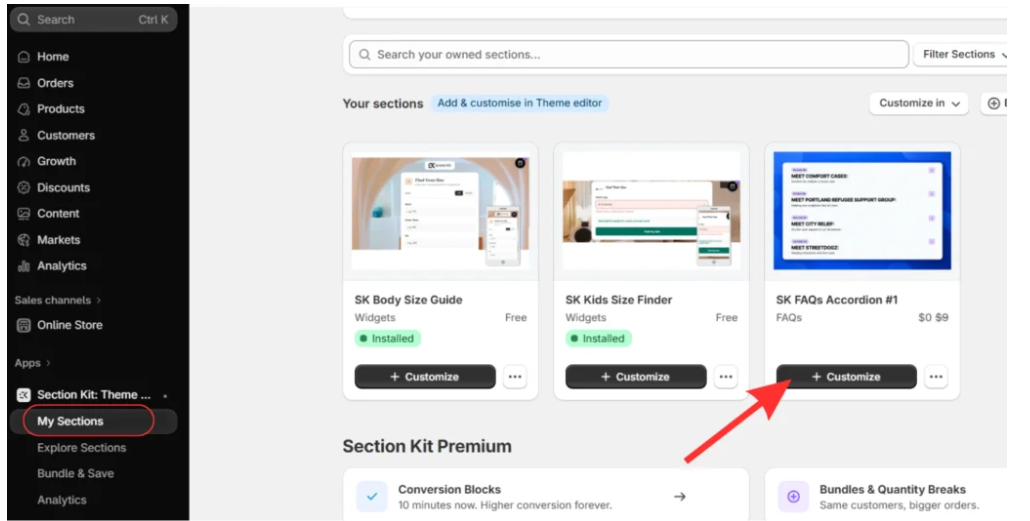
Image 8: The screenshot demonstrates how to search for an installed SectionKit section using the Add section menu in Shopify’s Theme Editor.
Once selected, the section appears on your page.
You can drag it into the desired position using the theme editor’s section controls.
Step 10: Customize Your Section
Click the section name in the Shopify Theme Editor to open its settings.

Depending on the selected design, you can customize:
- Layout and page width
- Headings and descriptions
- Background colors
- Spacing and padding
- Corner radius
- Individual content blocks
Step 10 — Customize section settingsImage 9: The theme editor displays section settings and a live preview. Adjust the available controls to match your storefront’s design.
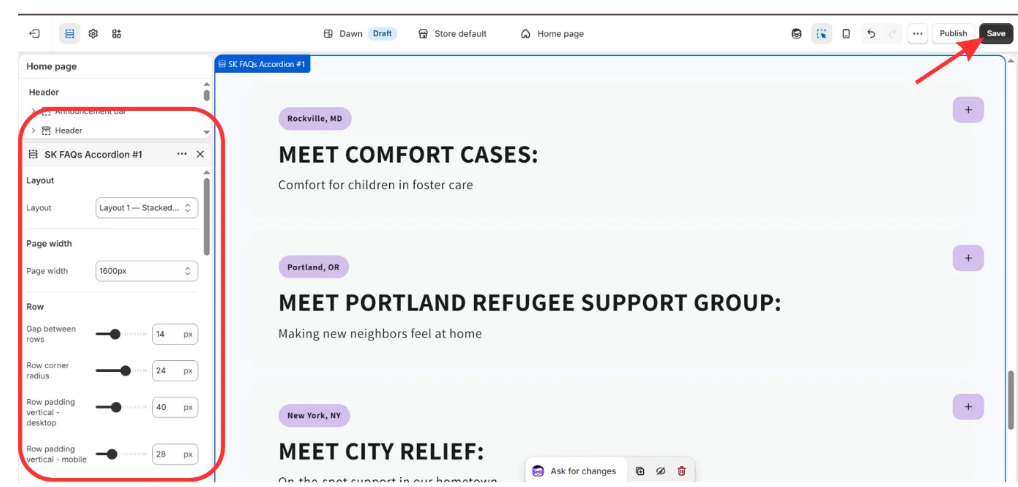
After making your changes, click Save.
Step 10 — Save the first sectionImage 10: The screenshot highlights the Save button. Save your changes before moving to another page or template.
Step 11: Reuse the Same Section on Another Shopify Page
Now comes the most important part: reusing your selected section design on another page or template.
You don’t need to install SectionKit again or purchase another copy of the same section simply to add another supported instance, subject to the section’s licensing and compatibility.
Follow these instructions:
- In the Shopify Theme Editor, use the page selector at the top to open another supported page or template.
- Click Add section in the location where you want the section to appear.
- Search for the previously installed SectionKit section, such as SK Partner Rows #1.
- Select the section to add another instance to that template.
- Customize the new instance’s content and layout as needed.
- Click Save to preserve your changes.
For example, you might use SK Partner Rows #1 on your homepage and add the same section design to an About Us page template.
Important: Shopify page templates can be shared by multiple pages. If you add a section to a shared template, every page using that template may display it. Create a separate template when you want the section to appear on only one particular page.
Step 12: Review Your Reused Section and Save
After adding the section to another page or template, review its appearance.
The screenshot below shows SK Partner Rows #1 inside Shopify’s Theme Editor.
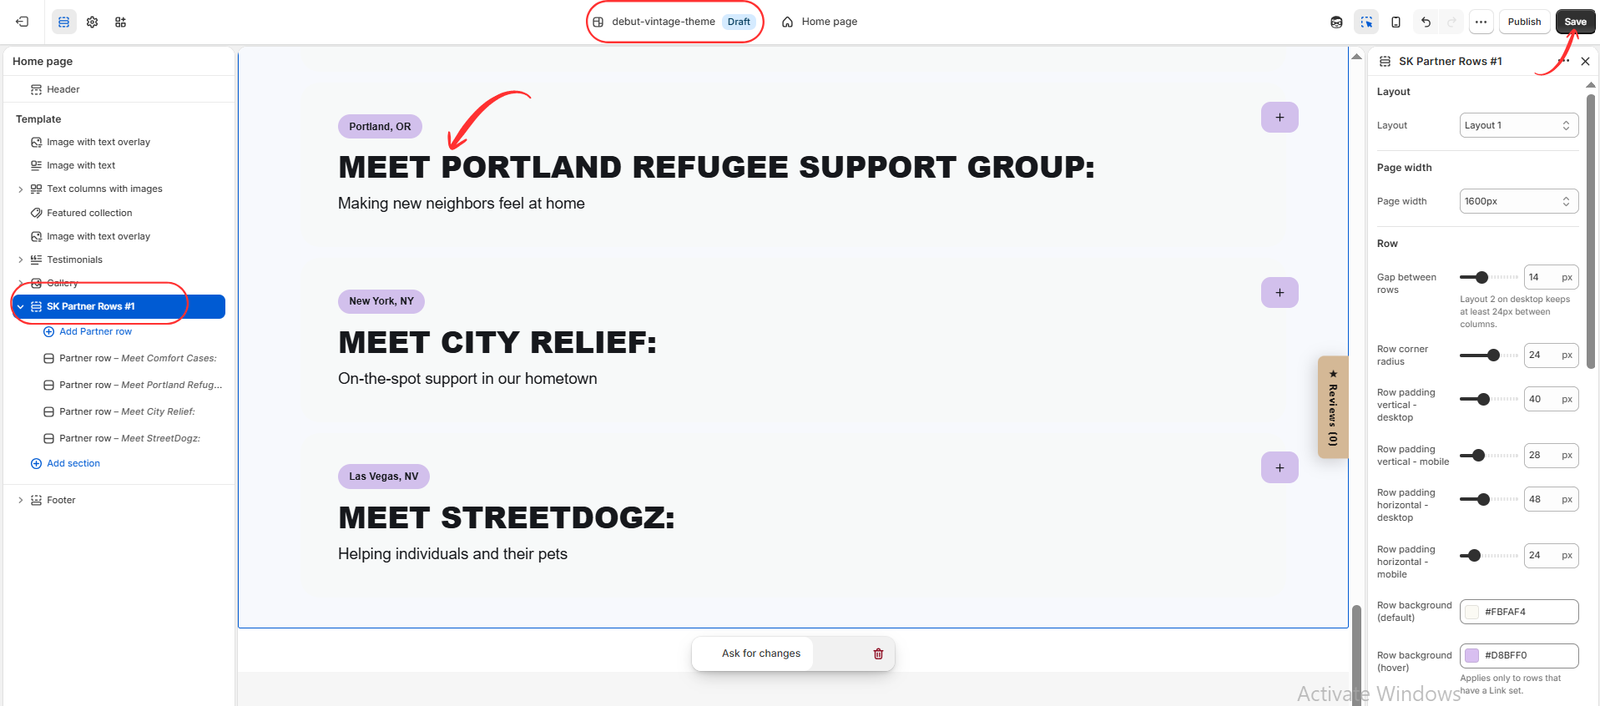
kner Rows section in Shopify Theme EditorImage 11: Your final screenshot shows SK Partner Rows #1 selected in the theme editor. The left sidebar contains its content blocks, the center shows the live section preview, and the right panel contains layout settings. The top bar identifies the selected draft theme, while the red arrow highlights Save.
You can see the partner entries displayed in the preview, including Portland Refugee Support Group, City Relief, and StreetDogz.
The right-hand settings panel allows you to adjust the section’s layout, width, spacing, padding, and colors.
Click Save once you’ve finished customizing the section.
This screenshot demonstrates the completed section and its editable settings. The process of adding it to another page uses the page selector and Add section controls described in Step 11.
Benefits of Reusing Shopify Sections
Reusing section designs can help merchants build a more consistent storefront without repeating unnecessary development work.
Save time: Add existing designs to supported pages rather than recreating them from scratch.
Maintain visual consistency: Use similar layouts, colors, and spacing across different pages.
Reduce manual coding: Customize supported sections through Shopify’s visual editor.
Improve flexibility: Add relevant sections to different templates according to your store’s needs.
Simplify store management: Keep your section designs organized within SectionKit instead of installing separate apps for every simple visual element.
Best Practices for Reusing Sections
When reusing custom sections, make sure they remain relevant to each page.
For example, a general FAQ section may work well on the homepage, while a product-specific FAQ section should contain information relevant to the product being displayed.
Review each section on desktop and mobile devices, keep the design consistent with your brand, and avoid placing too many sections on a single page.
Also remember that separate instances may have independent settings. If you update one instance, check whether other placements need the same changes.
Frequently Asked Questions
1. Can I reuse the same custom section on multiple Shopify pages?
Yes. Compatible sections can be added to multiple supported templates using Shopify’s Theme Editor.
2. Do I need to install SectionKit again for every page?
No. You install the app once and can use supported section designs across your theme.
3. Will editing one section automatically update every page?
Not necessarily. Separate section instances commonly have their own settings. Shared content requires a supported synchronization mechanism or shared data source.
4. Can I use the same section on my homepage and product pages?
Yes, if the section supports those template types. Select the relevant template and add the section through the theme editor.
5. Can I customize each instance differently?
Usually, yes. Separate section instances can have different settings and content, depending on the section’s capabilities.
6. Does SectionKit require Liquid coding?
No manual Liquid editing is required for the installation and customization workflow shown in this tutorial.
7. Can I use SectionKit with the Shopify Dawn theme?
SectionKit is designed for Shopify themes, including Dawn. Compatibility and available customization options may vary by section.
Conclusion
Reusing custom sections across multiple Shopify pages is a practical way to maintain consistent storefront designs while reducing repetitive customization work.
Instead of creating a new section from scratch for every page, merchants can use Section Kit: Theme Sections to access ready-made layouts and add them to compatible Shopify templates.
Whether you want to display FAQs, testimonials, banners, or partner showcases on multiple pages, SectionKit provides a convenient way to expand your storefront without manually editing Liquid code.
By reusing section designs and customizing each placement where needed, you can create a more professional, organized, and consistent shopping experience.
Start building reusable Shopify sections with SectionKit.Explore Section Kit: Theme Sections on the Shopify App Store