Shopify Development Tutorial: How to Customize Your Theme with Liquid

If you have ever wanted to take full control of your Shopify store’s design and make it look exactly the way you imagined, then learning Liquid is the skill you need. Liquid is the templating language that Shopify uses to load dynamic content into your store. It was built by Shopify and it powers every single Shopify theme out there. Once you understand how it works, you can customize almost anything product pages, collections, headers, footers, cart pages, and more.
This tutorial will walk you through everything from the very basics to some more advanced techniques. By the end, you will have a solid understanding of how to customize your Shopify theme using Liquid.
What is Liquid and Why Does it Matter
Liquid is an open source templating language created by Shopify back in 2006. It sits between your HTML and your store’s data. Think of it like a bridge. Your store has all this information product names, prices, descriptions, customer details, collection lists and Liquid is what pulls that information out and displays it on the page.
Without Liquid, your theme would just be a static HTML file with no real content. With Liquid, it becomes a dynamic, data-driven storefront that updates automatically whenever you add products, change prices, or update content in your Shopify admin.
Liquid is made up of three main things: objects, tags, and filters. These three building blocks are all you need to start writing Liquid code and customizing your theme.
Setting Up Your Development Environment
Before you start editing your theme, you need to set things up properly. The worst thing you can do is start editing your live theme directly. If something breaks, your customers will see a broken store in real time.
The first thing you should do is duplicate your theme. Go to your Shopify admin, click on Online Store, then Themes. Find your current theme and click the three dot menu next to it. Select Duplicate. This creates a backup copy you can always go back to.
Next, you should set up the Shopify CLI on your computer. This is a command line tool that lets you work on your theme locally and sync changes to your store. To install it, you need Node.js installed on your machine first. Then you run the following command in your terminal.
npm install -g @shopify/cli @shopify/theme
Once it is installed, you can log in to your Shopify store using the CLI and pull down your theme files to work on them locally. This is a much better workflow than editing files directly in the Shopify admin code editor, especially once your customizations get more complex.
That said, for small edits and learning purposes, the built in code editor in Shopify admin works perfectly fine. Just go to Online Store, Themes, and click the three dot menu on your theme, then select Edit Code.
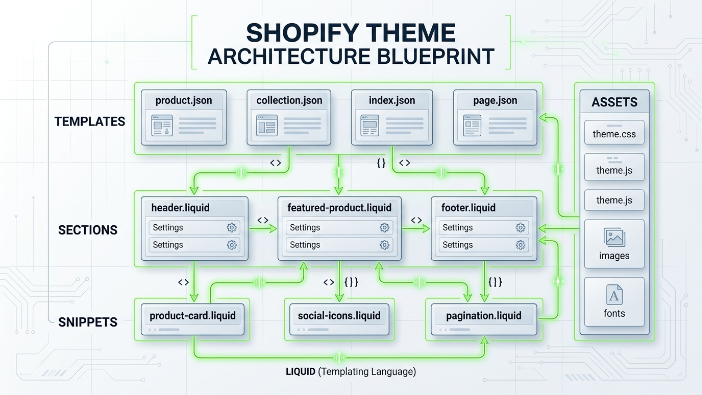
Understanding the Theme File Structure
When you open your theme files, you will see several folders. Each one has a specific purpose and understanding this structure is important before you start editing anything.
The layout folder contains your theme’s master templates. The most important file here is theme.liquid. This file wraps around every single page on your store. The header, footer, and any global elements you want on every page go here.
The templates folder contains files for each type of page. You will see files like product.liquid, collection.liquid, index.liquid, cart.liquid, and so on. Each of these controls the layout of that specific page type.
The sections folder is where most modern Shopify themes keep their reusable content blocks. Sections are powerful because they can be added, removed, and reordered right from the theme editor without touching any code.
The snippets folder holds small reusable pieces of code. Things like a product card, a star rating widget, or a social share button are often stored as snippets so you can include them in multiple places without repeating code.
The assets folder is for your CSS files, JavaScript files, and images that are part of the theme itself.
The config folder holds your settings files, which define the options that appear in the theme editor. The locales folder holds translation files if your store supports multiple languages.
The Three Building Blocks of Liquid
Now let us get into the actual Liquid syntax. Once you understand these three concepts, everything else starts to make sense.
Objects
Objects are how you output dynamic content onto the page. They are written with double curly braces. For example, if you want to display the title of a product on a product page, you write it like this.
{{ product.title }}
When Shopify renders the page, it replaces that code with the actual product title from your store. So if you have a product called Blue Cotton T Shirt, that is exactly what will appear on the page.
Some other common objects you will use are product.price to show the price, product.description for the description, product.featured image for the main product image, shop.name for your store name, and customer.first name to greet a logged in customer by name.
Objects can also have nested properties. For example, product.featured image.src gives you the actual URL of the product image, which you would use inside an img tag.
Tags
Tags are the logic part of Liquid. They are written with curly braces and percentage signs. Tags do not output text directly. Instead they control what happens on the page.
The most common tags are if statements and for loops.
An if statement lets you show or hide content based on a condition. For example, if you only want to show a sale badge when a product is on sale, you would write something like this.
{% if product.compare at price > product.price %} On Sale {% endif %}
This checks if the compare at price is higher than the current price. If it is, it shows the On Sale text. If not, it shows nothing.
You can also use elsif and else to handle multiple conditions.
{% if product.available %} Add to Cart {% elsif product.available == false %} Sold Out {% endif %}
For loops let you repeat a block of code for each item in a list. This is incredibly useful for displaying product lists, collection items, navigation menus, and more.
{% for product in collection.products %} {{ product.title }} {% endfor %}
This loops through every product in a collection and outputs each product title. You would add more HTML and Liquid around this to make it look like an actual product grid.
Filters
Filters are used to transform the output of an object. They are added inside double curly braces using a pipe symbol. Shopify has a huge library of built-in filters.
For example, to format a price properly with currency symbol and decimal places, you use the money filter.
{{ product.price | money }}
To convert a product image URL to a specific size so it loads faster, you use the image_url filter.
{{ product.featured image | image url: width: 500 }}
To capitalize the first letter of a string, you use the capitalize filter.
{{ product.title | capitalize }}
You can even chain multiple filters together. Each filter is applied in order from left to right.
{{ product.title | upcase | truncate: 20 }}
This first converts the title to all uppercase, then cuts it off at 20 characters if it is too long.
Customizing Your Product Page
The product page is usually the most important page to get right because it directly affects conversions. Let us walk through how to customize it using Liquid.
Open the file templates/product.liquid or if your theme uses JSON templates, look for sections/main-product.liquid or a similarly named section file.
A basic product page structure in Liquid looks something like this.
You start with a div to wrap everything, then display the product title using {{ product.title }}. Below that you show the price with {{ product.price | money }}. Then comes the description with {{ product.description }}. And finally a form using the action /cart/add to handle adding the product to the cart, which includes a hidden input for the variant ID and a submit button.
One common customization is showing different content based on product tags. For example, if you tag certain products as featured, you can show a special banner for them.
{% if product.tags contains ‘featured’ %} This is a featured product {% endif %}
Another popular customization is displaying a low stock warning. You can check the inventory quantity of the selected variant and show a message if it is low.
{% if product.selected or first available variant.inventory quantity < 5 and product.selected or first available variant.inventory quantity > 0 %} Only a few left in stock! {% endif %}
Working with Sections and Blocks
Sections are one of the most powerful features in modern Shopify themes. They allow you to create customizable, drag and drop content areas that merchants can edit right from the theme editor without touching code.
A section file is just a Liquid file with a special JSON schema at the bottom. The schema defines what settings and blocks are available for that section in the theme editor.
Here is a simple example of a custom banner section. The Liquid part at the top renders the HTML, pulling in values from the schema settings using the section.settings object. So if you define a setting called heading in the schema, you access it in your Liquid as {{ section.settings.heading }}.
The schema at the bottom is wrapped in {% schema %} tags and contains JSON that defines the section name, the settings like text inputs, color pickers, image pickers, and the presets that control how the section appears when added from the theme editor.
Blocks take this further. Blocks are repeatable elements inside a section. For example, a testimonials section might have a block for each individual testimonial. The merchant can add as many blocks as they want from the theme editor.
To render blocks in your Liquid, you loop through section.blocks using a for loop and access each block’s settings using block.settings.
Using Snippets to Keep Your Code Clean
As your theme gets more customized, your files can get very long and hard to maintain. Snippets solve this by letting you break your code into smaller reusable pieces.
To create a snippet, add a new file to the snippets folder. For example, you might create a file called product-card.liquid that contains the HTML and Liquid for displaying a single product card.
Then anywhere in your theme where you want to show a product card, you include it using this tag.
{% render ‘product-card’, product: product %}
The second part, product: product, passes the current product object into the snippet so it has access to the product data. You can pass any variables you want into a snippet this way.
This is a huge improvement over copying and pasting the same code in multiple places. If you need to update the product card design later, you only have to change it in one file.
Liquid and JavaScript Working Together
Modern Shopify themes often use JavaScript alongside Liquid to create interactive experiences. One common pattern is using Liquid to output data that JavaScript then uses.
For example, you might want to make product variant switching work without a page reload. To do this, you can output all the product data as a JSON object using Liquid, and then have your JavaScript read from that object.
You do this by assigning the product to a JSON variable in a script tag inside your Liquid file. You create a script tag and inside it assign a JavaScript variable using {{ product | json }}. The json filter converts the entire product object into a JSON string that your JavaScript can parse and work with.
This is a very common pattern and you will see it in almost every well-built Shopify theme.
Global Objects You Should Know
Shopify gives you access to a huge range of global objects that you can use anywhere in your theme. Here are some of the most useful ones.
The shop object gives you information about the store itself, like shop.name, shop.email, shop.description, and shop.url.
The cart object gives you access to the current cart, including cart.item count to show how many items are in the cart and cart.total_price for the total amount.
The customer object is available when a customer is logged in. You can use it to personalize the experience with things like customer.first name, customer.email, and customer.orders to show order history.
The request object tells you about the current page request. request.page type tells you what kind of page is being rendered, which is useful for conditional logic.
The settings object gives you access to your theme’s global settings, which are defined in the config/settings schema.json file.
Common Mistakes to Avoid
Now that you know the basics, let me point out some mistakes that catch a lot of people out.
One of the biggest mistakes is editing your live theme directly. Always work on a duplicate or use the CLI with a development theme. One bad edit can break your store for real customers.
Another common mistake is forgetting to handle cases where an object might be empty or nil. For example, if you try to display a product’s second image but it does not have one, your code might error out or display a broken image. Always wrap these in an if check.
People also often forget that Liquid is rendered on the server side. This means you cannot use Liquid inside JavaScript dynamically. If you need to pass data from Liquid to JavaScript, you need to output it as a variable in a script tag as we discussed earlier.
Watch out for performance too. Putting complex for loops inside other for loops can slow down your page rendering. Try to keep your Liquid logic as simple and flat as possible.
Tips for Learning More
The best resource for learning Liquid is the official Shopify Liquid documentation at shopify.dev. It lists every object, tag, and filter available with examples for each one. Bookmark it and refer to it constantly.
Another great way to learn is to look at open source Shopify themes. Shopify’s own Dawn theme is available on GitHub and it is a great reference for how themes should be structured and how Liquid is used in real world projects.
The Shopify community forums and the Shopify Partners Slack are also great places to ask questions and learn from other developers.
Wrapping Up
Liquid might look a little strange at first but once it clicks, it becomes a genuinely enjoyable language to work with. It is clean, readable, and powerful enough to handle almost anything you need to do with a Shopify theme.
Start small. Pick one thing you want to customize on your store and try to do it with Liquid. Maybe it is showing a custom badge on certain products, or adding a personalized greeting for logged in customers, or creating a new section for your homepage. Small wins build confidence and before you know it you will be comfortable customizing every part of your theme.
The skills you learn here will also make you much more valuable as a developer if you work with Shopify clients, because every merchant has unique needs and the ability to customize themes with code sets you apart from someone who can only use drag and drop editors.
Good luck and happy coding.