HOW TO UPLOAD YOUR OWN BRANDED CURSOR TO SHOPIFY
Introduction
Your brand identity appears throughout your Shopify store: in your logo, product photography, colors, and typography. A branded cursor can extend that identity to another small part of the desktop shopping experience—the pointer visitors use to explore your pages.
If the standard mouse pointer feels disconnected from your store’s design, you can replace it with a simple brand-inspired icon. This guide explains how to upload your own branded cursor to Shopify using Custom Cursor, then enable it in your theme without manually editing theme code.
The Main Headache: Adding a Brand Detail Without More Theme Work
A merchant may have a polished storefront but still struggle to add small custom interactions. A ready-made cursor library offers choices, yet those designs may not match a specific brand mark, mascot, or visual style.
Building a custom solution manually introduces extra tasks: preparing an image, editing theme styles or scripts, handling hover states, and checking that the pointer remains usable. For a small design change, that can become more work than expected.
There is also a design challenge. A full logo with tiny lettering may look good in a header but become unreadable at cursor size. Large or low-contrast images can obscure buttons or make clicking less precise. The best branded cursor is usually a simplified symbol that stays clear when displayed small.
Why Use Custom Cursor for Branded Uploads?
Custom Cursor provides an app-based way to choose pointer designs and upload your own cursor artwork. Its interface includes a dedicated Upload your own tab, a preview area, cursor size controls, and a Save & Publish button.
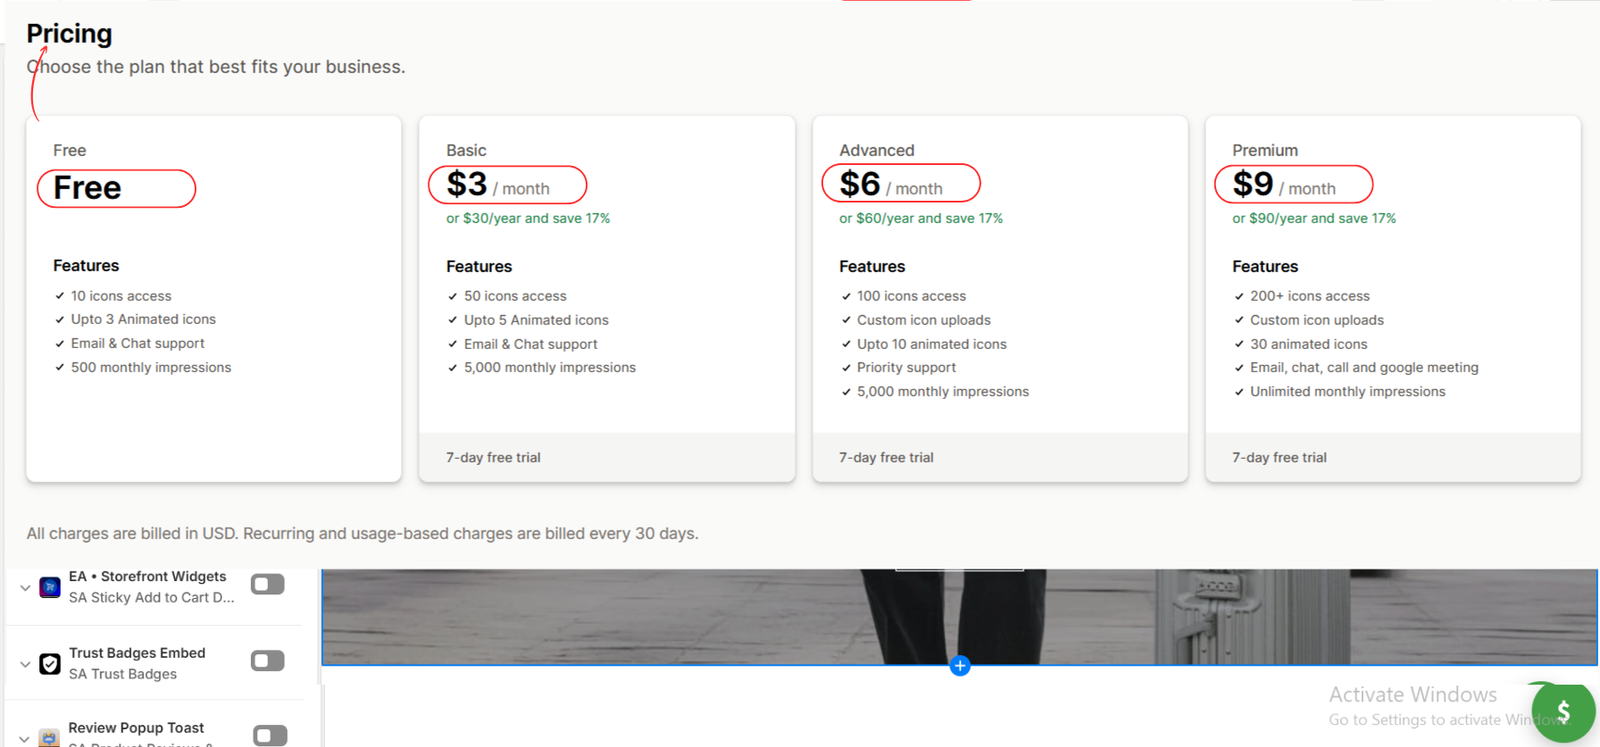
Custom icon uploads are included in the Advanced and Premium plans shown in the supplied pricing image and current app listing. Free and Basic do not list that feature. Check the available plans before starting so you can use the upload option you need.
Why a Branded Cursor Can Be Useful
A cursor that matches your visual identity can make desktop browsing feel more consistent. It may suit a playful mascot-led shop, a creative accessories store, or a brand with a distinctive graphic symbol.
However, this is a finishing detail, not a substitute for clear product information or easy navigation. Choose artwork that complements your store and remains comfortable to use. A branded pointer does not guarantee more sales, and uploading a static design does not automatically make it animated.
Prepare Your Cursor Artwork Before Uploading
- Use a simple symbol: select a recognizable part of your brand rather than a detailed logo with text.
- Keep the edges clear: make sure the icon remains visible against light and dark backgrounds.
- Consider transparency: a transparent background can help the design blend into the storefront, if supported by the upload requirements.
- Follow the app’s requirements: check the upload panel for accepted formats, dimensions, and file limits before exporting your final artwork.
- Plan for accurate clicking: choose a shape with an obvious pointing tip or selection point.
How to Upload Your Own Branded Cursor to Shopify: Step by Step
Step 1: Install Custom Cursor
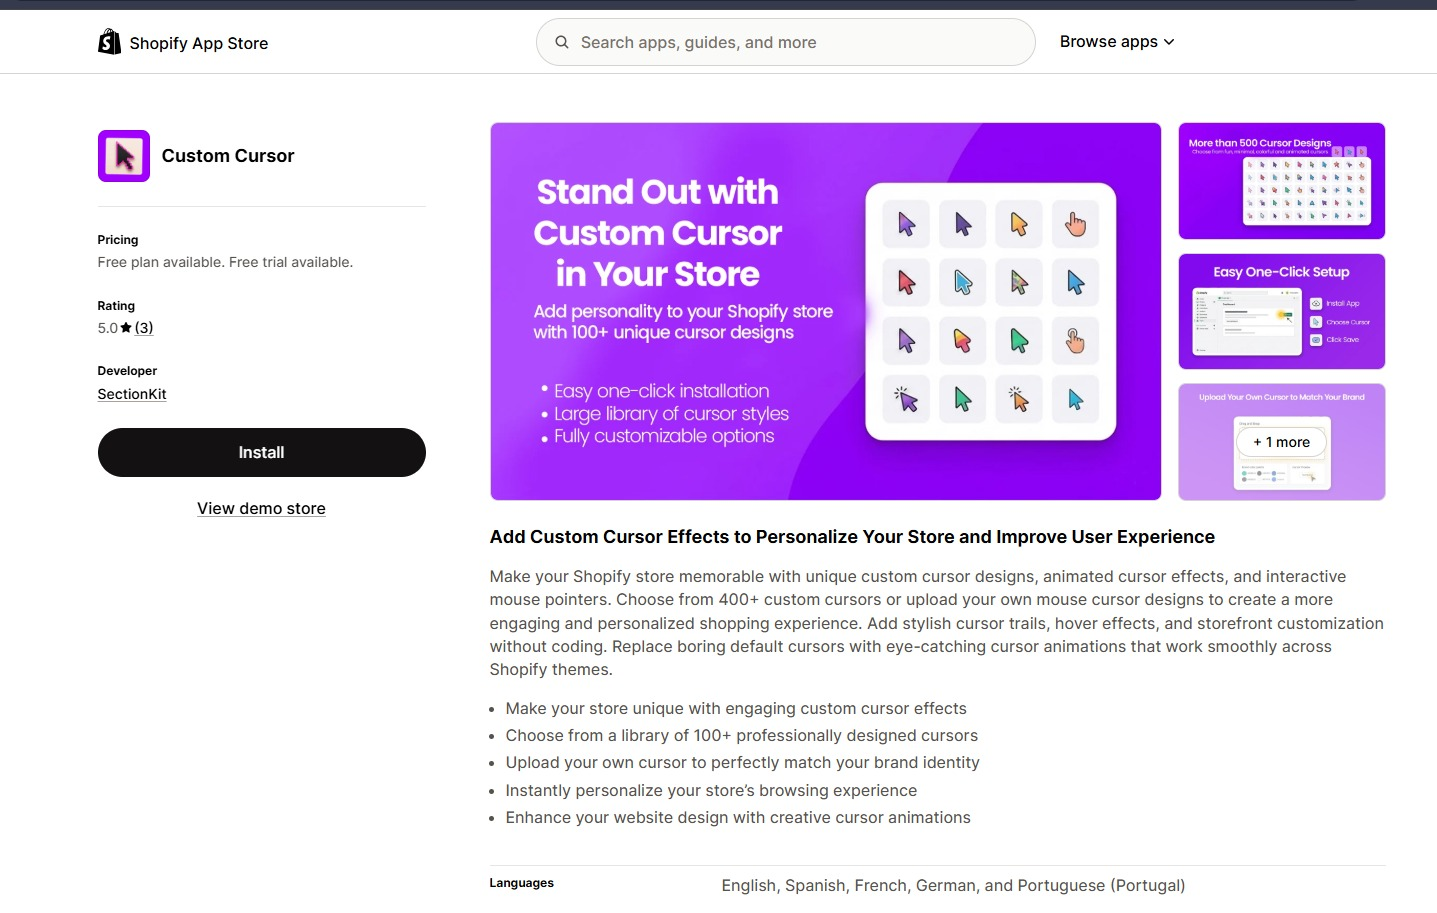
Open the Custom Cursor listing in the Shopify App Store and click Install. Select the correct store if prompted, review the permissions, and complete Shopify’s installation process.
The first image shows the app listing and the Install button. Once installed, the app will be accessible from your Shopify admin.
Step 2: Choose a Plan That Includes Custom Uploads
Review the app’s pricing and select a plan that includes Custom icon uploads. In the second image, Advanced is shown at $6 per month and Premium at $9 per month. Both list custom uploads; Free and Basic do not.
Compare the other allowances, such as monthly impressions, before choosing. Confirm the latest price and terms in Shopify, then complete any subscription approval required to activate your chosen plan.
\
Step 3: Open the Custom Cursor Dashboard
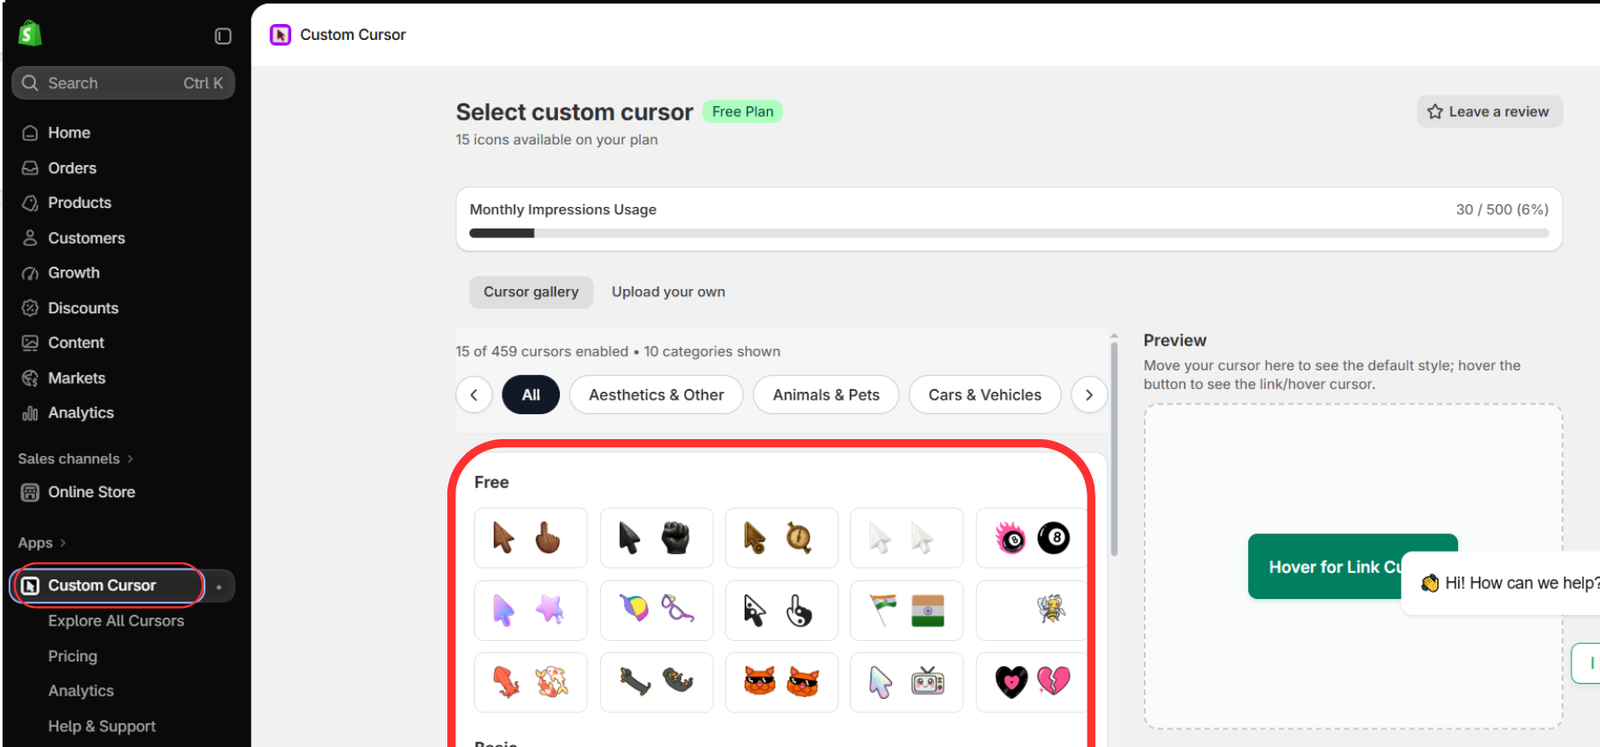
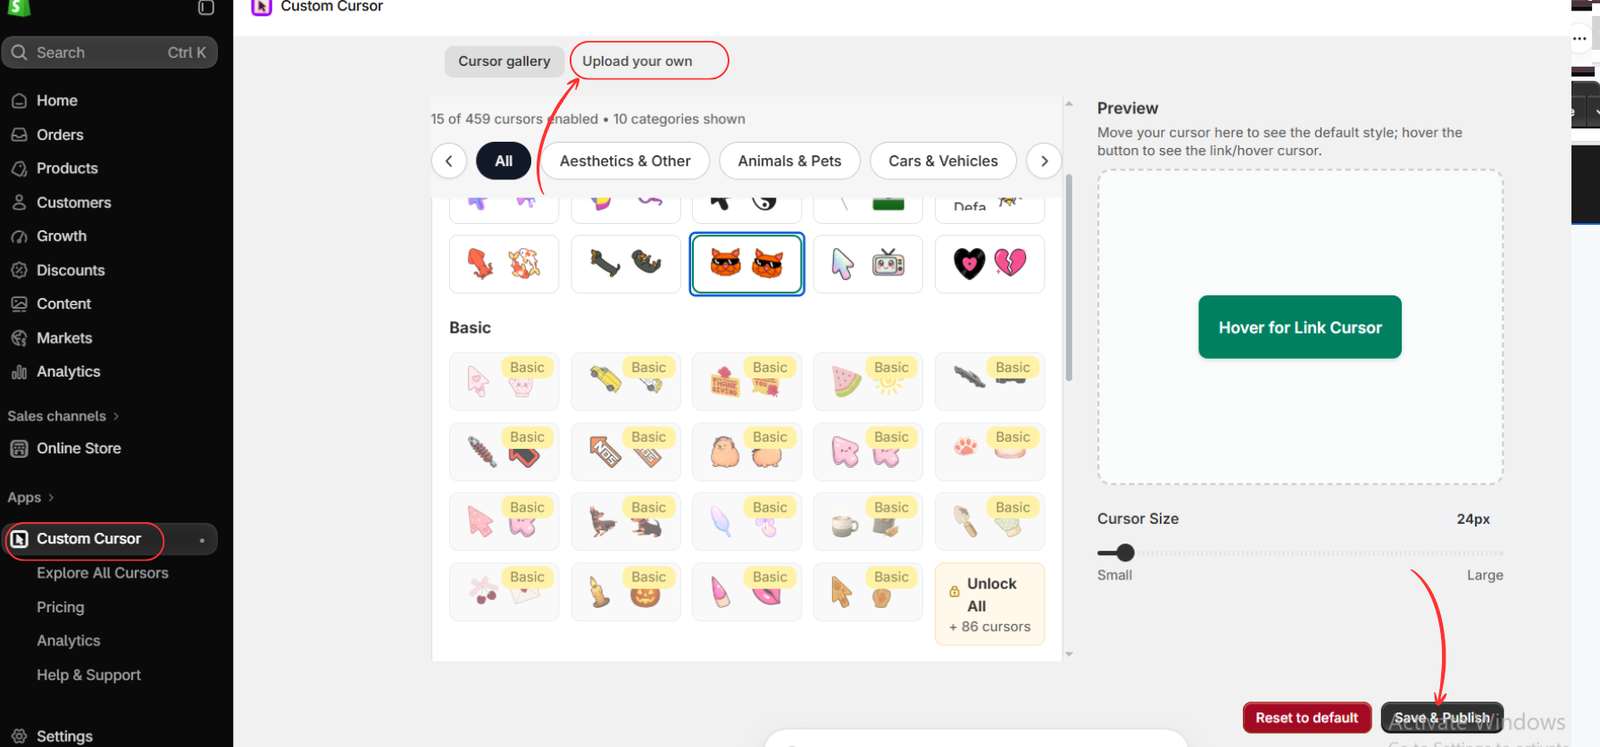
In Shopify admin, go to Apps → Custom Cursor. The third image shows the cursor gallery, a preview panel, and the tabs for Cursor gallery and Upload your own.
This image still displays a Free Plan badge. Use it to locate the controls; it does not show that upload access has been activated. If you have upgraded, confirm that the app recognizes your eligible plan before continuing.
Step 4: Upload Your Branded Design and Publish It
Click Upload your own, highlighted in the fourth image. In the upload panel that opens, follow the displayed instructions to select and upload your prepared cursor artwork. Check the accepted file requirements before submitting the file.
The supplied image shows the tab leading to the upload workflow, rather than the upload form itself. If the panel offers separate default and link-hover images, configure those options as needed so both states match your brand.
After uploading, select or apply your custom design as directed by the app. Use the preview to inspect its appearance and adjust Cursor Size where available. Choose a size that stays visible without covering product details or buttons.
Click Save & Publish once your configuration is ready. The fourth image points to that button. If you still see a gallery design in the preview, check that your uploaded artwork has been applied before saving.
Step 5: Enable the App Embed and Save Your Theme
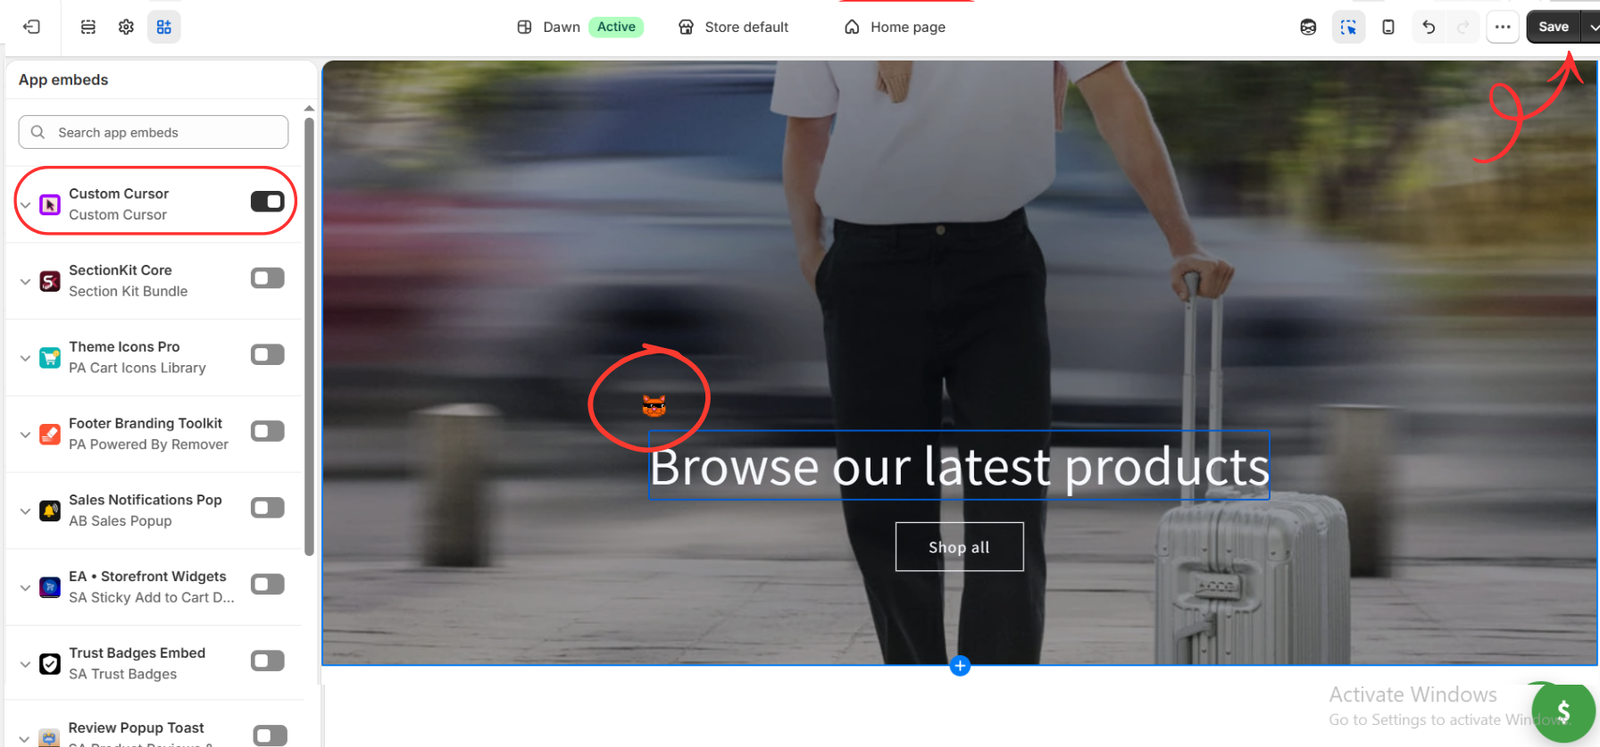
Go to Online Store → Themes and open the theme editor for the theme you want to use. Select App embeds, switch on Custom Cursor, and click Save in the top-right corner.
The fifth image shows the embed enabled. Its storefront preview contains an orange cat gallery cursor; it demonstrates activation, not proof that a branded file was uploaded. Your own preview should show the artwork you selected in the app.
Open your storefront in a separate desktop browser tab and test the cursor over the homepage, collection pages, product pages, and navigation links. Confirm that the uploaded design appears and that buttons remain easy to click.
What to Check If Your Branded Cursor Does Not Appear
- Plan access: verify that your active plan includes custom icon uploads.
- Uploaded selection: confirm that the uploaded artwork is applied rather than a gallery cursor.
- App settings: check that you clicked Save & Publish after configuring your design.
- Theme activation: enable the app embed in the correct theme and save it.
- Desktop testing: refresh the storefront and test with a mouse. A touchscreen-only phone is not suitable for checking a mouse cursor.
Keep Your Branded Cursor Clear and Comfortable
Inspect the design at its actual display size instead of judging only the original artwork. Check contrast over banners, white product backgrounds, and dark footer areas. Hover over links and try clicking small controls to confirm the pointer feels accurate.
If the cursor is distracting or difficult to see, simplify the artwork or adjust its size. Keep the effect secondary to shopping: customers should still be able to read, navigate, and interact with your store easily.
Conclusion
To upload your own branded cursor to Shopify, prepare a clear icon, install Custom Cursor, choose a plan with custom uploads, and open Upload your own. Apply your artwork, save the app settings, and enable the theme embed before testing the result on your desktop storefront.
Ready to add your own brand detail? Explore Custom Cursor on the Shopify App Store




